The Mustang Forum for Track & Racing Enthusiasts

Taking your Mustang to an open track/HPDE event for the first time? Do you race competitively? This forum is for you! Log in to remove most ads.

  • Welcome to the Ford Mustang forum built for owners of the Mustang GT350, BOSS 302, GT500, and all other S550, S197, SN95, Fox Body and older Mustangs set up for open track days, road racing, and/or autocross. Join our forum, interact with others, share your build, and help us strengthen this community!

Finished DIY rear seat delete

This site may earn a commission from merchant affiliate links, including eBay, Amazon, and others.

dmichaels

Papa Smurf
547
30
CT
I'm planning to install a roll bar shortly, so I decided to use my week off at Christmas to put together a rear seat delete. Being a cheap engineer (it's genetic...) I refused to pay for a seat delete kit, and instead took on the challenge of building my own for much cheaper. It took a while, but I was pretty careful in creating templates, tweaking the pieces along the way, and spent a good amount of time determining how to best attach everything. In the end I think it came out quite good!

Parts list:
1/4" plywood
roll of 40"x15' interior carpet: http://www.carid.com/xscorpion/xscorpion-audio-accessories-installation-parts-16610374.html
1.5" #8 bolts (qty 2)
Wood screws
Staple gun & lots of staples
Wood glue
Cardboard (for template)
Jig saw & sand paper
Drill & various drill bits
2" thick wood for wedge

That's about it. Total cost was about $45-50 for plywood, fasteners, carpet, and glue.

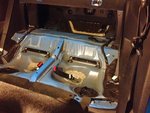
Everything removed
photo%2B1.jpg

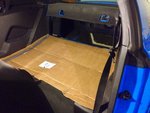
Template made out of cardboard. Lots of trimming required....
photo%2B3.jpg

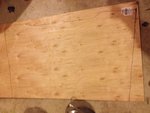
Template used to outline shape for base and back on thin plywood
photo%2B4.jpg

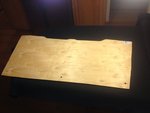
Cut and pre-drilled (for bolting to car) laid out on carpet. I used the cardboard to locate holes needed (ended up just needing the center one for the one center bolt that originally held down the OEM seat). In the seat-back piece, I drilled two small holes for the slots that are above the OEM brackets. There is decent access to the back side of those slots to support a bolt
photo%2B2%2B%282%29.jpg

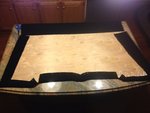
Wrapping carpet - used glue and lots of staples from trusty staple gun.
photo%2B3%2B%282%29.jpg

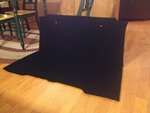
Everything wrapped, dried, and a bolts pre-placed (not covered yet)
photo%2B4%2B%282%29.jpg

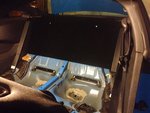
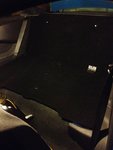
Back piece put in
photo%2B5%2B%282%29.jpg

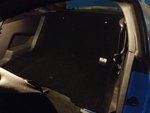
Both upper and lower installed and one of two hinges attached (to retain seat fold down capability). I'll be covering the hinges with a small flap of carpet
0cIg-NaIzArgt44jFjfsvVTUkd8dh6e3JdVn8=w748-h561-no.jpg
photo%2B2%2B%283%29.jpg

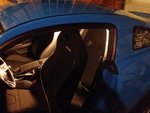
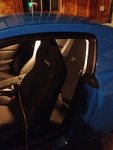
Front seats back in place. Tough to see it all in place.
photo%2B5%2B%283%29.jpg
photo%2B%283%29.jpg

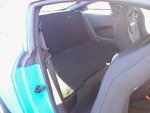
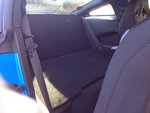
Slightly better view in the daylight and with the hinge covers in place. I'm pleased with the outcome. All set for the roll bar soon!
IMG_1912.jpg
IMG_1913.jpg
 
Fit and finish look oem quality! Nice job... Always feels good when you successfully take on and complete a project such as this!!
 
Great job and thanks for posting all the photos.
 

dmichaels

Papa Smurf
547
30
CT
Thx for comments. I always intend to document my projects, and usually get excited, crank through them, and then remember I forgot pictures. Glad I finally remembered to take pictures along the way for once. Feel free to move to "How To" forum if this might help othes
 
DMichaels said:
Thx for comments. I always intend to document my projects, and usually get excited, crank through them, and then remember I forgot pictures. Glad I finally remembered to take pictures along the way for once. Feel free to move to "How To" forum if this might help othes

What was the total coast for your project. this may inspire others when they see the $avings.

VERY NICE JOB.>>>CLEAN!
 

dmichaels

Papa Smurf
547
30
CT
superhero said:
What was the total coast for your project. this may inspire others when they see the $avings.

VERY NICE JOB.>>>CLEAN!

Came out better than I expected. If I did it again, I would clean up a few minor things, but overall it's better than I expected, and zero vibrations so far. Also muffles all trunk noises about the same as with seats installed, which made me happy ;D


Approximate costs:
$12 for 4'x8' plywood
$26 for 4"x15' roll of carpet at my provided link
$3 for glue
$3 for bolts
Total $44 or there abouts


I had staple gun, staples, jig saw, drill & bits, etc etc so I am not counting any of those items.
 

302 Hi Pro

Boss 302 - Racing Legend to Modern Muscle Car
2,009
441
Southeast
DMichaels:

Very nice, great write up and pics. Your finished product looks great! Any plans to install a rear shock tower brace and/or Mustang X-Brace? The Cool Tech roll bar is a nice product as it comes with a nice, (functional), shock tower brace.

Good Luck with your roll bar install
Dave
 

dmichaels

Papa Smurf
547
30
CT
302 Hi Pro said:
DMichaels:

Very nice, great write up and pics. Your finished product looks great! Any plans to install a rear shock tower brace and/or Mustang X-Brace? The Cool Tech roll bar is a nice product as it comes with a nice, (functional), shock tower brace.

Good Luck with your roll bar install
Dave

I'm not currently planning a shock tower or x-brace. I figure the roll bar will stiffen things up quite a bit and should keep the car more capable than I am as a driver for a while longer! I have seen Pete's Cooltech bar and it does look top notch, but at more than double the (group rate) Watson bar (which also looks to be very high quality!), I'm most likely going to go with the Watson.

I haven't researched much in regards to rear strut brace or x-brace in terms of effectiveness. Might poke around at it, as I guess since I'm planning to run almost exclusively R-comps or full slicks this season, the car will be subject to a little more stress than in previous seasons!

Derek
 

dmichaels

Papa Smurf
547
30
CT
TGR96 said:
Great DIY! Did you happen to weigh the seats vs the plywood? Just wondering how much, if any, weight savings you got.

Plywood I used was very light. Probably 3-4 lbs. I'll weigh a comparable piece soon. Back seats seemed to be about 30 total with the brackets and belt pieces I removed. So saved quite a bit of weight! Carpet is very light.
 
DMichaels said:
Plywood I used was very light. Probably 3-4 lbs. I'll weigh a comparable piece soon. Back seats seemed to be about 30 total with the brackets and belt pieces I removed. So saved quite a bit of weight! Carpet is very light.
You might want to remove the factory belts as well. I got a total reduction of 54 lbs between the seats and belts.
 

dmichaels

Papa Smurf
547
30
CT
cloud9 said:
You might want to remove the factory belts as well. I got a total reduction of 54 lbs between the seats and belts.

Yeah I might remove the belts too. Took out the bottom parts, didn't think to do the shoulder belt until later. If it's that much weight it will be removed shortly. Appreciate the tip
 
SO i figured it would be better to do a slight threadjack on this post instead of just starting my own new thread... everyone talks about weight reduction and things that can be removed ie: rear seat, but i dont feel anyone talks about how that affects the car?

I am probably over thinking this, but all the free weight to be removed, rear seats, truck liner, spare ... is all in the back. This car already suffers from being nose heavy, so is removing all that weight off the rear actually beneficial? I hear a lot of mixed reviews: All weight is bad and should be removed, and, The rear end is going to get floaty now that all that weight is off it.

I have a base model GT, but i do have the adjustable boss suspension and FRPP k springs, so i suppose i could "tune" the rear end being loose out, but i'm just wondering if its actually that big of a deal. Realistically, just gutting the rear is ~100 lbs ... is that even enough to impact things at all?

Awesome seat delete by the way man, i hate to come in here and "threadjack," but i figured it was the most recent and relevant thread i could post in.
 
Voltwings said:
SO i figured it would be better to do a slight threadjack on this post instead of just starting my own new thread... everyone talks about weight reduction and things that can be removed ie: rear seat, but i dont feel anyone talks about how that affects the car?

I am probably over thinking this, but all the free weight to be removed, rear seats, truck liner, spare ... is all in the back. This car already suffers from being nose heavy, so is removing all that weight off the rear actually beneficial? I hear a lot of mixed reviews: All weight is bad and should be removed, and, The rear end is going to get floaty now that all that weight is off it.

I have a base model GT, but i do have the adjustable boss suspension and FRPP k springs, so i suppose i could "tune" the rear end being loose out, but i'm just wondering if its actually that big of a deal. Realistically, just gutting the rear is ~100 lbs ... is that even enough to impact things at all?

Awesome seat delete by the way man, i hate to come in here and "threadjack," but i figured it was the most recent and relevant thread i could post in.
Excellent question. From a pure braking and acceleration standpoint, less weight equals faster. The classing for NASA Time Trials is driven primarily by power-to-weight for that reason. Better distribution of the weight will certainly improve the handling in corners. You also don't want the rear so light that you can't power out of the corners without losing grip. One way to address that is doing a battery relocation you move 38 lbs from high in the front to low in the back. It changes the F/R balance by a little over 1% and lowers the center of gravity. You can check out the thread here https://trackmustangsonline.com/index.php?topic=6289.0
 
1,281
3
Tulsa, OK
My thought is that removing as much weight as possible is more important than getting the balance correct. Certainly you want good distribution as well, but as cloud9 said less weight is faster.
 

dmichaels

Papa Smurf
547
30
CT
I agree that a lot of weight is out of the back with this, muffler deletes, axle weight removal, trunk emptying, etc. Installing my roll bar offsets a decent amount of this, and there are a few things like lightweight battery, 2-piece rotors, fiberglass hood, etc that can be done for the front end as well to help keep the weight balance.

I would expect that if nothing was done except weight removal in the rear of the car then there would be some "negative" handling impacts, but as noted above that can essentially be times out through suspension adjustments and tire choice. And of course aero if you go that route... Which I plan to at some point in the not too distant future

But good quetions and I've thought about the same things multiple times.

Glad the thread has been beneficial to a few people too
 
Welp, stuck at home now to avoid the 'rona, so I might as well get to work on this. Any overachievers out there save a template with measurements? The top section is pretty easy, but I'm finding the bottom to be quite a bit more challenging. The OP did a great job, but it also looks like it's just a straight cut along the sides, but the interior panels have two angled sections per side. Plus I'm having to negotiate a Watson rollbar. If you guys could post up any other DIY seat delete panels from your private photo collections, that might help, if not just motivate me. Thanks!
 

TMSBOSS

Spending my pension on car parts and track fees.
7,556
5,291
Exp. Type
HPDE
Exp. Level
10-20 Years
Illinois
Jimmy

Snag as much card board as you can and start cutting out templates. Transfer the preferred design to plywood and cut. I would wait until I had the bar before I cut too much or applied carpet to the plywood.

Watson posts instruction for install. These show you where to cut the side panels. I did this a few weeks back. Just take your time.
 

TMO Supporting Vendors

Top