After about a year of frustration with the ‘feel’ of my RXT clutch, I found a post by Lexustech48 (SVTPerformance) about a worn out the clutch master cylinders causing harshness such as noise, high engagement, rough feel, etc. I had many of the same issues and thought a swap of the master cycler wouldn’t hurt and would eliminate a ‘possible’ component and may even restore the drivability I enjoyed with the stock clutch. After doing a little homework, I decided to pull my brake master cylinder as well, as it was a inexpensive and I needed to have most of the parts dissembled anyway. My other goal was to separate the clutch fluid reservoir to help with heat transfer from the brakes and prevent cross contamination on the shared stock reservoir. I opted for the small GM reservoir for a Pontiac GTO, bolted to the strut tower (thanks to other on this forum for posting about this mod).
I pumped out as much brake fluid as I could and removed the brake master cylinder. It was pretty messy and I spilled a good amount of fluid, but I was prepared with lots of rags and towels.
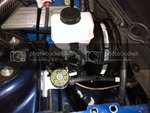
After attaching the new brake reservoir (with no clutch line connection), I bolted the new brake master to the booster and was back in business. Little did I know at this point I made an error in the ‘order’ of replacing the part since I was about to start on the clutch master cylinder.
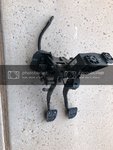
To get access to the clutch master cylinder, you need to remove the brake and clutch pedal assembly from the car. Being a contortionist would help, but I missed that class in college. There are three switches that need to be disconnected, four nuts to be removed and 2 bolts that hold the assembly from the top. The pedal assembly is loose at this point, but getting it out is a PITA. Finally wiggled it out and easily replaced the clutch master cylinder and cleaned up the assembly.

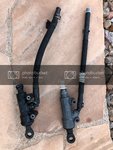
Here’s the original clutch master compared to stock. I opted for the ’13-’14 version since it a bit sturdier and the bore is slightly larger.

All good to this point, until I need to get the pedal assembly under the dash and into place. For the life of me, I can’t get it in place. The four holes that the assembly slides over the bolts through the firewall wont budge and I struggled to get it lined up. I finally realized that the bolts were connected to the brake booster and if I move it back 1-inch, I should be able to line things up. However, with the brake lines back in place from replacing the brake master cylinder, it wouldn’t budge. Lesson learned – leave the parts loosely bolted and do not fill with fluid until you are done with both parts of the project.
After the project was all done, I can happily report the clutch ‘feels’ better. The engagement is still high, but it’s smooth, less jerky and less noisy. Unfortunately, I introduced lots of air into the brake system and it felt pretty spongy the first day, but resolved itself after working the air out.
Mistakes:
- Connecting the brake lines too early so I couldn’t move the brake booster to line up the pedal assembly.
- Installing the stop lamp switch before the booster bin (clearly stated not to do this in shop manuals). The step needs to be done in the correct order or you will be doing it over.
- Not replacing the clutch line rubber O-rings - $1 and a quick trip to the hardware store could have saves a couple hours of hassle.
Overall difficulty/cussing level: 5-6 – access is tight, brake fluid is messy, steps/order are critical
Cost: ~$200

I pumped out as much brake fluid as I could and removed the brake master cylinder. It was pretty messy and I spilled a good amount of fluid, but I was prepared with lots of rags and towels.
After attaching the new brake reservoir (with no clutch line connection), I bolted the new brake master to the booster and was back in business. Little did I know at this point I made an error in the ‘order’ of replacing the part since I was about to start on the clutch master cylinder.
To get access to the clutch master cylinder, you need to remove the brake and clutch pedal assembly from the car. Being a contortionist would help, but I missed that class in college. There are three switches that need to be disconnected, four nuts to be removed and 2 bolts that hold the assembly from the top. The pedal assembly is loose at this point, but getting it out is a PITA. Finally wiggled it out and easily replaced the clutch master cylinder and cleaned up the assembly.

Here’s the original clutch master compared to stock. I opted for the ’13-’14 version since it a bit sturdier and the bore is slightly larger.

All good to this point, until I need to get the pedal assembly under the dash and into place. For the life of me, I can’t get it in place. The four holes that the assembly slides over the bolts through the firewall wont budge and I struggled to get it lined up. I finally realized that the bolts were connected to the brake booster and if I move it back 1-inch, I should be able to line things up. However, with the brake lines back in place from replacing the brake master cylinder, it wouldn’t budge. Lesson learned – leave the parts loosely bolted and do not fill with fluid until you are done with both parts of the project.
After the project was all done, I can happily report the clutch ‘feels’ better. The engagement is still high, but it’s smooth, less jerky and less noisy. Unfortunately, I introduced lots of air into the brake system and it felt pretty spongy the first day, but resolved itself after working the air out.
Mistakes:
- Connecting the brake lines too early so I couldn’t move the brake booster to line up the pedal assembly.
- Installing the stop lamp switch before the booster bin (clearly stated not to do this in shop manuals). The step needs to be done in the correct order or you will be doing it over.
- Not replacing the clutch line rubber O-rings - $1 and a quick trip to the hardware store could have saves a couple hours of hassle.
Overall difficulty/cussing level: 5-6 – access is tight, brake fluid is messy, steps/order are critical
Cost: ~$200


