The Mustang Forum for Track & Racing Enthusiasts

Taking your Mustang to an open track/HPDE event for the first time? Do you race competitively? This forum is for you! Log in to remove most ads.

  • Welcome to the Ford Mustang forum built for owners of the Mustang GT350, BOSS 302, GT500, and all other S550, S197, SN95, Fox Body and older Mustangs set up for open track days, road racing, and/or autocross. Join our forum, interact with others, share your build, and help us strengthen this community!

mattlqx's Dual-Duty Shelby GT350

This site may earn a commission from merchant affiliate links, including eBay, Amazon, and others.

I pulled mine through using washers and think the washers rubbing up against the threads removed most of the coating. I also pulled them through using the old fashioned method with a large ratchet as I don't like using an impact for this specific application. My arms nearly fell off the next day. Pressing them in is clearly a better option.

Nice work on the hood. You are a brave soul to be cutting up a perfectly good GT350 hood!
 

mattlqx

Mustangless
Look closely and note how the stud coating is often removed when installing studs this way. You are likely seeing galling, indicative of exceedingly high torque values. There are also likely microscopic fractures along the thread roots.

Not trying to rain on anyone's parade here. But I would pay very close attention to those studs.

I hear you and thanks for the advice. I agree its very suboptimal. I have a stud installer gizmo on its way. I did take some precautions though, I used some lubricant which after the first one which actually did make a huge decrease in temperature and I don't believe my Ryobi can make much more than ~125 ft/lbs so I'm not sure there's a huge risk of grossly over torquing but I defer to people more knowledgable. It was a learning experience, first time I installed press-ins. All ze germans I've installed have been screw in. I'll keep an eye on these.
 
Word of caution. Matt, I would keep a close eye on any stud that was "pulled through" with washers, lug nuts, and an impact gun. While I am not at liberty to share it I have had the opportunity to review and discuss with a manufacturer a complete professional metallurgical analysis of wheel studs on S550 Mustangs that were installed this way. In a nutshell, this installation methodology directly caused the studs to fail - in some cases before they ever even saw road use and not visible to the naked eye.

Look closely and note how the stud coating is often removed when installing studs this way. You are likely seeing galling, indicative of exceedingly high torque values. There are also likely microscopic fractures along the thread roots.

Not trying to rain on anyone's parade here. But I would pay very close attention to those studs.

I agree 100%
Even though you probably don't see it with the naked eye, there are probably micro fractures because the stud is being stretched. The best way would be to press the stud in from the back side.
Just my 2 cents.


Sent from my iPhone using Tapatalk
 

mattlqx

Mustangless
Sorry, I thought I replied to that message. Nah, I'm gonna put some effort into the RaceCapture train or just stick with my Harry's setup.
 

mattlqx

Mustangless
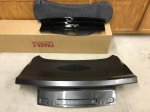
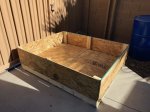
Received my donor trunk lid today. Came complete and in really great shape and in a massive wooden pallet that will be fun to break down. This lid should make the logistics of swapping a bunch easier not having to swap out the latch, camera or panel trim. Speaking of the panel, can I just drill out the four points on the back that appear to be the mold joints to ditch the GT from the panel or are they more affixed than that? I could just fill them and slap a decal over it or something.

IMG_1059.jpg

Tomorrow I'll drop it off to be repainted. Adios Magnetic.
 

mattlqx

Mustangless
Nobody carries those anymore (despite the fact they still leave them up on their sites, ugh). And I really don't care that much about it to spend another few hundred on it.
 
Matt is correct. I got one of the FRPP decklid panels just before they were discontinued. I noticed a small indentation in it, not from shipping or handling but rather when molded. I figured I'd get another one and when I called my good friend Mike at Buyfordracing, he told me they were discontinued because of this very issue. Instead of addressing the problem they just decided to stop making them altogether. Odd...
 

mattlqx

Mustangless
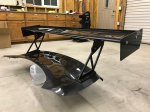
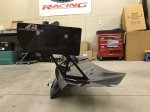
I realized this morning rather than get the lid painted first, I should drill the holes and mount the spoiler, derp! So that's what I did this evening. Pretty straight forward install. Use an existing hole on the inner-side to drill out a primary. Then use the pedestal base to mark and drill out another two holes on each side. Place reinforcement plates between the inner and outer layers and attach the supports, secure with a couple nuts. Then attach the foil. Easy peasy.

The S550 has a pretty stout deck lid with all the folds and angles on it. The inner structure is pretty busy too. I can't recall what the inside of an S197's lid looks like but it seems that it combined with the reinforcement plates (that I don't think they gave you with the S197 GT-250 wing) should be enough to support the wing, which from my conversations is different than what you S197 guys have had to do. The pedestal base plates are also very substantial on the S550 version. I'm impressed!

Okay, off to paint tomorrow.

IMG_1063.jpgIMG_1065.jpgIMG_1064.jpgIMG_1062.jpg
 

TMO Supporting Vendors

Latest posts

Buy TMO Apparel

Buy TMO Apparel
Top