- Thread starter
- #61
- Welcome to the Ford Mustang forum built for owners of the Mustang GT350, BOSS 302, GT500, and all other S550, S197, SN95, Fox Body and older Mustangs set up for open track days, road racing, and/or autocross. Join our forum, interact with others, share your build, and help us strengthen this community!
You are using an out of date browser. It may not display this or other websites correctly.
You should upgrade or use an alternative browser.
You should upgrade or use an alternative browser.
mattlqx's Dual-Duty Shelby GT350
- Thread startermattlqx
- Start date
This site may earn a commission from merchant affiliate links, including eBay, Amazon, and others.
More options
Who Replied?Cool. When are the back seats coming out?
- Thread starter
- #63
mattlqx
Mustangless
Tomorrow morning! After watching F1... natch.
- Thread starter
- #64
mattlqx
Mustangless
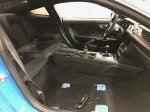
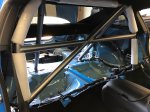
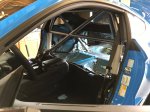
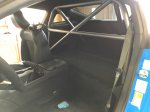
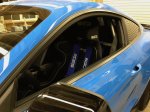
Wow, what a weekend. That was some adventure doing the roll bar by myself with the exception of my wife lending a hand to get the bar aligned and the rear bar bolts in. I'm totally spent. Here's what I did...
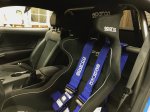
- Rear seat removed
- Watson Racing roll bar installed
- Watson Racing rear seat delete installed
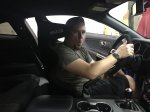
- Driver Sparco and harness installed and adjusted
I took it for a spin and the car is totally and utterly different to drive. NVH has been bumped up a notch. I chalk most of this up to the seat, which obviously has no springs and basically no cushion. You can feel every bit of movement the car makes. I've never been able to A/B test a normal OE seat vs. a 1-piece race seat; every other one I've driven has been in full-stripped race car. It's really interesting to put a quantity on what just the seat actually does. The effect though is... intoxicating! Every subtle little bounce the suspension is doing I can feel through the seat. Cornering is fantastic as my hips are totally sunk and connected to the seat. I really can't wait to try this out on track.
Quality wise on the roll bar, I've very pleased. The paint on the bar is nice and doesn't appear to scratch very easily. The fit was pretty good around the roof as well. I would not have wanted to do the install with the seats in. That would've been madness. Despite reading the instructions in advance as they say on the first page, I still bolted down the rear bars too soon, which made getting the rear side trim panels in a major undertaking, but not as much as redoing those rear bars. That was seriously 50% of the whole weekend, drilling, trying to get every aligned based on that and trying to get the bolts through and threaded on the "nut bars" underneath the car. The setup is super solid though, as you'd hope!
The rear seat delete is nice and composed of carpet over plastic backing and heat sealed. Unfortunately, I wanted this to be semi-removable so I had to cut into it to be able to slip it over the rear bars. It could be a little bit wider towards where it meets the trim panels and fitment could be a little better where they're secured in the middle. But overall, it beats paying twice as much for the R seat delete and then still having to cut it up.
I still need to order a passenger base to get the other Sparco in, so I'm rocking the OE seat in that position. Some pictures of various points of progress:
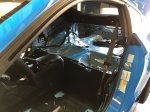
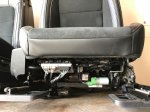
Also, check out all the junk underneath the stock convenience seat. I mean duh and all, considering it's motorized, heated, cooled and has airbags, but dang!
- Rear seat removed
- Watson Racing roll bar installed
- Watson Racing rear seat delete installed
- Driver Sparco and harness installed and adjusted
I took it for a spin and the car is totally and utterly different to drive. NVH has been bumped up a notch. I chalk most of this up to the seat, which obviously has no springs and basically no cushion. You can feel every bit of movement the car makes. I've never been able to A/B test a normal OE seat vs. a 1-piece race seat; every other one I've driven has been in full-stripped race car. It's really interesting to put a quantity on what just the seat actually does. The effect though is... intoxicating! Every subtle little bounce the suspension is doing I can feel through the seat. Cornering is fantastic as my hips are totally sunk and connected to the seat. I really can't wait to try this out on track.
Quality wise on the roll bar, I've very pleased. The paint on the bar is nice and doesn't appear to scratch very easily. The fit was pretty good around the roof as well. I would not have wanted to do the install with the seats in. That would've been madness. Despite reading the instructions in advance as they say on the first page, I still bolted down the rear bars too soon, which made getting the rear side trim panels in a major undertaking, but not as much as redoing those rear bars. That was seriously 50% of the whole weekend, drilling, trying to get every aligned based on that and trying to get the bolts through and threaded on the "nut bars" underneath the car. The setup is super solid though, as you'd hope!
The rear seat delete is nice and composed of carpet over plastic backing and heat sealed. Unfortunately, I wanted this to be semi-removable so I had to cut into it to be able to slip it over the rear bars. It could be a little bit wider towards where it meets the trim panels and fitment could be a little better where they're secured in the middle. But overall, it beats paying twice as much for the R seat delete and then still having to cut it up.
I still need to order a passenger base to get the other Sparco in, so I'm rocking the OE seat in that position. Some pictures of various points of progress:


Also, check out all the junk underneath the stock convenience seat. I mean duh and all, considering it's motorized, heated, cooled and has airbags, but dang!

Last edited:
Looking good. That bar is a lot easier to install than the one for a S197. But it's still a PITA.
- Thread starter
- #66
mattlqx
Mustangless
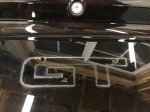
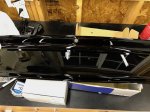
A couple hits with the drill (two, the other two holes are alignment pins) and it popped right off. That "GT" dirt is persistent though. I tried no less than 4 different products to try and get it off. (R3, GooGone, Bugs-B-Gone, Bleche-wite) I'll try some WD40 if I could only find my can. Regardless, I'm putting some sort of sticker there to cover the holes anyway.


Claybar
Fabman
Dances with Racecars
- 6,553
- 8,204
- Exp. Type
- W2W Racing
- Exp. Level
- 20+ Years
A couple hits with the drill (two, the other two holes are alignment pins) and it popped right off. That "GT" dirt is persistent though. I tried no less than 4 different products to try and get it off. (R3, GooGone, Bugs-B-Gone, Bleche-wite) I'll try some WD40 if I could only find my can. Regardless, I'm putting some sort of sticker there to cover the holes anyway.
View attachment 433View attachment 434
TMO sticker
Sent from my iPhone using Tapatalk
- Thread starter
- #69
mattlqx
Mustangless
302 Hi Pro
Boss 302 - Racing Legend to Modern Muscle Car
On the on the GT dust, try some good ole Gasoline. Amazing what I have cleaned with gas when all else has failed.
Looks like you're progressing nicely.
Good Luck,
302 Hi Pro
Looks like you're progressing nicely.
Good Luck,
302 Hi Pro
Man that GT250 wing is beasty! I love your pictures and setup with spare lid. I just got mine yesterday. I could not resist opening up the box. The CF is awesome looking. I was expecting it to be heavier but it's quite light for the size. I'm waiting for my FP front tow hook and then I'll install the APR front splitter and rear wing at the same time, maybe next week if I can find a bit of free time!
Keep up the good work!
Keep up the good work!
- Thread starter
- #72
mattlqx
Mustangless
TymeSlayer
Tramps like us, Baby we were born to run...
Those Forgestars look awesome. Great color choice and I don't care what size they are, I know they're saving you on some rotational mass.
- Thread starter
- #74
mattlqx
Mustangless
I started putting in my rear studs today. Got the passenger side done after figuring out the parking brake by trail and error. Wow, f that setup. I was able to maneuver my 18mm sockets in there to get the hub off, but now I'm on the driver side and surprise, the dimensions all different so I can't get any socket on the hub bolts. I'm guessing I need to disconnect the knuckle from the sway bar and control arm to get it to flop outwards at this point? I'd rather put in 5 more roll bars than put in these studs at this point. It seriously sucks.
Oh and to add fun to the driver side, the dealer over-torqued all the things they touched when they put a new spindle nut on. The nut itself was on there really good. I had to put the wheels back on, have my wife stand on the brake and use the weight of the car to break it with a 4 foot jack handle. So I'm guessing 300ish ft. lbs. The wheel lugs were at no less than 200 ft. lbs. If I wasn't planning on tossing the lugs anyway, I'd be super pissed as I basically destroyed the (admittedly fragile) OE lugs getting them off. Good ol' Ford service!
Oh and to add fun to the driver side, the dealer over-torqued all the things they touched when they put a new spindle nut on. The nut itself was on there really good. I had to put the wheels back on, have my wife stand on the brake and use the weight of the car to break it with a 4 foot jack handle. So I'm guessing 300ish ft. lbs. The wheel lugs were at no less than 200 ft. lbs. If I wasn't planning on tossing the lugs anyway, I'd be super pissed as I basically destroyed the (admittedly fragile) OE lugs getting them off. Good ol' Ford service!
Yep just replacing my calipers was a PITA. My ARP rear wheel studs are still sitting in the box they were delivered in and may never get installed, at least by me.
- Thread starter
- #76
mattlqx
Mustangless
Yep just replacing my calipers was a PITA. My ARP rear wheel studs are still sitting in the box they were delivered in and may never get installed, at least by me.
That's pretty defeatist.
I unhooked the upper control arm to get a tiny bit more access and got it done. The worst part about the stud install is the parking brake setup and that you have to back off the adjuster nut in the most inconvenient location above the exhaust and driveshaft. Then dealing with getting the drum brake out (never thought I'd be messing with that on a car made in 2017. That said, I do like being able to set the parking brake after tracking without consequence), springs and all. The lever where the brake cable hooks up to is a pain just to maneuver the clip over. BUT WHATEVER, IT'S DONE. The control arm wasn't bad to rehook up with the assistance of a jack in the right spot.
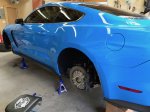
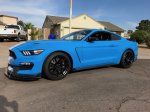
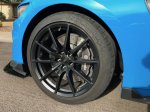
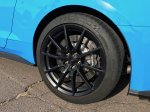
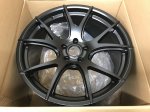
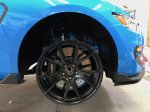
I test fit a Forgestar (CF5V, 19x11) while I was in the right position. Plenty of room, more than stock! Right at the end of the stud though. I'm glad @VoodooBoss was able to tell me to get the 1" over stock for the fronts. The shorter studs wouldn't have worked here. This is with a 25mm spacer.
Maintenance items completed during: bleed brakes and replaced front pads. The old ones were still above the noise maker. I'll probably swap them back in for street duty eventually but with this change out, I'll be good for AMP and COTA on Memorial Day. I also installed the caliper studs, but no action shots. I'm happy with the pieces and the sleeves are nice, though I already had the extra long bolts that I was using to slide the caliper already. With how much I'll be changing brake pads, I'm happy to not have to unbolt those shitty T-60 bolts from that soft aluminum.
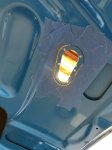
Finally, I started the weekend by finishing the job on my hood pins. I cleared out the inside layer surrounding them. By sandwiching them between the outer and inner layers, they were creating a bit of a well. Removing the inner layer removes most of that effect except for a small amount of indentation where the curved surface of the hood straightens a bit from the pin housing being flat. I did it with a dremel and a cutting disc and lots and lots of slow deliberate movement as you only want to cut the inner, not the outer layer! I was very glad to be done with it.
Last edited:
You've made nice progress on your car. Your new wheels look sharp and I'm glad there's plenty of clearance between the barrel and caliper. Which lug nuts are you using?
I'll either install my rear ARP wheel studs when I have another need to remove the parking brake or my next visit to AED or CorteX.
I'll either install my rear ARP wheel studs when I have another need to remove the parking brake or my next visit to AED or CorteX.
- Thread starter
- #78
mattlqx
Mustangless
These lugs came from OP Mustang. They're the best of the lugs I've gotten so far in that they're plated or treated instead of being chrome. Also have a 19mm head. I bought Dormans from NAPA when I installed the front studs a few weeks ago (22mm head). The Forgestars came with some, but half were closed for some reason despite ordering open. I opted to order the studs with lugs just in case from OP. Glad I did.
Time to get AMPed! You got tires already for those Forgestars?
- Thread starter
- #80
mattlqx
Mustangless
Should be here tomorrow. I got a barely used set of R7s for $1000 shipped off of a guy.
