The Mustang Forum for Track & Racing Enthusiasts

Taking your Mustang to an open track/HPDE event for the first time? Do you race competitively? This forum is for you! Log in to remove most ads.

  • Welcome to the Ford Mustang forum built for owners of the Mustang GT350, BOSS 302, GT500, and all other S550, S197, SN95, Fox Body and older Mustangs set up for open track days, road racing, and/or autocross. Join our forum, interact with others, share your build, and help us strengthen this community!
ED1_2507.jpg

S550 Honey Badger GT350 Build Build Thread Profile - S550 Mustangs

Modified GT350 called the Honey Badger

This site may earn a commission from merchant affiliate links, including eBay, Amazon, and others.

After a week of printing (14 total build plates!) I have my first prototype. Going to try and test fit tomorrow.


At the same time, I've been prepping a plug of my center console as well as a my rear seat shelf replacement.

My center console is a play on the S550 Mustang GT4 panel, but with a single tilted panel vs duals

I made a nice plug for this so I can create a fiberglass mold and build more than 1 version if needed.

For the rear seat panel, I am using the actual 3d printed part as the mold. plan is to do a wet layup and slide it into a bag for vacuum it down. We'll see how it works out. If it works out well and there's interest, I can create a mold and make additional panels

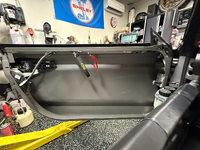
Oh there is definitely interest from yours truly in the door cards and center console...how are you mounting your door interior handles? Or did you remove them? Need to know what to do with mine as I removed my door cards and hate the ziptie fix.

1786459995157.png
 
okay - inbetween the like 80 coats of epoxy, filler, glazing putty, and the like for the door fitment, I am tackling a sidequest on the sway bars

As a refresher, I am putting some Genesis Blades on the car so I can easily adjust it. In my sim setup, i've gotten really used to adjusting brake bias and sway bars throughout a stint or track to track and I'd like to bring that flexibility to the real car. Total overkill - but trying to make my days easier. I'm often a one man show and the less the easier it is to optimize setup, the less stress for me.

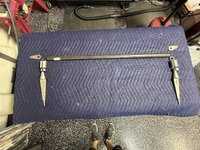
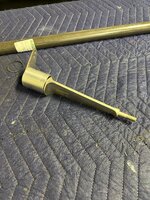
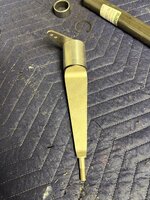
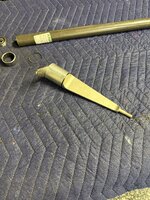
Okay, so enough justification for the ridiculous investment in bars. Here's my starter pack for the front bar. 1.25" OD chromoly torsion bar (.120 wall), two barrels, 2 inner bearings, 2 outer bearings, 2 genesis blades, and the adjustment tabs. I'll need a cable in the future for adjustment, but waiting until I figure out how I want to adjust in the car. More on that later.

IMG_1308.jpeg

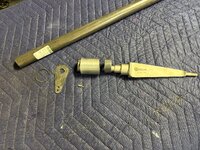
Close up of how the parts go to together
IMG_1310.jpeg

The tab screws into the end of the blade and a push/pull cable rotates it. Vertical for full stiff, flat for full soft. IMG_1311.jpegIMG_1312.jpeg

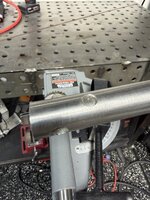
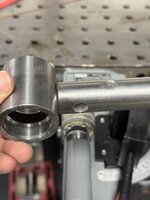
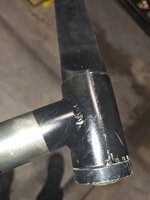
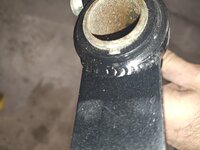
So this is where I have a question for our resident fabrication expert, @Fabman - my rear bar is smaller. 1" OD with only .085 wall to hit my torsion target. That's a bit thin on the wall, so I bought some 7/8 OD 0.120 wall and turned it down in my mini lathe to act as a slug and up the thickness in that area. My plan was to have (4) plug welds to handle the torsion loads t then use a hole saw to "notch" the now thicker end and then weld to the barrel. Does this sound reasonable?

IMG_1314.jpeg

Imagine notched tube end after welding. I was planing on doing a root pass and then second to flush it out and widen it a bit. thoughts?
IMG_1315.jpeg

IMG_1313.jpeg
 
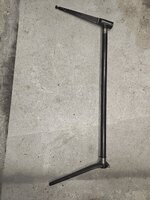
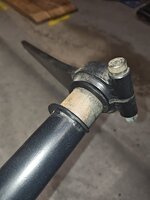
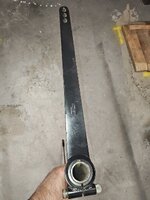
See attached, mine was made buy a guy who supplied parts for our Group A touring cars. This was a version for my 944.
It has one fixed end and one blade end. The fixed end was keyed and had hole adjustment as well. Easily swap or exchange damaged ends. One end of the torsion tube also had location collars to stop it walking.
It was setup without in car adjustment. Easily changed by exchanging the notched end cap for a lever type.

IMG_20260818_181906801.jpgIMG_20260818_181919203.jpgIMG_20260818_181936294.jpgIMG_20260818_181946327.jpgIMG_20260818_182022222.jpg
 
Last edited:
okay - inbetween the like 80 coats of epoxy, filler, glazing putty, and the like for the door fitment, I am tackling a sidequest on the sway bars

As a refresher, I am putting some Genesis Blades on the car so I can easily adjust it. In my sim setup, i've gotten really used to adjusting brake bias and sway bars throughout a stint or track to track and I'd like to bring that flexibility to the real car. Total overkill - but trying to make my days easier. I'm often a one man show and the less the easier it is to optimize setup, the less stress for me.

Okay, so enough justification for the ridiculous investment in bars. Here's my starter pack for the front bar. 1.25" OD chromoly torsion bar (.120 wall), two barrels, 2 inner bearings, 2 outer bearings, 2 genesis blades, and the adjustment tabs. I'll need a cable in the future for adjustment, but waiting until I figure out how I want to adjust in the car. More on that later.

View attachment 111531

Close up of how the parts go to together
View attachment 111530

The tab screws into the end of the blade and a push/pull cable rotates it. Vertical for full stiff, flat for full soft. View attachment 111529View attachment 111528

So this is where I have a question for our resident fabrication expert, @Fabman - my rear bar is smaller. 1" OD with only .085 wall to hit my torsion target. That's a bit thin on the wall, so I bought some 7/8 OD 0.120 wall and turned it down in my mini lathe to act as a slug and up the thickness in that area. My plan was to have (4) plug welds to handle the torsion loads t then use a hole saw to "notch" the now thicker end and then weld to the barrel. Does this sound reasonable?

View attachment 111526

Imagine notched tube end after welding. I was planing on doing a root pass and then second to flush it out and widen it a bit. thoughts?
View attachment 111525

View attachment 111527
I'm a little confused....I see that you plan to use a slug in the end of the tube and then weld it to the collar and use plug welds which is fine.
However, do you plan to weld the center piece to the collar first and then slip the outer tube over it and plug weld the center to the outer and then to the collar?
Also, when I have made sway bars from scratch in the past (solid bars that had to be bent for fitment) I have used 4140 condition "N" for "normalized".
If the alloy is full hard you could end up with embrittlement in the heat affected zones and have the part snap next to the welds. Watch your heat input, this is critical.
Might wanna look this procedure up as I am not an expert with Chrome moly.
 
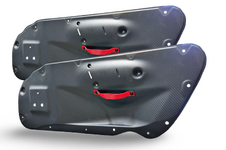
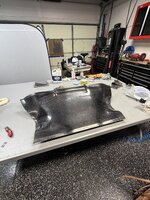
Still need to clean it up and throw a coat of matte clear on it, but sneak peek. going to be sick, i think
IMG_1334.jpeg
I have such a love-hate relationship with composites. It's sooooo much work. Like 40 working hours to get to this point. But then you hold the finished product and you go "oh, yeah. that's why." weighs like 2lbs if that.
 
Top