The Mustang Forum for Track & Racing Enthusiasts

Taking your Mustang to an open track/HPDE event for the first time? Do you race competitively? This forum is for you! Log in to remove most ads.

  • Welcome to the Ford Mustang forum built for owners of the Mustang GT350, BOSS 302, GT500, and all other S550, S197, SN95, Fox Body and older Mustangs set up for open track days, road racing, and/or autocross. Join our forum, interact with others, share your build, and help us strengthen this community!
IMG_4673.JPG

S550 2017 Mustang GT Track Build Build Thread Profile - S550 Mustangs

My attempt at a reliable HPDE car / money pit.

This site may earn a commission from merchant affiliate links, including eBay, Amazon, and others.

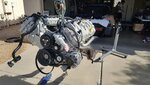
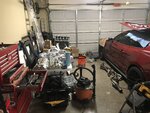
I didn't have to do anything to get the clearance where it should be. I used ARP main studs and they include a sketch to shorten and counterbore the oil tube spacer so it sits on the stud correctly. I did that and the clearance worked out to be 0.270". Moroso recommends 3/16" to 1/2". No oil pressure issues so I guess it is fine.

Ahhh should have thought about that. I am on the stock main hardware still.
 
I finished test fitting the Evo L seat on the Sparco sliders and base. Took a few iterations to get it right but it fits perfect. Need to figure out how to best mount the sub belt and adjust the harness a bit since it was setup for the stock seat. The Watson 4 point bolt-in roll bar and SVE rear seat delete were done this spring.

IMG_9239.jpg


IMG_9240.jpg

IMG_9245.jpg
 
Last edited:
I installed the Trackspec hood vents that replace the 2017 stock vents. Install went ok. I trimmed as much as I could with tin snips but had to use an angle grinder with a thin cutting wheel on it for the remainder. Word of advice, if using an angle grinder to cut the hood try and go fast to avoid getting too much heat into it. I blistered the paint in two areas that are somewhat visible with the vents installed. Once I get the car cleaned up I am going to try and fill the affected areas with touch up paint on a toothpick to prevent water from getting in there and causing more issues later.

IMG_9070.jpg

IMG_9182.jpg
 
Have not driven the car much lately. Been working with PBD on tune revisions because the initial datalogs showed the throttle body closing around 4500 rpm when WOT. The fix for that ended up making the drivability suffer, so hopefully we can get it squared away soon. Car feels fast, but should be better once this is ironed out.

After installing the hood vents I noticed my IAT increased quite a bit and I didn't like how if I ever got caught in the rain water would pour right into the GT350 airbox. So I cut a piece of lexan to fit. Should solve both issues.

IMG_9293.jpg
 
Got tired of going around and around with PBD on tune revisions and the car never felt like it pulled up top like I expected it to. I also saw 31 degrees of timing on 91 octane which I didn't like. Going to try and get my money back for that tune. Went back to AED and he had it figured out with one revision. Pulls like mad all the way up to 8k rpm which was as high as I was comfortable with and that's probably higher than it should regularly spin with stock (Boss 302R) valve springs.
 
Last edited:
Maiden voyage yesterday... ran great and my laptimes were ~2 seconds faster than my last time to this track in May when it lost compression. Temps were in the mid 60s I believe but I was pretty relieved to see my oil temps peak at 220F and my coolant temp sensor I added in the block peaked at 200. Forgot to check CHT. Now I just need to see what it does when the weather is 40 degrees warmer.

 
So I've got 5 events on the car since the rebuild now and everything seems to be working OK. I've been waiting for a hot event to really test my oil cooler setup and yesterday was about 99F during my last session. Coolant temp peaked at 228F and oil at 248F near the end of a 20 minute run. Hot oil pressure was 80 psi shifting at 7300 rpm. Seems safe to me but wanted others opinions?

I'm far from a great driver but overall I am super happy with how the car is running and handling. The only thing that needs improvement is me.
 
Last edited:
First update in a while. I destroyed a set of NT01s in 4 HPDE days which was about half of what I was hoping to get. I wondered if maybe the rubber bushings in the front tension links or the balljoints were bad allowing the the wheels to toe out excessively. Car felt very darty even after an alignment so I decided to go through and redo my setup. Last alignment could have been off too but it was the same shop that I've been using for years.

Removed the Steeda dual rate springs and put in BMR handling springs. Replaced both control arms and tension links in the front, I bought the Steeda kit with the corrected roll center and the spherical bearing in the tension link. I had the roll center correction before but the ball joint felt a little loose so I decided to replace it. Adjusted the sway bar since I was changing springs. Was 2nd hole from full stiff (out of 4), now it is on the 3rd.

IMG_1833.jpg

IMG_1835.jpg

Since I did bearings up front, I dropped the subframe and installed the BMR aluminum subframe bushings, BMR differential bushing supports, and BMR LCA bearings. What a huge PITA removing the bushings. The RLCA bearing install was pretty tedious even with frozen bearings and a 20 ton press. I thought something was going to break, but no issues. Also added Steeda eccentric bolts to make rear camber adjustment easier. Not surprisingly, I can hear the diff whine now, which isn't necessarily bad and I was expecting it. Also, the driveline clunking is amplified 10x over stock. No big deal, expected that too. What surprised me is that the suspension action is possibly quieter than before, I was expecting more NVH. Getting rid of the bushings and replacing with aluminum pucks and bearings tightened up the car big time, very noticeable.

Installing the subframe solo blows. After struggling a few times I went to the store and bought some long bolts and cut the heads off. Used those as alignment dowels to raise the subframe into place and removed them and replaced with the proper bolts.

IMG_1855.jpg

IMG_1863.jpg

IMG_1867.jpg

Got new GY SC3 non-R 305/30R19 mounted and the car aligned at a different shop, ended up with:

Front
Camber -3.05 degree (passenger side strut tower is maxed out)
Toe in 0.1 degree ( I usually shoot for 0, decided to try slight toe in since I was scared of cording the inners again)

Rear
Camber -2.00 degree
Toe in 0.30 degree

My previous best lap at AMP CCW with the NT01s was a 1:50.283 in October with nearly the same weather as today. Today I was able to squeak out a 1:48.385 which I was pretty impressed with. The car was so composed, balanced, and more predictable than before. I'm a fan of the GY SC3 tires so far.

 
Last edited:
They pretty similar in my opinion. I stuck with the BMR springs as I believe the single rate spring makes more sense. Neither are as stiff as I thought they would be. Car is still totally streetable.

The Steeda springs make an annoying rattle sound when the spring coils bind over bumps which I found very irritating. You can alleviate it by running spring isolators on the top coils. The BMR springs are quiet.
 
Last edited:
I've put about 300 miles on it so far, breaking it in pretty hard. Changed the oil and filter after the first 200 miles and it seems relatively clean. Dark from the ARP fastener lube but no big shavings or copper colored debris that I could detect in the oil or when I cut open the filter.

It is running strong, is a bit noisier than it was stock, but I was somewhat expecting that with the forged pistons. It gets quieter the hotter it gets so not too worried about it. I had put in a Reische 170F thermostat when the engine was apart but I feel like this is a waste for track use so I went back to stock. The car is going to be operating way over the stock 180F set point so not sure it offers any benefit besides making my motor noisier running the block 10-15F cooler around town.

Been a long time since the hood was on....
View attachment 58700

I always though the way the evap line was routed along the driver side cylinder head to the intake manifold was dumb so I decided to take advantage of the unused passage inside the 2018 IM (no vacuum required with IMRC locked out). I plumbed the evap connection under the brake master cylinder to the back of the intake manifold and then cut the tabs of the evap solenoid to clean up everything at the front end. Less clap-trap, and blend in nicely.
View attachment 58701

I originally left the oil cooler disconnected but hooked it up after the first oil change. It is an Earls 85000AERL 50 row cooler. I used -12AN lines and fittings since I did not want to add a lot of resistance to the system. I drilled out all of the fittings except the 90 degree elbows with a 9/16" drill bit and then used a flex-hone to smooth it out and get rid of most of the tool marks. I enlarged the ports on the Mishimoto sandwich plate by hand since in/out ports were smaller than the ID of the fittings that thread in.

Something I am unsure of on my setup. This cooler is pretty big, and the way I mounted it gave me a super clear shot to the sandwich plate but the elbows are only about 1" above the bottom of the belly pan. Too little clearance in case of going off? I cleaned all the bugs out before the bumper cover went back on.

View attachment 58705

View attachment 58702

View attachment 58703

View attachment 58704

One thing I do not like about this is how cool the oil stays on the freeway even though the sandwich plate has a 185F thermostat. I was cruising at 80 mph in 6th which is around 2500 rpm and oil temps creeped down to 154F before I exited. I reached out to Mishimoto to see if this is expected behavior of the thermostat, not sure when I will hear back. Oil seems to be around 175-180F in stop-and-go traffic around town.

Next time I change the filter I need to remove a bit of material from the -12 fittings on the sandwich plate. The fittings just barely rub on the extra large FP FL820 filter, you can see the paint scraped off.
View attachment 58706

My BMR front subframe brace wouldn't go back on with the Moroso pan so I got a Steeda 2-point brace to take it's place. Passenger side headers are close, about 3/8" clearance. Steeda includes shims to drop the brace for additional clearance but not needed in my case.

View attachment 58707

I used some P-clamps to routing the wiring hardness along the new oil pan since it doesn't have mounting points like the stock pan. I used some plastic loom to route my oil and water temp sensor wires up to the sound-tube hole in the firewall. Whatever cheap junk loom I used the first time was totally melted after 200 miles so I had to redo this with flame retardant wire loom. What a PITA getting the melted stuff out since it shrunk up like shrink wrap.

View attachment 58708

Here is my ritual after every one of the first few drives to make sure nothing was leaking. So far not a drop of anything...
View attachment 58709

The car sounded great with the catless headers...

...but the stink was too much for me since I still drive this on the street time-to-time. Everytime I started the car the house A/C unit would pick up the fumes and circulate them around the whole house. Cats are back on as of yesterday, sound is neutered a bit but still sounds nice.

Need to get the car cleaned up and get some good photos of it. I feel like every square inch is covered in hand prints.

Used, like new Reische thermostat and BMR front subframe brace coming up for sale!
I saw in another thread you switched to the Setrab thermostatic sandwich plate, I was wondering if this worked better for you with oil temps on the street?
 
It didn’t make any difference but I like the design and build quality of the Setrab unit more.

The oil cooler I showed in this thread developed a leak so I switched over to the Harrop kit which is less efficient but mounts cleanly and out of the way and I’ve been using that for almost 4 years without issues. That kit came with the same Setrab sandwich plate.
 

Buy TMO Apparel

Buy TMO Apparel
Top