An inexpensive and relatively easy fabrication.
Cautions !
This design and the trunk location should accommodate any standard extinguisher no more than 15” tall in a 2013 Mustang. I specifically used a H3R 2 ½ pound Halotron 1 unit.
The bracket design requires two non-reversible operations. One is drilling a small hole through the floor of the trunk for a sheet metal screw. The other is slitting the trunk mat to fit around the extinguisher bracket. It might be possible to avoid these permanent changes by using Velcro on the bottom leg of the “L” bracket, but I didn’t feel this would make the bracket stable enough in a collision situation or even for normal trunk storage where items could bump the extinguisher and bend the bracket.
Materials/tools required:
1 piece 2” X 1/8” aluminum flat bar at least 18” long.
Bench vise
Hack saw
Toolmaker’s Square
Round file or grinder with ¼” bit.
Drill and bits (11/32”, 3/16”, and 13/64”). The last two are dependent on the size of the sheet metal screw you choose.
File or sander to dress the corners and edges prior to painting.
Aluminum primer (Rust-Oleum 254170) and standard semi-flat black paint as required.
Getting your initial measurements:
Open the trunk and look up under the sheet metal on the passenger side. You’ll see a hex bolt (13mm head) holding the trunk liner up. Remove the bolt:

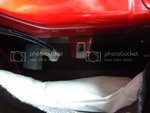
Pull back the liner back and you’ll see the trunk bracket and threaded clip attached.
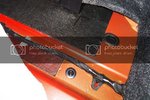
Pull back the trunk mat on the floor on the right side. You’ll find a rectangle of sound deadener just below the trunk bracket (this photo taken after the extinguisher bracket was installed).
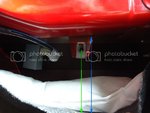
Measure from the surface of this sound deadener on the trunk floor to the top of the trunk bracket (blue arrow), leaving some clearance for the tip of your extinguisher bracket. It should be approximately 15 ¾”.
Fabricating the bracket:
The blueprint:

Buy a piece of aluminum 2” wide and 1/8” (.125”) thick at least 18” long. Home Depot or Ace should have it. It was about $11 for a 36” long piece.
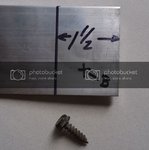
With a square, mark a line 1 ½” back from one end.
Note: Mark a spot approximately in the location of the “B” centerline. Before bending, drill a hole through the short leg to accommodate a short sheet metal screw. I used a small hex head screw with about a 3/16” major diameter. The hole in the bracket should be about .010” larger than the thread. During installation you will also need a smaller drill (.010-.020” smaller than the body of the screw) to drill through the trunk floor to ensure a tight fit.
With the short length down in the vise, align the 1 ½” mark at the top of the vise jaw and clamp securely.
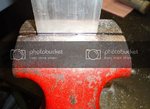
Keeping pressure near the vise so as to not bow the long leg, bend the aluminum until you have a right angle. You will probably have to tweak this several times to get it right. It doesn’t have to be a perfect 90, but close.
Measuring from the outside of the leg of the newly formed “L”, place a mark with your square to equal the length of the blue arrow (approximately 15 ¾”). Using a hack saw, cut off at the line. Holding the short leg of the bracket against the trunk floor (Note, you’ll have to lift the trunk liner on the outboard side of the wheel well to slide the short “L” bracket underneath), see if the long side will fit up under the sheet metal without touching at the top. If it does, file or grind a little off at a time. There should be about 1/16-1/8” clearance at the top.
With the short leg held tightly against the trunk floor and straight up, place a mark on the long leg even with the centerline of the threaded clip hole (green arrow). With the square, extend this line all the way across the bracket. Mark the center of the 2” wide bracket. This will be the location for your 11/32” bolt hole.
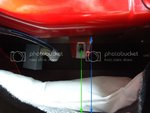
The bolt diameter is about 5/16, so I used an 11/32” bit to start with. You will probably have to elongate the hole slightly on the top or bottom to ensure the bracket sits flush against the trunk floor.
Assemble the “L” bracket to the trunk bracket with the short leg of the bracket facing towards the outside of the car. Make sure you slip the leg under the trunk liner. Finger tighten only to see if the bottom of the “L” rests firmly against the sound deadener on the floor. If it doesn’t, use a round file or grinder to elongate slightly until it does.
Reattach the “L” bracket loosely enough so it will move but stay in place. Assuming your car is on a level surface, use a small level and move the bracket side-to-side each way until it is plumb. Mark the location of the bracket on the sound deadener with a Sharpie.
Ensuring the bracket is still plumb, drop a screw or scribe through the small “B” hole in the short leg and mark the sound deadener with a small hole.
Remove the bracket and drill though the trunk floor with a drill bit .010-.020” smaller than the body of the sheet metal screw you decide to use.
At this point you can prime and paint your bracket. I used a special aluminum primer after I heard it improves paint adhesion. However, I also found out the hard way that this primer is not compatible with all spray paints. Before to experiment with a scrap piece of aluminum before you paint your bracket.
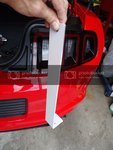
When the bracket is fully dried, assemble the fire extinguisher clamp to the “L” bracket so the extinguisher is about ½” off the floor and the top clears the top of the trunk roof. This will vary with your particular extinguisher design:
Next, place some sealant in the small hole you drilled in the trunk floor. I used a small dab of black silicone. Keeping the trunk mat held back, align the short leg of the bracket on the floor and apply just a little sealant to the sheet metal screw. Insert the screw and tighten part way.
Place the trunk liner back in place at the top only, insert the bolt through the “L” bracket and tighten partially. Go ahead and finish tightening the sheet metal screw on the short leg at the bottom. Do not over-tighten! Finish tightening the bolt at the top.
With the bracket now in place, push the trunk mat firmly up against the bottom of the “L” bracket with your fingertips. Take a utility knife and cut the mat along the base of the bracket. Pull the mat back and cut the mat as shown here so the mat will fall around the bracket when laid in place.

When laid around the bracket the slits are barely visible.
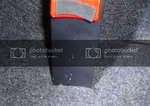
Finished look:

Finally, I got underneath the car and put some silicone in a small plastic cap and put it over the end of the screw to seal it against the sheet metal. It isn’t visible unless you really know where to look.
Cautions !
This design and the trunk location should accommodate any standard extinguisher no more than 15” tall in a 2013 Mustang. I specifically used a H3R 2 ½ pound Halotron 1 unit.
The bracket design requires two non-reversible operations. One is drilling a small hole through the floor of the trunk for a sheet metal screw. The other is slitting the trunk mat to fit around the extinguisher bracket. It might be possible to avoid these permanent changes by using Velcro on the bottom leg of the “L” bracket, but I didn’t feel this would make the bracket stable enough in a collision situation or even for normal trunk storage where items could bump the extinguisher and bend the bracket.
Materials/tools required:
1 piece 2” X 1/8” aluminum flat bar at least 18” long.
Bench vise
Hack saw
Toolmaker’s Square
Round file or grinder with ¼” bit.
Drill and bits (11/32”, 3/16”, and 13/64”). The last two are dependent on the size of the sheet metal screw you choose.
File or sander to dress the corners and edges prior to painting.
Aluminum primer (Rust-Oleum 254170) and standard semi-flat black paint as required.
Getting your initial measurements:
Open the trunk and look up under the sheet metal on the passenger side. You’ll see a hex bolt (13mm head) holding the trunk liner up. Remove the bolt:

Pull back the liner back and you’ll see the trunk bracket and threaded clip attached.

Pull back the trunk mat on the floor on the right side. You’ll find a rectangle of sound deadener just below the trunk bracket (this photo taken after the extinguisher bracket was installed).

Measure from the surface of this sound deadener on the trunk floor to the top of the trunk bracket (blue arrow), leaving some clearance for the tip of your extinguisher bracket. It should be approximately 15 ¾”.

Fabricating the bracket:
The blueprint:

Buy a piece of aluminum 2” wide and 1/8” (.125”) thick at least 18” long. Home Depot or Ace should have it. It was about $11 for a 36” long piece.
With a square, mark a line 1 ½” back from one end.
Note: Mark a spot approximately in the location of the “B” centerline. Before bending, drill a hole through the short leg to accommodate a short sheet metal screw. I used a small hex head screw with about a 3/16” major diameter. The hole in the bracket should be about .010” larger than the thread. During installation you will also need a smaller drill (.010-.020” smaller than the body of the screw) to drill through the trunk floor to ensure a tight fit.

With the short length down in the vise, align the 1 ½” mark at the top of the vise jaw and clamp securely.

Keeping pressure near the vise so as to not bow the long leg, bend the aluminum until you have a right angle. You will probably have to tweak this several times to get it right. It doesn’t have to be a perfect 90, but close.
Measuring from the outside of the leg of the newly formed “L”, place a mark with your square to equal the length of the blue arrow (approximately 15 ¾”). Using a hack saw, cut off at the line. Holding the short leg of the bracket against the trunk floor (Note, you’ll have to lift the trunk liner on the outboard side of the wheel well to slide the short “L” bracket underneath), see if the long side will fit up under the sheet metal without touching at the top. If it does, file or grind a little off at a time. There should be about 1/16-1/8” clearance at the top.
With the short leg held tightly against the trunk floor and straight up, place a mark on the long leg even with the centerline of the threaded clip hole (green arrow). With the square, extend this line all the way across the bracket. Mark the center of the 2” wide bracket. This will be the location for your 11/32” bolt hole.

The bolt diameter is about 5/16, so I used an 11/32” bit to start with. You will probably have to elongate the hole slightly on the top or bottom to ensure the bracket sits flush against the trunk floor.
Assemble the “L” bracket to the trunk bracket with the short leg of the bracket facing towards the outside of the car. Make sure you slip the leg under the trunk liner. Finger tighten only to see if the bottom of the “L” rests firmly against the sound deadener on the floor. If it doesn’t, use a round file or grinder to elongate slightly until it does.
Reattach the “L” bracket loosely enough so it will move but stay in place. Assuming your car is on a level surface, use a small level and move the bracket side-to-side each way until it is plumb. Mark the location of the bracket on the sound deadener with a Sharpie.
Ensuring the bracket is still plumb, drop a screw or scribe through the small “B” hole in the short leg and mark the sound deadener with a small hole.
Remove the bracket and drill though the trunk floor with a drill bit .010-.020” smaller than the body of the sheet metal screw you decide to use.
At this point you can prime and paint your bracket. I used a special aluminum primer after I heard it improves paint adhesion. However, I also found out the hard way that this primer is not compatible with all spray paints. Before to experiment with a scrap piece of aluminum before you paint your bracket.

When the bracket is fully dried, assemble the fire extinguisher clamp to the “L” bracket so the extinguisher is about ½” off the floor and the top clears the top of the trunk roof. This will vary with your particular extinguisher design:

Next, place some sealant in the small hole you drilled in the trunk floor. I used a small dab of black silicone. Keeping the trunk mat held back, align the short leg of the bracket on the floor and apply just a little sealant to the sheet metal screw. Insert the screw and tighten part way.
Place the trunk liner back in place at the top only, insert the bolt through the “L” bracket and tighten partially. Go ahead and finish tightening the sheet metal screw on the short leg at the bottom. Do not over-tighten! Finish tightening the bolt at the top.
With the bracket now in place, push the trunk mat firmly up against the bottom of the “L” bracket with your fingertips. Take a utility knife and cut the mat along the base of the bracket. Pull the mat back and cut the mat as shown here so the mat will fall around the bracket when laid in place.

When laid around the bracket the slits are barely visible.

Finished look:

Finally, I got underneath the car and put some silicone in a small plastic cap and put it over the end of the screw to seal it against the sheet metal. It isn’t visible unless you really know where to look.


