
- Thread starter
- #61
continued from above


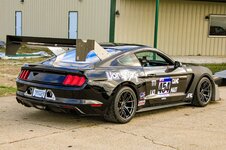
At the March 30th event I drove VERY poorly and had a high speed off track excursion, so Brad had to replace two of the Professional Awesome carbon splitter strut rods. They were frayed from the impact but they still held on in later sessions that day!


The next weekend we had scheduled to enter a NASA Time Trial event with the new Hoosiers and the bigger 12" splitter, so Brad made the taller air dam for this splitter version at this point.
CLEARANCING FOR REAR FLARES
One of the things that people associate with Vorshlag is putting BIG TIRES on everything, and that is a fair association. We have added giant tires and flares to SO MANY CARS that I have lost count. And it goes way back to my early days of track and autocrossing in the 1990s...


Always make sure the car owner is OK with the work involved, because this is a one way trip. There is NO GOING BACK once you add flares because you have to hack up the bodywork to make the wider tires fit underneath the flares. In 2013 we added flares my wife's 2011 Mustang (above left) and she was NOT on board, and I got into some trouble. No means no!


The front fenders on this body swap was easy, as it was a complete replacement carbon fender. But out back of this unibody chassis, we had to chop up the rear fenders and the underlying inner fender structure to clear the 345mm Hoosiers. The addition of the over-fender itself was cake compared to the clearance work underneath. We usually quote 12-15 hours to do this correctly on a steel unibody car for the rear. Brad used painters tape to make an arc and started cutting the outer skin with a reciprocating air body saw.


Once you are through the outer fender skin it is time to cut the layers of structure underneath away until you have the "bump travel" tire clearance you need. Brad switched to a our little Milwaukee M12 saw at this point. NOTE: There is all manner of foam and insulation inside the outer skin that is very flammable. Remember to have a buddy there with a serious water gun handy to put out small flare-ups when you start welding!


With the steel outer skin and inner structure cut away, it is time to check bump clearance. We mounted up one of the new Jongbloed 18x13.5" wheels with a 345/35R18 Hoosier and removed a rear spring, then raised that corner up until it runs out of shock travel OR the tire bottoms out on the flat horizontal surface of the inner fender structure. What we don't want is the sharp "point" of the outer fender curving down to dig into tread, as that can cut a tire. We keep cutting that structure out until the tire touches flat sections.


At this point we have the clearance we need but some serious gaps to fill between the now cylindrical inner fender structure and the outer skin, which has been raised several inches along its wheel arch. We need to close up this gap and restore structure to the unibody with steel sheet panels. Brad starts here with some cardboard to make a template for our filler panel.


At this point you transfer your template to some 18 to 20 gauge steel sheet. That's when Brad used the English wheel to add a bit of arc to the piece. That was then placed over the gap (with all mating surfaces sanded clean of paint) and a 2 man job of tack welding and holding is done. Brad was using a big hammer to hold the panel in place while Austin tack welded that to the outer skin.
Again WATCH OUT FOR FIRE. It might be wise to have a third person watching for flare ups with your water sprayer loaded and ready to put them out. If you see smoke under your welding hood it is far too late. Ask me how I know (yes, our crew caught part of the left rear fender on fire, but put it out quickly - with the nasty, powdery chemical extinguisher that made a MESS. The burned paint was repaired, and is thankfully all underneath the over fender)


The filler panels for the rear fenders were made in two parts and we used a skip weld tacking technique to keep from adding too much heat to the surrounding sheet metal. We let the panel hang past the fender so we can get a nice shelf there for easier welds on the top side.


Anything you can do to avoid overhead welding is always good. But you'll have to do some of that on the inner seams, which overlap the inner fender structure. Once you are happy with the coverage of the welds you can grind off the outer "shelf" that overhung the fenders. Brad used a flap disc on a 4" angle grinder here.


Post-Weld seam sealer was slathered onto all of the welded seams. After that dried the area was hit with self-etching metal primer, to prevent rust down the road. This is an important step that so many skip.


Now the actual flares could be fitted. This took another 8 hours to trim, mark, drill, rivnut, and fit together. After mocking up the fender we picked a spacing for the many holes we had to drill for exposed mounting bolts. This might not fit the car show crowd, but for racers who run into things, it makes for a quicker repair. Brad installed dozens of M6 rivnuts into the chassis.


The Anderson JTP kit includes 3 pieces per side for the rear, and the rear section shown above left bolts to the main over-fender portion. Then there is another lower section that ties into that and the rocker. The secondary sections were test fit with the main fender in place, then the holes to attach them together were marked, drilled, and thru-bolts and nuts were used.


We test fit the rear wheel and tire again and checked for clearance - and that fat 345mm tire was starting to eat into the added lip that these over-fenders had built into the outer edge. That's nice for structure, but we gotta let these tires eat. So that was marked on the carbon fiber fender and Brad trimmed that away to allow the tire to clear in the upward "bump" direction.


Once the lower portions were fitted they look seamless. Brad had to open up the oval hole for the fuel door to allow enough clearance for the door to open and close, but otherwise these fenders fit REALLY well. The glossy carbon finish is striking and the weight of these parts was a rounding error.
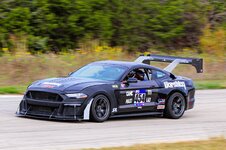
ADDING HOOSIERS + WEIGHT CHECK
Now it was time to mount the other 3 Hoosier tires - for the two fronts and the other rears. I put the 315mm Yokohama next to the 345mm Hoosier below for reference. Not even close...


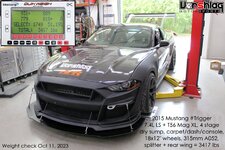
This weight check on April 4th was the second time we put the Mustang on the scales since the roll cage was added. We had a full tank of fuel and the numbers were bleak - 3604 pounds, without driver!

We still had full interior to run SCCA Max1 class but the big tires and big splitter we wanted for NASA and Apex events. The wheels were very light but adding the 175 pounds of roll cage did us no favors.


With some extra wood ramps we were able to get this car loaded into the trailer on Friday the 5th before a NASA event on the 6th at ECR. We had our big splitter, big tires, and the full cage since our last NASA event. Let's see how it stacks up...?
NASA AT ECR, APRIL 6, 2024
This was a super frustrating day. Amy and I got a crappy parking spot because most NASA weekend entrants show up Thursday or Friday. We're just here for the day so we got what we got. At least we had Annual Tech for the log book from the March event, so I parked up near the front for the first session.


Well nobody parked ahead of me on grid, so I led out the first run group, the TT Warmup. Which went very poorly for me! Apparently there was some leftover fire retardant powder buried down inside the left rear fender (the one that caught on fire slightly, in the section above), and at speed that turned into a dust storm inside the car. I mean the interior was spotless when I got there.


The dust was SO THICK that I thought the car was on fire, but the smell was wrong. I came in quickly in that warm up session, never got a lap, but after checking everything I went back out again in HPDE 4 session and even an HPDE 1 session - just to make enough laps to blow all of this powder out of the cabin. What a mess!

I went out in TT session 2 and started at the back, because I had no official lap time. I set a huge gap to the field on the out lap and ran a 1:58.5 lap, which I felt was junk. I mean hell, I'd run a 1:59 on street tires here the year before, WTF?


It came down to several issues, but we finally traced the total lack of rear grip to the two 9 year old "sticker" rear 345mm tires that I won with Hoosier contingency way back in 2015. They just never switched on, and one rear tire's carcass started separating belts and was VERY MUCH not round in the 3rd TT session, which I had to abort. That pair of tires went right into the trash pile after this event.


I was actually pretty embarrassed by my performance, even with a new Personal Best at this track and in this car. I should have purchased new rear tires, but money was tight and I had these "new" sticker 345mm tires that I could not make myself throw away.

I felt slow and was holding up cars 2 classes down, but somehow I still won TT1 (which had some of my SCCA TT buddies) by 8 seconds. I took a bunch of short laps but was stalled out in traffic for most of the day and just had the ONE sub-2 minute lap. I had to clean up and shower at this event and head to a friends birthday party, so it was a long day.


I just rewatched my one quick lap from this event, and it isn't great - I was fighting issues with the clutch or transmission all day, a situation that is only getting worse. Back end is sliding all over the place. I was by no means proud of that win, and I was really chasing the faster TTU cars above me - I knew at this point we have a lot of work to do.
RESET, REPAIR, REPLACE - CLUTCH DISCS, TIRES AND ABS FAULT
The season was in full swing now and we had one week until the next Apex Lap Attack event at MSR. After the Mustang was unloaded it was time to get ALL of the fire retardant dust out of the car - Brad masked up and took the M18 Milwaukee air blower to the interior outside the shop. THAT got our the dust, followed by some serious vacuuming and wipe downs of all surfaces.


The clutch we have in this car at this point is a used ClutchMasters 850 series (8.5" diameter) twin disc that a customer wanted a refund on after driving it for 2 days on the street. I don't actually love this clutch, but it was an expensive unit that fit this transmission. To try to fix the shifting issues we ordered new discs as a last attempt to save this expensive clutch system.


Pulling the Tremec Magnum XL takes a bit of work - exhaust, driveshaft, shifter, clutch hydraulics, etc. Not a fun job but clutches do become wear items with 620 whp engines.


We were grasping at straws once the clutch and pressure plate was removed. The aluminum flywheel has a steel facing for the 8.5" diameter clutch face, and it had some hot spots. We had started with a hybrid organic / bronze disc stack and were moving to a straight bronze clutch setup with the new discs.


The wear material looked fine, just some hot spots. But it was out, so the new sintered bronze "race" clutch pack was installed. Hey, it is a $1800 clutch kit and I don't want to just toss it if this new set of discs fixes it.


The measurement for the free play from the hydraulic TOB to the pressure plate was checked and it was off, so an over-night delivery of the shims was ordered and that was re-shimmed to the ClutchMasters specifications by Brad (none of this work or parts fixed the shifting issues, sadly).
continued below
At the March 30th event I drove VERY poorly and had a high speed off track excursion, so Brad had to replace two of the Professional Awesome carbon splitter strut rods. They were frayed from the impact but they still held on in later sessions that day!
The next weekend we had scheduled to enter a NASA Time Trial event with the new Hoosiers and the bigger 12" splitter, so Brad made the taller air dam for this splitter version at this point.
CLEARANCING FOR REAR FLARES
One of the things that people associate with Vorshlag is putting BIG TIRES on everything, and that is a fair association. We have added giant tires and flares to SO MANY CARS that I have lost count. And it goes way back to my early days of track and autocrossing in the 1990s...
Always make sure the car owner is OK with the work involved, because this is a one way trip. There is NO GOING BACK once you add flares because you have to hack up the bodywork to make the wider tires fit underneath the flares. In 2013 we added flares my wife's 2011 Mustang (above left) and she was NOT on board, and I got into some trouble. No means no!
The front fenders on this body swap was easy, as it was a complete replacement carbon fender. But out back of this unibody chassis, we had to chop up the rear fenders and the underlying inner fender structure to clear the 345mm Hoosiers. The addition of the over-fender itself was cake compared to the clearance work underneath. We usually quote 12-15 hours to do this correctly on a steel unibody car for the rear. Brad used painters tape to make an arc and started cutting the outer skin with a reciprocating air body saw.
Once you are through the outer fender skin it is time to cut the layers of structure underneath away until you have the "bump travel" tire clearance you need. Brad switched to a our little Milwaukee M12 saw at this point. NOTE: There is all manner of foam and insulation inside the outer skin that is very flammable. Remember to have a buddy there with a serious water gun handy to put out small flare-ups when you start welding!
With the steel outer skin and inner structure cut away, it is time to check bump clearance. We mounted up one of the new Jongbloed 18x13.5" wheels with a 345/35R18 Hoosier and removed a rear spring, then raised that corner up until it runs out of shock travel OR the tire bottoms out on the flat horizontal surface of the inner fender structure. What we don't want is the sharp "point" of the outer fender curving down to dig into tread, as that can cut a tire. We keep cutting that structure out until the tire touches flat sections.
At this point we have the clearance we need but some serious gaps to fill between the now cylindrical inner fender structure and the outer skin, which has been raised several inches along its wheel arch. We need to close up this gap and restore structure to the unibody with steel sheet panels. Brad starts here with some cardboard to make a template for our filler panel.
At this point you transfer your template to some 18 to 20 gauge steel sheet. That's when Brad used the English wheel to add a bit of arc to the piece. That was then placed over the gap (with all mating surfaces sanded clean of paint) and a 2 man job of tack welding and holding is done. Brad was using a big hammer to hold the panel in place while Austin tack welded that to the outer skin.
Again WATCH OUT FOR FIRE. It might be wise to have a third person watching for flare ups with your water sprayer loaded and ready to put them out. If you see smoke under your welding hood it is far too late. Ask me how I know (yes, our crew caught part of the left rear fender on fire, but put it out quickly - with the nasty, powdery chemical extinguisher that made a MESS. The burned paint was repaired, and is thankfully all underneath the over fender)
The filler panels for the rear fenders were made in two parts and we used a skip weld tacking technique to keep from adding too much heat to the surrounding sheet metal. We let the panel hang past the fender so we can get a nice shelf there for easier welds on the top side.
Anything you can do to avoid overhead welding is always good. But you'll have to do some of that on the inner seams, which overlap the inner fender structure. Once you are happy with the coverage of the welds you can grind off the outer "shelf" that overhung the fenders. Brad used a flap disc on a 4" angle grinder here.
Post-Weld seam sealer was slathered onto all of the welded seams. After that dried the area was hit with self-etching metal primer, to prevent rust down the road. This is an important step that so many skip.
Now the actual flares could be fitted. This took another 8 hours to trim, mark, drill, rivnut, and fit together. After mocking up the fender we picked a spacing for the many holes we had to drill for exposed mounting bolts. This might not fit the car show crowd, but for racers who run into things, it makes for a quicker repair. Brad installed dozens of M6 rivnuts into the chassis.
The Anderson JTP kit includes 3 pieces per side for the rear, and the rear section shown above left bolts to the main over-fender portion. Then there is another lower section that ties into that and the rocker. The secondary sections were test fit with the main fender in place, then the holes to attach them together were marked, drilled, and thru-bolts and nuts were used.
We test fit the rear wheel and tire again and checked for clearance - and that fat 345mm tire was starting to eat into the added lip that these over-fenders had built into the outer edge. That's nice for structure, but we gotta let these tires eat. So that was marked on the carbon fiber fender and Brad trimmed that away to allow the tire to clear in the upward "bump" direction.
Once the lower portions were fitted they look seamless. Brad had to open up the oval hole for the fuel door to allow enough clearance for the door to open and close, but otherwise these fenders fit REALLY well. The glossy carbon finish is striking and the weight of these parts was a rounding error.
ADDING HOOSIERS + WEIGHT CHECK
Now it was time to mount the other 3 Hoosier tires - for the two fronts and the other rears. I put the 315mm Yokohama next to the 345mm Hoosier below for reference. Not even close...
This weight check on April 4th was the second time we put the Mustang on the scales since the roll cage was added. We had a full tank of fuel and the numbers were bleak - 3604 pounds, without driver!
We still had full interior to run SCCA Max1 class but the big tires and big splitter we wanted for NASA and Apex events. The wheels were very light but adding the 175 pounds of roll cage did us no favors.
With some extra wood ramps we were able to get this car loaded into the trailer on Friday the 5th before a NASA event on the 6th at ECR. We had our big splitter, big tires, and the full cage since our last NASA event. Let's see how it stacks up...?
NASA AT ECR, APRIL 6, 2024
This was a super frustrating day. Amy and I got a crappy parking spot because most NASA weekend entrants show up Thursday or Friday. We're just here for the day so we got what we got. At least we had Annual Tech for the log book from the March event, so I parked up near the front for the first session.
Well nobody parked ahead of me on grid, so I led out the first run group, the TT Warmup. Which went very poorly for me! Apparently there was some leftover fire retardant powder buried down inside the left rear fender (the one that caught on fire slightly, in the section above), and at speed that turned into a dust storm inside the car. I mean the interior was spotless when I got there.
The dust was SO THICK that I thought the car was on fire, but the smell was wrong. I came in quickly in that warm up session, never got a lap, but after checking everything I went back out again in HPDE 4 session and even an HPDE 1 session - just to make enough laps to blow all of this powder out of the cabin. What a mess!
I went out in TT session 2 and started at the back, because I had no official lap time. I set a huge gap to the field on the out lap and ran a 1:58.5 lap, which I felt was junk. I mean hell, I'd run a 1:59 on street tires here the year before, WTF?
It came down to several issues, but we finally traced the total lack of rear grip to the two 9 year old "sticker" rear 345mm tires that I won with Hoosier contingency way back in 2015. They just never switched on, and one rear tire's carcass started separating belts and was VERY MUCH not round in the 3rd TT session, which I had to abort. That pair of tires went right into the trash pile after this event.
I was actually pretty embarrassed by my performance, even with a new Personal Best at this track and in this car. I should have purchased new rear tires, but money was tight and I had these "new" sticker 345mm tires that I could not make myself throw away.
I felt slow and was holding up cars 2 classes down, but somehow I still won TT1 (which had some of my SCCA TT buddies) by 8 seconds. I took a bunch of short laps but was stalled out in traffic for most of the day and just had the ONE sub-2 minute lap. I had to clean up and shower at this event and head to a friends birthday party, so it was a long day.
I just rewatched my one quick lap from this event, and it isn't great - I was fighting issues with the clutch or transmission all day, a situation that is only getting worse. Back end is sliding all over the place. I was by no means proud of that win, and I was really chasing the faster TTU cars above me - I knew at this point we have a lot of work to do.
RESET, REPAIR, REPLACE - CLUTCH DISCS, TIRES AND ABS FAULT
The season was in full swing now and we had one week until the next Apex Lap Attack event at MSR. After the Mustang was unloaded it was time to get ALL of the fire retardant dust out of the car - Brad masked up and took the M18 Milwaukee air blower to the interior outside the shop. THAT got our the dust, followed by some serious vacuuming and wipe downs of all surfaces.
The clutch we have in this car at this point is a used ClutchMasters 850 series (8.5" diameter) twin disc that a customer wanted a refund on after driving it for 2 days on the street. I don't actually love this clutch, but it was an expensive unit that fit this transmission. To try to fix the shifting issues we ordered new discs as a last attempt to save this expensive clutch system.
Pulling the Tremec Magnum XL takes a bit of work - exhaust, driveshaft, shifter, clutch hydraulics, etc. Not a fun job but clutches do become wear items with 620 whp engines.
We were grasping at straws once the clutch and pressure plate was removed. The aluminum flywheel has a steel facing for the 8.5" diameter clutch face, and it had some hot spots. We had started with a hybrid organic / bronze disc stack and were moving to a straight bronze clutch setup with the new discs.
The wear material looked fine, just some hot spots. But it was out, so the new sintered bronze "race" clutch pack was installed. Hey, it is a $1800 clutch kit and I don't want to just toss it if this new set of discs fixes it.
The measurement for the free play from the hydraulic TOB to the pressure plate was checked and it was off, so an over-night delivery of the shims was ordered and that was re-shimmed to the ClutchMasters specifications by Brad (none of this work or parts fixed the shifting issues, sadly).
continued below


