The Mustang Forum for Track & Racing Enthusiasts

Taking your Mustang to an open track/HPDE event for the first time? Do you race competitively? This forum is for you! Log in to remove most ads.

  • Welcome to the Ford Mustang forum built for owners of the Mustang GT350, BOSS 302, GT500, and all other S550, S197, SN95, Fox Body and older Mustangs set up for open track days, road racing, and/or autocross. Join our forum, interact with others, share your build, and help us strengthen this community!
Screenshot_20231026-124614_(1).png

S197 DeepImpactBlues Build Thread Profile - S197 Mustangs

A Salvage Restoration Project

This site may earn a commission from merchant affiliate links, including eBay, Amazon, and others.

Welding the alternator bracket shouldn’t be a big deal I don’t think that little bit would get it hot enough to warp a head if your worried about it
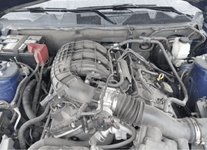
Yeah, I don't think the head would warp either. My concern is more about the timing cover itself. Or the o-ring seal being heat damaged.
 
Wait, you sanded down the artistic custom "crackle finish" paint job? ;)

I can't begin to imagine how long that took, and the patience involved, but the result is very nice. Congratulations on the final product.
 
Wait, you sanded down the artistic custom "crackle finish" paint job? ;)

I can't begin to imagine how long that took, and the patience involved, but the result is very nice. Congratulations on the final product.
LOL!
I'm not sure if I should just be ultimately happy with it or seek treatment, I kept telling myself I must be crazy. Either way the trauma is over!
 
I went ahead and ordered a new timing cover, removed the cracked one, and learned that my replacement's shipping date has been delayed.

Very soon I'll be able to say I've actually installed a part on this car! Meanwhile a few more details to take care of.
One was that It appears the car had a leaking pinion seal and there was a greasy mess on much of the undercarriage, along with the expected accumulation of road dirt, etc. I removed the goo-covered gas tank and will use the tank from the other car, it's got over 100K less miles on the internals. Also removed the 3rd link, I won't need it when I transplant my Cortex Torque Arm.

20240813_074956.jpg
Not the home I'd like to put the motorsport goodies from the other car and some new stuff into.

20240813_075031.jpg

After a mixture of Simple Green and Elbow Grease things look much better now!

20240815_115156.jpg20240815_114902_HDR.jpg
 
Since you've dropped the gas tank, consider the fuel cell foam mod that @blacksheep-1 did to prevent slosh to the non-pump side saddle and fuel starvation at the pump under high cornering loads. Or there's another thread where someone put a small auxiliary pump on the non-pump side. And if you're planning E85 and bigger injectors down the road, maybe a mild pump upgrade as well (e.g., DW400).
 
Since you've dropped the gas tank, consider the fuel cell foam mod that @blacksheep-1 did to prevent slosh to the non-pump side saddle and fuel starvation at the pump under high cornering loads. Or there's another thread where someone put a small auxiliary pump on the non-pump side. And if you're planning E85 and bigger injectors down the road, maybe a mild pump upgrade as well (e.g., DW400).
I've been watching the postings regarding fuel slosh/starvation with keen interest. Thank you for reminding me! I've got so many things going on with this project that it slipped my mind. I just ordered a block of foam. My experience with this problem hasn't been as extreme as some others but I've always kept the tank over 1/2, and it still needs to be addressed, The fix @blacksheep-1 used seems reasonable and simple. With the tank out I have nothing to lose by trying it, and I might even avoid his "bloodbath"!

When I had my supercharged car (parts donor for this one) tuned by Shaun at AED for E85, he recommended I use a JMS pump booster. Not as solid of an upgrade as a better pump but it was working out fine until my wreck. This would be a great time go further but for now, since I'm already tuned for this steup and I need to stick to some semblance of a budget, I plan on just switching everything over as it was.
 
Progress! Not very significant but I reached a symbolic milestone. First parts from old car actually installed in the new. A morale booster! I replaced the entire old fuel system including the filler tube, evap stuff, all the hoses, and the tank with internals. And I installed some anti-slosh foam in the saddle area of the tank. Thanks @blacksheep-1 for a little advice. I got respect for any one doing this in-car, it was a little difficult even with the tank out! My elbows barely fit through the tank openings, if your forearms are longer... good luck!
20240818_142845_HDR.jpg20240826_115109_HDR.jpg20240827_112705_HDR.jpg
20240827_111827.jpg20240827_112141.jpg20240827_120214.jpg
 
I was curious about what the stock fuel transfer setup looked like, and wanted to ensure that my foam anti-slosh wasn't interfering with it. Since I have an unneeded fuel tank I took a peek:

20240828_110051~2.jpg
20240828_110607_HDR.jpg
The only external moving part is a spring loaded (check valve?), the blue piece. I feel confident that the foam will not interfere.
I tried removing this part during the foam install and am glad I didn't invest much time. If you can't get 2 hands and tools in there, it's not coming out. 4 plastic tabs lock it onto the mount.
 
Ok, I've got all my Cortex rear suspension out of the wreck, it'll go into this car as soon as I rebuild the axle.
I'm taking a plunge here and doing everything... my first time setting up rear end gears. The axles were starting to show early wear at the bearings previously so I had bought new axles, bearings, seals and a Torsen to replace the Trac Loc a couple of years ago but never had time to install them. I just ordered a Ford Performance ring and pinion set (3.31 out, 3.55 in ) and the M-4210- B2 install kit. I think this should be all the parts I need, am I missing something? After a little cleaning up this should be a completely new axle assembly. I was thinking powder coat untill I saw $$$, so it's going to get paint!

I never liked that Ford didn't see fit to spend a few bucks and paint the axle from the factory. The day I bought that car new I took a look underneath and it was already rusty. And it bothered me more when I installed the Cortex stuff... all that pretty hardware on a rusty axle. Not this time!

Somewhere around here I've got a new Ford Performance aluminum 1 piece driveshaft to mate up to it too.

20240902_164010_(1).jpg
 
I never liked that Ford didn't see fit to spend a few bucks and paint the axle from the factory. The day I bought that car new I took a look underneath and it was already rusty.
Don't know if it's true, but this is a story I heard. When a Ford corporate bean-counter balked at the Boss getting a painted axle, someone on the team explained, "Imagine 20 years from now, and a Boss is rolling across the block at Barrett-Jackson. The chassis cam in the floor shows a spotless engine and transmission going by overhead, then a rust-free exhaust with side pipes, and lastly a rusty axle." The bean-counter replied, "Paint it."
 
In my passion to get this done I didn't get pics of the process. After degreasing, a wire wheel attack of numerous sizes & shapes, a naval jelly bath, paint prep solvent, primer & 2K Satin Black paint, here we are:

20240912_160548_(1).jpg
20240912_160422_(1).jpg

Next... Install new ring & pinion, new Torsen, new axles & bearings
 
Getting my axle & new gears setup properly is taking a bit longer than expected, I've had it apart and together several times searching for a good gear pattern. Ran out of crush sleeves and pinion nuts by incorrectly assuming pinion depth was right, live & learn!

While awaiting more parts I started installing my Cortex K-member that's been taking up space in the garage for months. More room to work in now... YES!!
I found that the mounting holes on the K-Member are a bit larger than the OEM and contacted Cortex for advice, Filip gave me a quick & helpful response, now waiting for 4 plumb bobs to square things up with.
This is great engineering and will allow some room for adjustment if my frame is off a hair.

Gotta love Amazon! I might be dating myself but ordering online sure beats running all over town sourcing stuff!

A preview of the install:

20240923_111417_(1).jpg

20240923_111417_(1).jpg

20240923_110854.jpg
 
Axle update:
I've gone through a few phases of understanding of the process of setting up this gear set in this axle. I still can't explain some of my experiences, but have learned a lot in the process. I think that I've arrived at an acceptable setup and gear pattern but not quite sure which one it is (more below). After assuming that my original pinion shim was all I needed, then my original pinion depth, trying to fool with everything to make these work, then making more or less random adjustments and losing track of what was happening and why, it was time to get methodical about it! It should've been self-evident that every pinion depth change also requires a backlash adjustment, and once I started doing this it was easier to see the actual effect of my depth changes in the patterns. I've also become convinced that measuring the actual pinion depth number wasn't really that important, measuring changes to pinion depth and observing the resulting gear pattern was everything.

From the previous fooling around I had a hunch I needed more than the .027" shim the old pinion gear had. I started over from scratch and wanted to see the extremes of what was happening. I took pics for reference and comparison. The number in the photos is my pinion shim thickness, C or D (coast/drive side), all pics are with backlash adjusted to within .009" - .011"

020C~2.jpg020D~2.jpg
040C~2.jpg040D~2.jpg
Obviously unacceptable patterns but great for reference.

Splitting the difference I tried a .030" shim:
030D~2.jpg
030C~2.jpg
This is much better.

A little more experimenting, this with the original pinion shim .027":027C~2.jpg027D~2.jpgSeems a bit off, I liked .030" better.

One last try just over the .030" that looked maybe OK?:
032C~2.jpg032D~2.jpg

When It comes right down to the finer points of reading slight pattern changes I'm still a bit fuzzy on what I'm looking at, but I think my choice is between either the .030" or .032" shim will be OK?

I more than welcome other opinions on this, much easier for me to fix it now than tear it down again after installing.

One thing I can't explain, why my pinion depth changed from my setup bearing to a pressed on bearing early in my attempts. Still, that setup was wrong at that point anyway. I've got 2 new crush sleeves and nuts coming so, if this happens again at least I'll know how much to change things to achieve my predetermined acceptable pattern if I need to press the bearing twice.

Oh, and about measuring the pinion depth dimension not being important, I will measure it with my chosen shims and setup bearing before and after pressing the final bearing to see if/how much it changes. (wish I knew why this happened)

I've gotten really efficient at removing & installing the differential & pinion during all this, a skill I hope I won't need again for a long time!!!
 
Don't get cocky, kid. I still hold the world's record for disassembly for 1 gear swap... lol.
I wish it was someone else though.
I've n oticed changes like that between my setup stuff and the end setup as well. I don't know if it's because they are different brand gears, or what.
You are giving yourself an education though, 95% of the guys out there would never try a gear change, so you are in a fairly elite crowd.
We are literally talking .005 or lessat this point, so concentrate on the drive side.
 
I finally got my new crush sleeve & pinion nut. I'm pretty happy with my gear pattern so I did my final assembly, but not before replacing my "new" pinion seal. I figured after fumbling with removing/installing the pinion so many times it was cheap insurance, a leaking seal would require another teardown! It would've been a good idea to do all my setup without the seal. Live & learn! I'd like to install the axle housing now to get it out of my way, but as the chassis sits it's fairly tail heavy already, so...

Time for some forward weight. I completed my k-member install. Some plumb bobs to align it square to the chassis:

1000004169.jpg

I transferred my EPAS, coilovers & spindles from my wreck and things got interesting. It seems that with the extended ball joint length on the CorteX arm and the limited free hang range of the aft spherical arm bearing I needed to compress the spring a bit to fit everything together. I'm not sure this bodes well for the aft bearing when in free hang, it kinda binds up on the spacers. Hmmm...
I ended up shimming it in the lowest position to alleviate this condition. Anybody else with the CorteX k-member & arms encounter this?20241002_132922.jpg

I also installed BMR Radiator Support & swaybar with cortex links:
20241002_122447.jpg
20241002_100740.jpg20241002_101024.jpg
 

Buy TMO Apparel

Buy TMO Apparel
Top