The Mustang Forum for Track & Racing Enthusiasts

Taking your Mustang to an open track/HPDE event for the first time? Do you race competitively? This forum is for you! Log in to remove most ads.

  • Welcome to the Ford Mustang forum built for owners of the Mustang GT350, BOSS 302, GT500, and all other S550, S197, SN95, Fox Body and older Mustangs set up for open track days, road racing, and/or autocross. Join our forum, interact with others, share your build, and help us strengthen this community!
IMG_0570.jpg

S197 Eric's Candy Red S197 Build Thread Profile - S197 Mustangs

This site may earn a commission from merchant affiliate links, including eBay, Amazon, and others.

I was just posting a long over due review of the pads. See the new thread I just posted.

 
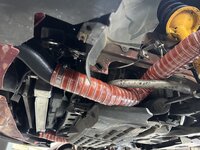
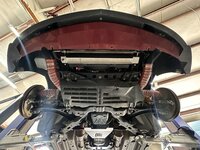
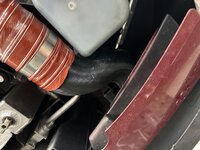
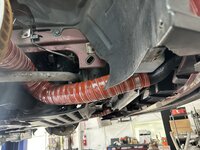
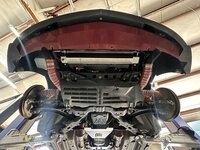
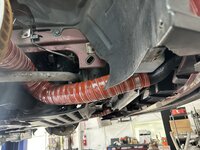
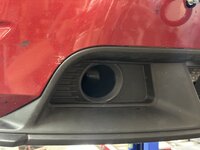
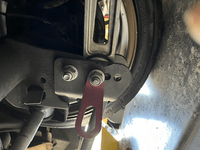
Okay, I had some brake cooling hose inlet ducts designed and 3D printed to facilitate changing hoses as needed. I was tired of removing the front bumper cover to change out the 3" hoses each time I caught them on a tire. This new routing should also help keep the hoses away from the tires. The ducts did not come back as far as I was thinking, so I can't change them from the wheel well like I was hoping. I still need to remove the plastic splash guard underneath, but do not have to take the entire front end off. These were designed to fit the 2011-2012 front end with the Boss/CS lower fascia using the fog light openings with 3" cooling hoses.

IMG_5931.jpg IMG_5934.jpeg IMG_5935.jpegIMG_5929.jpgIMG_5932-1.jpeg

IMG_5935-1.jpeg

IMG_5932.jpeg
 
Okay, I had some brake cooling hose inlet ducts designed and 3D printed to facilitate changing hoses as needed. I was tired of removing the front bumper cover to change out the 3" hoses each time I caught them on a tire. This new routing should also help keep the hoses away from the tires. The ducts did not come back as far as I was thinking, so I can't change them from the wheel well like I was hoping. I still need to remove the plastic splash guard underneath, but do not have to take the entire front end off. These were designed to fit the 2011-2012 front end with the Boss/CS lower fascia using the fog light openings with 3" cooling hoses.

View attachment 90163 View attachment 90164 View attachment 90166View attachment 90167View attachment 90168

View attachment 90165

View attachment 90169
Looks great! Any chance you’ll be making more/selling any?
 
Looks great! Any chance you’ll be making more/selling any?
I have already paid the engineering/design costs. The printing is the cheaper part. The print job takes around 10 hours per side. The shop that did it for me can print more. I am waiting on the price to reprint them. I should no more in a day or two.
 
I just heard back. It is $265 to print each set. Remember these were made to fit the 2011-2012 Mustang GT with the Boss/CS lower fascia and 3" cooling duct hoses. I need to look at a stock GT lower fascia and see if they will fit the back. If so, it may be possible to run a hold saw through to open up the holes. If anyone is interested in a set pm me and I will get you the information to the shop that designed/printed them for me.
 
Regular GT lower fascia isn't going to work. I thought it had the molded in fog lights without the cutouts, but I was mistaken. That design is one I've seen but don't remember where.
 
What material did they use for the inlets? I've got one side done on my Bullitt, but have abandoned the other one for now, as they both need a bit of redesign. I used nylon for the one that's done, but will eventually get them both made in ASA.
 
I'm not an engineer and will not pretend to know the structural properties of the different materials. I do not have the design skills and no nothing about 3d printing. I know my limitations. That is why I farmed this one out. I was not a cheap project but I am happy with the outcome.
 
Most likely nylon. It's a fairly common combo, but I haven't tried it yet. It's fairly expensive, so I'd want to be pretty proficient at getting things set up before I try it. Standard ASA is still kicking my butt at times.
He talked about using a carbon infused material initially but ended up using ASA in the final product.
 
The carbon infused wouldn’t hold form and was losing its shape during printing. He said other cooling ducts previously made from carbon infused material started to show cracking with age. They switched to ASA for durability and printability.
 
The carbon infused wouldn’t hold form and was losing its shape during printing. He said other cooling ducts previously made from carbon infused material started to show cracking with age. They switched to ASA for durability and printability.
I've got several ASA pieces under the hood of my car that have already been through about 4 track day events and they still look new. I switched from ABS when I found out it was very similar, but also had UV resistance. It's way trickier to print than the standard PLA, but it is definitely way more temperature resistant. I'm sure I'll use ASA when it comes time to try making the ducts again. Good to hear he's had good luck with it.
 
Fixed a leaky pinion seal, changed trans fluid and gear lube in preparation for the trip down to Barber on Thursday. The pinion seal was leaking between the metal flange and the housing. I must not have gotten it in right when I did the gear swap last summer. Also noticed something didn't look right with the rear trailing arms when I was under there. The angles looked different.

tempImagePkR542.pngtempImagec6l0Gq.png
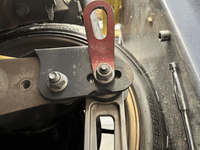
Somehow I managed to put one arm in the upper hole and the other in the middle hole. Not sure how long it has been like that, but it has been a year or so since either one was off. Had to pull a wheel and the sway bar to move the bolt.
 
It has been awhile since I updated this. I have been busy the last month or so. The engine and trans came out to allow the installation of the GT500 oil pan and high flow pump. Also installed new Boss 302R valve springs and Ford Performance timing set to include phasers, chains, guides and tensioners. A big thank you to @steveespo for all of his help in the project. It was a bigger job than I wanted to take on by myself and I couldn't have done it without him.
IMG_1345.JPGIMG_1351.JPG

Oil pan off and new pick up installed
IMG_1355.JPG IMG_1356.JPG IMG_1359.JPG


Timing set
IMG_1357.JPG IMG_1362.JPG

Going back in
IMG_1364 2.JPGIMG_1363.JPG IMG_1366.JPG IMG_1368.JPG

Driving it home I got a cam position cel. We had to tear it back down a few weeks letter. This time with the engine in the car. The passenger side exhaust cam phaser was the culprit. The button in the center that adjusts the timing was stuck about half way in. Not sure why. The button was free with the phaser off of the car. Once you put it on and tighten it the button would stick in place, so the variable cam timing was not working. The phaser was also very tight on the cam. It would not slide on by and and we had to tap it off with a block of wood and a mallet. It was Saturday and we had to get it back together so one of the old phasers was reinstalled. I only have around 50 miles on the car, but no cel and no pending codes.
 

TMO Supporting Vendors

Buy TMO Apparel

Buy TMO Apparel
Top