The Mustang Forum for Track & Racing Enthusiasts

Taking your Mustang to an open track/HPDE event for the first time? Do you race competitively? This forum is for you! Log in to remove most ads.

  • Welcome to the Ford Mustang forum built for owners of the Mustang GT350, BOSS 302, GT500, and all other S550, S197, SN95, Fox Body and older Mustangs set up for open track days, road racing, and/or autocross. Join our forum, interact with others, share your build, and help us strengthen this community!

S197 Ken Build Thread Profile - S197 Mustangs

This site may earn a commission from merchant affiliate links, including eBay, Amazon, and others.

49
60
Exp. Type
HPDE
Exp. Level
3-5 Years
Michigan
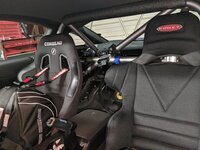
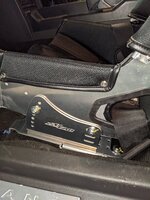
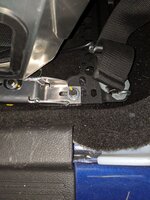
Just to add a couple more pictures for the seat bracket and harness bracket. Seat bracket fit perfectly where the OEM seat mounted to, came with predrilled holes to set the seat forwards and backwards and the slots on the side of the bracket helped position it, a nice arc so tilt can be changed without drilling new holes. The hardest part was marking where to drill the interior side holes in the seat with the center console being there, a good pick tool could scribe it without any issue though. Definitely something you need to have a friend over to help with, and make sure you leave the bottom cushion for the seat in, I pulled it to get it out of the way but added it back when I remembered it had a couple inches of foam in it. You can kind of see the sub-belt bar across the back which has two holes for 5 or 6 point harnesses and is actually steel unlike the aluminum the rest of the bracket is.
Then the bolt that replaced the stud in the second image, I think it was an M12x1.75 but I know for certain the threads into the body were different than the exposed stud for the original seat nut, I went fender washer along with a lock washer and of course paint marks for everything!
PXL_20230817_000424644.jpgPXL_20230817_000453446.jpg
 
49
60
Exp. Type
HPDE
Exp. Level
3-5 Years
Michigan
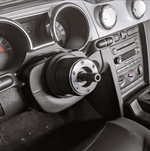
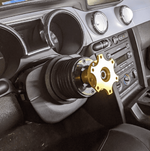
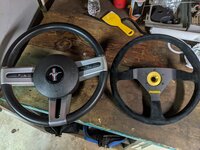
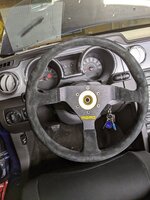
Some more supporting mods for the seat, since it was going to be fixed I wanted to add a removable steering wheel to make ingress/egress a bit easier. The stock wheel was a bit to large and a bit slick, after spending some time with the S550 I liked the wheel size a lot more. I didn't want to go too small to where it was awkward to hold the wheel, the OEM wheel on the S197 was 15" the S550 is 14.5" which was noticeably more comfortable, I really wanted the Ford Racing/Sparco wheel as it has a very subtle flat bottom but it being a 13" diameter made me a bit nervous it would be too small for me so I chose the MOMO Mod 78 which measures at 13.78". I contemplated the Mod 88 which has a more squared off bottom which I like the thought of for leg room but decided to just keep it a circle for now. Lifeline quick disconnect is another PRI find that felt good and was priced good, realistically I wasn't really sure what made any of them good or bad so just went with what I found. Just a generic MOMO/OMP hub adapter to attach the quick connect to as well.
The wheel with the suede has been a big help as it's easier to grip and the smaller diameter makes it easier to make some quick turns and the added bonus of removing a chunk of weight between the larger wheel, airbag, and clock spring
Screen Shot 2023-08-18 at 9.01.40 PM.pngScreen Shot 2023-08-18 at 9.01.58 PM.png
PXL_20230112_232828529.jpgPXL_20230112_233436832.jpg

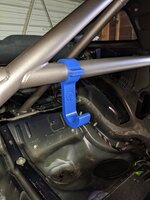
Then some 3D printing fun to make a hanger for the wheel using a design I found off the internet! Looking to try and see what else I can 3D print for the car as well
PXL_20221231_175532651.jpg
 
49
60
Exp. Type
HPDE
Exp. Level
3-5 Years
Michigan
Nice... Superbeater approved.
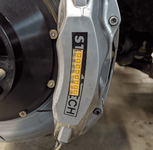
How do you like the stop tech brakes?
Appreciate it!
I have mixed feelings on the Stoptechs to be honest, so I got them since they are a two piece rotor so less rotational weight, the 4 piston was an easy call and man do they stop the car darn good. But if I were to do it again I would probably go with the 07-09 GT500 4 piston Brembo's. The replacement rotor rings are a lot more expensive than I expected and I should have done a little more research on replacement parts, I think pads are similar between the two calipers but I could have saved some money on the upfront cost as well.
I don't regret them to any extent they have been very consistent and arguably my lack of adequate brake cooling may have been the cause of some early rotor failures so I have some of @Fabman ducts on now that I am anticipating that to help reduce rotor ring failure but that should translate to if/when I get the Brembos as well
 
49
60
Exp. Type
HPDE
Exp. Level
3-5 Years
Michigan
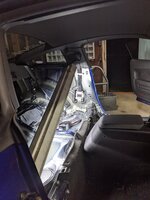
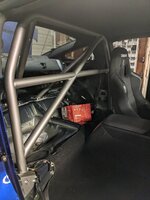
The last supporting mod for the new seat was the cage obviously for safety but also for a better attachment point for the shoulder harnesses. Went with the Watson Racing 4 point cage largely because they are local to me so I can save the extra freight shipping charge and just go pick it up from them. Install wasn't terribly difficult, it seems my car had a slightly larger drivers side corner gusset where the main hoop attaches to so to get it seated fully down where it needed to be I had to have someone pull it down and then mark the holes on the corner. There was some fore/aft movement for the main hoop so it has to be taken into consideration where exactly the rear bars are landing as they should be centered over the rear axle hump before everything is drilled and tightened. While installing one of the gussets after it was drilled for the main hoop attachment points I ended up snapping a bolt off so all the bolts that came out just got replaced with equal grade hardware, I am not sure if these are torque to yield or anything like that from the factory but at the very least they are not designed for many on/off cycles so for $30 of hardware and some thread locker it was mostly peace of mind.

PXL_20221217_233422128.jpgPXL_20221229_231521620.jpg
Of course I just put the old drivers seat in the passengers spot and got the obnoxiously heavy seat, seat belt, and harnessing out of there to lighten things up a bit. These OEM seats were much heavier than I thought they would be so I am happy to be able to pull them as the side quest this season has been weight reduction. The front still has some interior to help class better for SCCA Time Trials, the spherical bearings already place the car into Max 2 and if I understand the rules correctly no interior (or not enough interior) puts you into the Unlimited class which Max 2 is already incredibly optimistic for this car as that puts it up against some pretty powerful and new machines which really doesn't make sense but that is a conversation for another time
PXL_20230731_011659444.jpg
 
49
60
Exp. Type
HPDE
Exp. Level
3-5 Years
Michigan
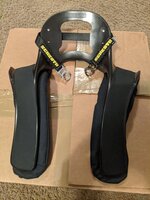
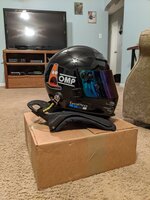
After seeing a couple pretty good crashes and due to the wife and I expecting our first kid, I decided to add a FHR to the mix. I went Schroth since I visited them at PRI and they had an entire setup with seat that you could try out. Was a little hesitant of the Flex system due to it having the hinge point and it came with pretty stiff pads so I went with the standard Super Sport XLT, it took an afternoon to get used to but with more and more organizations requiring that especially in higher levels it made the most sense to get it. Another nice thing with the Schroth over other brands was they included the helmet posts where others you have to buy them separate, really a one time cost but it still adds $60 if you need them. Pads are comfortable and the winglets on the edges hold the harness well.
PXL_20230104_024407510.jpgPXL_20230104_024630356.jpg
 
49
60
Exp. Type
HPDE
Exp. Level
3-5 Years
Michigan
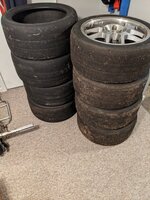
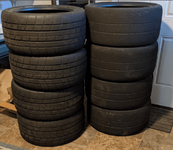
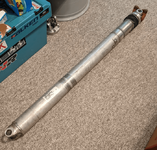
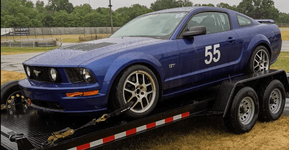
After having a miserable time in the rain with the 315's and wanting to eventually transition to Spec Iron the main goal in the off season last winter was to find some GT500 wheels and put some tires on that had a better tread for the wet. In combination with being a narrower wheel it is a pretty heavy wheel as well. Found a set down in NC and made a very impulsive decision to make the 1,200 mile trip to grab the wheels, the seller also had some new Toyo RA1's which I could grab along with some used slicks tossed in for free. The last piece I grabbed was the aluminum drive shaft which I want to get the balance checked along with a new dust boot and u-joints, depending on how much it takes to get to a good condition I may just end up getting a new one and being done with it but we'll cross that bridge when I actually get it checked out. The main concern for me is there is a spot where it was contacting the safety hoop so it has a bit rubbed thin and if I remember correctly it's not particularly thick aluminum to start with but after taking the iron two piece off when I did the clutch I absolutely want to ditch that and put something lighter on.
First track day of the year was eventually wet, ran the 315's for a session or two as it was more damp then wet then we got some standing water and after a tire change it was an even bigger difference than I imagined, I have no idea why I didn't do this sooner. Now I just need to build some storage out in the garage to hold them and get some heat out there to help them keep through the winter.
Someone taking pics at the track managed to get a couple shots of the car in the wet, of course it was before the tire change, but the GT500 wheels suit this car nicely.

PXL_20230226_142358987.jpgScreen Shot 2023-08-28 at 6.21.00 PM.png

Screen Shot 2023-08-28 at 6.28.13 PM.png

Screen Shot 2023-08-28 at 6.49.53 PM.pngScreen Shot 2023-08-28 at 6.51.48 PM.png
 

Bill Pemberton

0ld Ford Automotive Racing Terror
8,496
8,497
Exp. Type
Time Attack
Exp. Level
20+ Years
Blair, Nebraska
You are getting Trackitis quite quickly and it looks like a bad case! Just be forewarned that you are now ready for contagious fun and there is no cure! Welcome to TMO, we all have the sickness!
 
49
60
Exp. Type
HPDE
Exp. Level
3-5 Years
Michigan
Almost caught up with the mods.
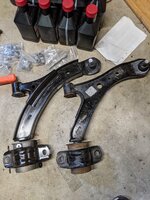
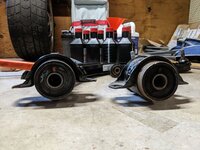
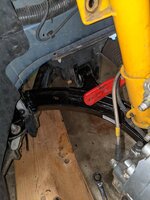
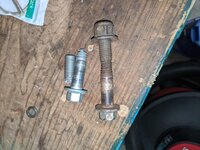
Next up was the continuation of preventative maintenance and refreshing some of the old rubber. Despite Spec Iron not allowing this from what I can tell, I decided to add the Ford Performance front lower control arms, cheaper than the bushing only set by a few hundred dollars, comes with an upgraded ball joint, thicker steel, better design overall and a denser rubber bushing for the front and rear bushings. Overall install wasn't terrible, mildly annoying the steering rack has to get loosened to get the front bolt out, ball joint bolts need a large hammer to break loose, torquing the rear bushing was rather tedious given the lack of space, doing it again I would invert the orientation of the capture nut and bolt so that the bolt is on the bottom and running the torque on those wouldn't be very difficult. Hard to see in the second picture but the rubber bushing on the right was showing its age but not nearly as bad as some other bushings on the car. My lesson learned was that either someone incorrectly stated the ball joint bolt torque or I misread the component they were referring to, regardless, apparently ball joint bolt torque is 76lb/ft NOT 129lb/ft, I broke the original hardware going to 129, assumed old and probably one time use anyways. Imagine the frustration when I broke a brand a new OEM bolt trying to get 129, thankfully the kit comes with 4 not 2 so I had some extras.
PXL_20230630_213541909.jpgPXL_20230630_213552859.jpg
PXL_20230630_220633059.jpgPXL_20230716_165953361.jpg

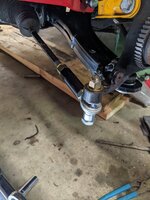
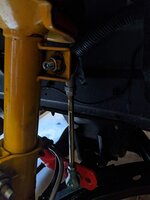
I figured while I was in there I may as well swap out the outer tie rod ends for some Maximum Motorsports bump steer ends along with some adjustable swaybar end links.

PXL_20230703_164734382.jpgPXL_20230703_164745373.jpg

Ran an SCCA Time Trial event after these changes and it really woke the car up, the front felt much more predictable and I would have to go check some data but it seemed the straight aways could be lengthened slightly as turn in was less pushy so it could be initiated later than with the original control arms. A fun first TT event but I either need to pull the spherical bearings out to drop a class or drop some serious weight to make the car more competitive for the M2 class but I was really just looking for some seat time and there was plenty of that so overall it was a good weekend
 
49
60
Exp. Type
HPDE
Exp. Level
3-5 Years
Michigan
You are getting Trackitis quite quickly and it looks like a bad case! Just be forewarned that you are now ready for contagious fun and there is no cure! Welcome to TMO, we all have the sickness!
It's a hard itch to scratch! There's always those nagging improvements that NEED to be made
 

Fabman

Dances with Racecars
6,553
8,204
Exp. Type
W2W Racing
Exp. Level
20+ Years
Pleasanton: 1/2 way between Sonoma and Laguna Seca
Here’s an idea, eyeball the bump like 90% of people do and then check it with a proper bump gauge….you’ll never eyeball it again.
 
49
60
Exp. Type
HPDE
Exp. Level
3-5 Years
Michigan
Yeah I just eyeballed it but then took it to an alignment shop, getting the equipment/knowledge to do that stuff in the garage in on my short list
 

Fabman

Dances with Racecars
6,553
8,204
Exp. Type
W2W Racing
Exp. Level
20+ Years
Pleasanton: 1/2 way between Sonoma and Laguna Seca
Yeah I just eyeballed it but then took it to an alignment shop, getting the equipment/knowledge to do that stuff in the garage in on my short list
An alignment shop won’t have a proper bump gauge, regardless of what they may tell you.
 
49
60
Exp. Type
HPDE
Exp. Level
3-5 Years
Michigan
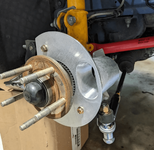
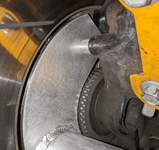
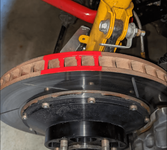
Even though I had the brake cooling deflectors I was a bit skeptical of how much air was actually making its way to the rotor and more importantly through the vanes, I have already toasted one set of rotors rings a bit sooner than I probably should have. In all reality I think the deflectors are a good option and do move a lot of air with less material (i.e. hoses) but for me since I couldn't confirm where the air was actually making it I wanted to try something new. So after some talks with @Fabman I decided to try out a set of his brake cooling ducts, since I'm stock motor I figured 3" would be plenty, and hoses would be easier to route. While we're at it I am working to gather some actual rotor temp data to see how hot things are really getting as well as how hot the calipers are getting. Overall fitment was a breeze, the spacers provided set the duct backing plate perfectly in the rotor. Install didn't take long, just pop the caliper off and the rotor off, I threw a bead of loctite on the bolts and mounted to the steering knuckle where the dust shield previously mounted.
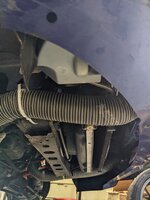
I didn't get overly detailed in my previous post discussing the brake cooling but I just have a pair of 3" Allstar flanges mounted to the outside section of the lower grill, just a hole saw and a few bolts and it fits well, I also decided to add a small mesh of 1/4" fencing to keep some rocks and debris out of the hose, so all of that got reused. With these ducts I changed up the hose to dual wall which is very smooth on the inside so airflow should be much smoother but it was a little more difficult to work with just being stiffer overall. Routing was probably the hardest part but really not bad, the hard part being setting enough hose so that it stays on full lock when turning that side out and doesn't kink on full lock the when turning in. I ended up using the edge of the frame rail (I'm not sure that is the correct terminology?) as a mounting point and the sway bar as the other. I followed the sway bar to clear the tires and that was successful and these are 315's in the front. After some driving one side crept up and had some hose rub from the wheel so that'll get adjusted.
Screen Shot 2023-08-30 at 6.17.48 PM.pngScreen Shot 2023-08-30 at 6.19.48 PM.png
PXL_20230805_230345238.jpg

Screen Shot 2023-08-30 at 6.18.30 PM.pngScreen Shot 2023-08-30 at 6.20.18 PM.png
 
49
60
Exp. Type
HPDE
Exp. Level
3-5 Years
Michigan
An alignment shop won’t have a proper bump gauge, regardless of what they may tell you.
right, sorry. I just meant I try and eyeball it as straight I can and let the alignment shop get the last little bit so it runs true straight.
 

Fabman

Dances with Racecars
6,553
8,204
Exp. Type
W2W Racing
Exp. Level
20+ Years
Pleasanton: 1/2 way between Sonoma and Laguna Seca
right, sorry. I just meant I try and eyeball it as straight I can and let the alignment shop get the last little bit so it runs true straight.
All they can do it set the toe. If you have camber plates you might get a full alignment but they will not be able to check bump.
 

Fabman

Dances with Racecars
6,553
8,204
Exp. Type
W2W Racing
Exp. Level
20+ Years
Pleasanton: 1/2 way between Sonoma and Laguna Seca
Back when photobucket was a thing I used it to post a video here on TMO when I set the bump on my car like most people do and then put a gauge on it and showed how bad it was. When photobucket deleted everybody’s data I lost that link. I may have a copy somewhere and I’ll post it up if I find it. It’s eye opening.
 
Last edited:

Fabman

Dances with Racecars
6,553
8,204
Exp. Type
W2W Racing
Exp. Level
20+ Years
Pleasanton: 1/2 way between Sonoma and Laguna Seca
I wish you were closer, I’d help you out with that.
 

Fabman

Dances with Racecars
6,553
8,204
Exp. Type
W2W Racing
Exp. Level
20+ Years
Pleasanton: 1/2 way between Sonoma and Laguna Seca
Here you go:
Bump kit just thrown on, uncorrected bump. .240 out in 2 1/2” of travel.
That’s 1/4” per wheel!

 
Last edited:

TMO Supporting Vendors

Top