The Mustang Forum for Track & Racing Enthusiasts

Taking your Mustang to an open track/HPDE event for the first time? Do you race competitively? This forum is for you! Log in to remove most ads.

  • Welcome to the Ford Mustang forum built for owners of the Mustang GT350, BOSS 302, GT500, and all other S550, S197, SN95, Fox Body and older Mustangs set up for open track days, road racing, and/or autocross. Join our forum, interact with others, share your build, and help us strengthen this community!
Boss Track Attack Banner.jpg

S197 Laguna Seca (302SX) Build Thread Profile - S197 Mustangs

‘13 Boss 302 LS to a street 302S (Hence 302SX)

This site may earn a commission from merchant affiliate links, including eBay, Amazon, and others.

I'm enjoying seeing all the modifications you've made to your car. The navigation upgrade is very impressive. I also appreciate the fact you went through the trouble of getting proper rights-holder clearance to use the Laguna Seca track logo for your sill plates.

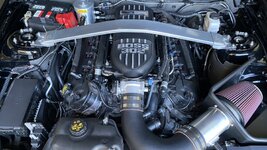
Steeda says the larger MAF in their Boss CAI requires a tune. Who did you use for that? As far as I've found, using an SCT tuner will erase the TracKey programming. HP Tuners can retain the TracKey, but most tuners seem to prefer the SCT devices.
 
Thank you for your compliments and question Dave. The Steeda CAI has a ‘sleeve’ option that makes it so a tune is not required and I can maintain the TracKey while still flowing better than OEM.


It’s a bit like members who installed the Ford 90mm TB and/or shorty headers and did not get an aftermarket tune. Are we getting the most out of the parts, no. But it does allow us to push the TracKey tune to the maximum. In a future posting, I discuss using the ProCal II to expand my options further.

I have heard rumors of tuners who claimed they could keep or tune TracKey. There was a tuner in Canada that claimed they could actually use dual tunes to the keys like Ford. When I called they sounded pretty sketchy.

Here is a video of a guy having it done.


I don’t see how they can alter the OEM tunes without some form of lockout or codes being thrown. I have not seen or heard of any US tuners doing this, perhaps this is what HP Tuners is doing?
 
Here is a video of a guy having it done.
Ayup, he mentions a couple times they're using HP Tuners software / hardware to do the tune. The trick is for the tuning software to recognize the 2 different tunes stored in the Powertrain Control Module (PCM aka ECU) when the TracKey is programmed / installed. As far as I know, only HP Tuners can do this (it shows the "red key" tune parameters on a separate tab) - all other tuning products only recognize one tune in the PCM and you lose TracKey if you overwrite the PCM tune with them.


The problem is that the go-to guy for Coyote track tunes only uses SCT tuners.
 
Very interesting @Dave_W . Looking at their website, they have zero reps or vendors in the U.S. - that only leaves remote tuning as an option, which, given the specifics, may require a lot of communication back and forth to achieve something meaningful. It would also cause me concern if something were to go wrong. Having never used a tuning element outside of Ford, I do not know the pitfalls of SCT versus others. I do recall Lund having a pretty slick unit that could nest in your driver's side air vent, but that was many years ago. Technology has likely improved.
 
Upgraded Fan, FRPP Front Bumper Beam, and Beginning the Install of Air-to-Oil Cooler (9/8/2021)

This was a relatively small modification at the onset, and I simply wanted to increase the cooling of the car. Being a black car in a location that regularly sees 90+ degrees in the summer, I noticed underhood temps were higher than I was comfortable with, so it seemed like an opportunity to continue towards the ‘race’ hardiness. Additionally, with the open CAI, I was also seeing intake temperatures that were higher than I was comfortable with, given the garbage fuel we have here in Colorado. For reference, the maximum octane available at 95% of stations is 91. The modification was to upgrade the electric radiator fan from the OE (DR3Z-8C607-D) to the one used on the ’13-’14 GT500 (M-8C607-MSVT). The installation was very straightforward and simply required a small move of the coolant overflow tank and the CAI. I will also say to use caution on the bumper cold air intake feed. The tabs can easily break if you are not careful with its removal.

While these elements were removed, it seemed like a good time to remove the bumper and install the FRPP Front Bumper Bar (M-17757-MB) that had been sitting in my parts collection for months. To install the beam requires removing the front crash beam. I saw a variety of responses on how easy it was which ranged from easy to PIA. Mine, sadly, fell on the PIA side. Each side of the beam was spot triple spot welded. I had to cut larger access holes, go through a handful of drill bits trying to break the spot welds, and then use a massive prybar to break what elements remained. I honestly thought going in that it would be a 1-hour job to remove and mount, and it ultimately ended up being about 4 hours of “WTF did Ford do to this brace.” Once removed, the frame mount was raw from my efforts so I cut away the old spot welds and then used Rust-oleum satin high temp spray to protect the exposed steel. In terms of weight savings, the OEM beam was 14.4lbs and the 302S/R bumper is 9.2lbs including the FRPP tow ring.

Cutting the front bumper was pretty nerve-wracking as I wanted the hole cut for the tow ring loop to be as small as possible. Using chalk and painters tape inside the bumper, I was able to get an approximate idea of where I needed to start. I was also fortunate to find a TMO member who provided some internal measurements. I don’t recall where the photos came from on the forum, but many thanks. Essentially, with the chalk marks and the measurements I was able to use my Dremel to make a very small slit. Then, after about a dozen back-and-forth mountings, I was able to cut the hole so that approximately 1mm of clearance exists on both sides. I chose to initially mount the tow beam with the OE foam in place. I had read that a few members saw sagging in their bumpers and wanted to ensure the plastic remained taut. The final addition was that some counties in Colorado require a front license plate. Using the OE tow hook bolt, I went to Home Depot and TCS and was able to find the equivalent along with some thick washers/spacers that could be welded to a front license plate holder I got from eBay. Thus far, the solution has worked well. My county does not require a front plate, so I rarely use it, but if I do take the car into Denver County, I have an option to throw the plate on when parked to avoid a fine. Hooray for bureaucracy.

With the bumper beam out of the way, I chose to tackle the beginnings of my Air-to-Oil cooler project. Had I known my end goals sooner, I would have bought the FRPP M-6642-MBA kit. Sadly, it was long discontinued by 2021. So my goal then became to duplicate this offering as closely as possible to keep with my OEM approach at the onset. Fortunately, Ford was kind enough to release a BOM and took enough photos to allow me to know exactly what parts were used. For those interested in doing something similar, here is what you need (Parts Purchased in November 2020)

  • TrackMustang (Setrab 9 Series Mounting Brackets @06mach1) - $80.00
  • Amazon (Canton Sandwich Filter PN#22-549) – $88.89
  • Amazon (Setrab 22-M22-AN10-SE ProLine Adaptors) – $28.32
  • Amazon (Setrab 9 Series ProLine 15 Row Oil Cooler PN:SET50-915-7612) – $180.94
  • Amazon (Paint Correction w Rustoleum Black) - $7.64
  • JEGS AN Line Plumbing using XRP Braided Nylon 10ft (302S Oil Cooler Lines) - $97.80
  • JEGS 30 Degree XRP -10AN BB Fitting (302S Oil Cooler Lines PN: 203010BB) - $62.14
  • JEGS 180 Degree XRP -10AN BB Fitting (302S Oil Cooler Lines PN: 100010BB) - $25.94
  • JEGS AN XRP Fittings from Oil Cooler (302S Oil Cooler Lines PN:XRP981610BB x 2) - $22.44


The first task was to install the @06mach1 bracket and the oil cooler. The directions from Mach1 were very well illustrated, and the installation was quite simple. It also helped that the bumper beam was completely gone, so I had unrestricted access. Some small drilling was required, but given what was just done with the OEM bumper beam, it was a breeze. I also still had the Rust-Oleum handy to protect any exposed metal created by the project. Once the cooler was mounted, I then used fabric tape to determine the length of the hose needed. Ten feet was about right, but 15 feet would have been a bit easier. You can always shorten the lines, but once they are cut, you are set. I left the cooler in place, used the OE Setrab plugs to seal the unit, and moved on to other projects while I waited for parts.

GT500 Fan Install
IMG_2067.JPG
Photo of original M-6642-MBA Kit to duplicate with parts above
Boss 302S Oil Cooler.jpg
Drilling holes for @06mach1 9-Series mount
IMG_2340.JPGIMG_2343.JPGIMG_2350.JPG
IMG_2345.JPG

Spot Welds in OEM Bumper Beam
IMG_2286.JPGIMG_2288.JPG

Drilling and Cutting Begins to Break Spotwelds...
IMG_2292.JPGIMG_2294.JPGIMG_2296.JPG
IMG_2295.JPGIMG_2293.JPGIMG_2298.JPG

Time to clean up the frame mounts, progression of drilled, to cut clean, to painted
IMG_2298.JPGIMG_2314.JPGIMG_2313.JPG
Painting exposed frame ends OEM crash beam removed
IMG_2315.JPG

Installing Air-to-Oil Cooler, lines were ordered
IMG_2817.jpg
IMG_2821.jpg
Mounting the 302S/R bumper beam
IMG_3147.JPG
IMG_3148.JPG
IMG_3151.JPG
Front Plate installed via Tow Loop
IMG_5912.jpg
Underside of front beam
IMG_3172.JPG
  • GT500 Electric Radiator Fan (M-8C607-MSVT)
  • Boss 302S/R Front Bumper Beam with Tow Ring (M-17757-MB)
  • Custom FRPP Air-to-Oil Cooler (M-6642-MBA) (Discontinued)
FRPP ProCal and Boss 302S SD Tune (6/20/2022)

Given that I was getting closer to my 302SX goal, I thought I would reach out to my contact at WR to see if they still had the Boss 302S engine tune. Unfortunately, he informed me that Ford Racing had tuned the engines prior to delivery at WR. Knowing that the ProCal II is a bit dated, my first effort was to find one that was complete. eBay helped, but also had some hiccups. The OE ProCal has a very unique OBDII cable that uses a different voltage than a generic OBDII cable. I initially bought a ProCal and was convinced I could find an OBDII cable that would work, but after multiple attempts with a variety of vendors, I was stuck. Fortunately, another ProCal came up on eBay and had the OEM cable. I was able to choose between the two units (one had the backlight still working, the other was not), so I sold the lesser unit and now focused my attention on the Boss 302S engine tune. I contacted a few Ford Performance individuals I had worked with on my other projects, and was lucky enough to secure one of the last OEM SD cards from the 302S program. The tune itself is not too special, hence why 90+% of owners replace it with an aftermarket one, but staying OEM was the goal, and so that is what I have done. No modifications have been needed with the tune (I expected long tubes would have been needed), as I have the option of choosing between a 91 octane tune or the Sunoco 260 GT. There is a very noticeable boost in throttle response with the 260 GT fuel, being oxygenated and of a slightly higher octane I assume the timing and perhaps the VCT are adjusted. It feels similar to the TracKey mapping from an engine braking perspective. I just went through Colorado emissions testing and had no issues, so all in all, it was a huge win for the 302SX effort.

From Step 6 of 302S Owners Manual: Use scroll arrows to select desired calibration. The text that will be displayed on the Procal screen is in bold and the parenthesis contain the description of each file.
  • 260GTX (Sunoco 260 GTX fuel calibration)
  • 91+ OCT (91+ octane fuel calibration)
  • 91+ OCT 2500 (91+ octane fuel calibration with 2500 rpm rev limit)
Boss 302S 91oct or 260GTX ProCal Tune (Discontinued)

IMG_3142.jpg

First Attempt at Upgrading Audio System (8/25/2022)

Using the time available, I next looked at improving the audio system. While the navigation system was an enhancement from the OE radio, it still was not sounding as I would have liked. In this first audio enhancement attempt, I wanted to look at having a DSP amp installed and upgrading the OEM paper speakers. In conducting research, I settled on the MATCH UP 7DSP. Not only did the MATCH amp provide the power bump I was seeking, but it would easily integrate with the OE head unit but take on all of the audio processing and power delivery. It also allows for custom calibration that can be saved directly into the OE head unit. When driving, I can choose between a ‘broad’ feel that creates a sound equal for both driver and passenger, or I can select a ‘narrow’ feel that has been calibrated specifically for me in the driver's seat. It is not too dissimilar to what I have done when calibrating my home theater systems with ATMOS. While I have no skills at 12v, I certainly appreciated the enhancement. While the amp was being installed, I also purchased OE GT500 door cards. My thinking was that the GT500 door cards having an integrated bass speaker unit which would negate me needing a subwoofer. Ultimately, the amp was a success, but the JBLs from 2019 and the GT500 door cards were not a sound or look I was happy with…more to come on the audio front.

IMG_4322.jpgIMG_4319.jpgIMG_4320.jpg
IMG_5041.jpgIMG_5042.jpgIMG_6787.JPG

While the audio system was being updated, I also took the opportunity to update the interior and exterior lighting on the Boss. I converted the interior lights to LED, added a Starkey footwell light (a surprising bonus when working under the dash), and replaced the exterior lamps (license plate and fender signals) with Diode Dynamic LEDs. For the fender lamps, I also went with clear as opposed to the yellow and red. While this was a deviation from ‘stock’ appearance, I like the look a lot better having seen it on a number of black Porsche’s. The fender lights still display the appropriate color of yellow and red, but when not illuminated, they are clear.

IMG_6783.JPGIMG_6784.JPGIMG_6785.JPG
  • MATCH UP 7DSP (M117001)
  • JBL GX862 x 4 w Baffels (Removed and sold)
  • GT500 Shaker Door panels (Discontinued, removed, sold)
  • Diode Dynamics - LED Map Lights
  • Diode Dynamics - LED Trunk Light
 
Last edited:
FRPP Rear Bumper Beam (5/26/2023)

The installation of the FRPP Rear Bumper Beam (WR-RRREARBUMPER 2005-2014) was SO much easier than the front unit. No spot welds to deal with at all. Just a simple socket wrench. Also, I see that the rear beam for our cars is discontinued through Watson Racing, but Lethal Performance may have some in stock. You could also try Kohr if they are still in operation.

The main challenge with the rear bumper beam is that it, too, requires a cut in the exterior bumper shell. Using the same method as the front bumper shell, I covered the interior of the bumper shell with painters' tape. Then I used my kid's concrete chalk to cover the tow loop mount. Mounting the bumper left a small imprint and showed me where to begin cutting. I started with a small slit and then progressively cut more until the loop passed through. Similar to the front, I have about 1mm clearance on all sides. The next step was cutting the license plate. I DO NOT ENDORSE ANYONE MODIFYING A STATE-ISSUED LICENSE PLATE. That said, it is fairly simple to mount the plate with the bumper shell off, scribe the back of the plate through the tow loop hole, and make the cuts needed. Colorado is fortunate to have a broad variety of colors and designs for license plates, so I chose one that hides the loop cut almost entirely. They recently released all black license plates in Colorado, so that may be my option in the future, as that option would make it invisible. Shout out to @SC Boss for his posting as well.

IMG_4431.JPGIMG_4433.JPGIMG_4434.JPG
Yellow Chalk Added to Tow Loop Extension
IMG_4435.JPG
Add Painters Tape to Rear Bumper Shell and Reinstall with Press to Transfer Chalk to Tape
IMG_4437.JPG

Cut SMALL oval slit and progressively increase size of hole until beam loop passes through
IMG_4440.JPG
IMG_4439.JPGIMG_4438.JPGIMG_4441.JPG

Adjust the plate to accommodate the pass-through and add FRPP tow loop to confirm fit. Do not drive on street with FRPP rear loop in place, regardless of the state, you WILL get stopped
IMG_4442.JPG

Boss 302S/R Bumper Beam with Tow Ring (WR-RRREARBUMPER 2005-2014) (Discontinued)
 
Significant Steps Towards Boss 302SX Goal (1/24/2024)

Similar to the mods performed in November 2019, I saw that the collection of parts in my basement was growing larger than I could keep up with or had the skill to install myself. With the car nearing 5000 miles, it felt like a good time to get some work done over the winter. I once again enlisted the help of 3R Performance in Denver, CO, to install a collection of 302S/R parts.

The largest item was a custom Watson Racing 4-Point Roll Bar. The roll bar was customized at Watson Racing to include an additional angle beam and taco gussets. These were requested to mimic better the full cage used on the road race cars like the 302S. I had the roll bar sent to me raw (first photo) so that it could be further modified on-site to accommodate my height (slight rear tilt) and seating position. Once installed, I had the custom 4-point bar and the OEM Laguna Seca X-Brace sent off for matching powder coat. For reference, the OE powder coat used by Ford in the Prismatic color line is ‘Speedway Grey’ #PMB-4911.

Holmes Custom Cage Unpowdercoated.jpgGusset Welded 1.jpgGusset Welded 2.jpg
302 Cage Install 1.jpg302 Cage Install 3.jpgBoss 302SX Cage Installed 2.JPG
Boss 302SX Cage Installed.JPG

The next part on my install list was the Boss 302S aluminum radiator (M-8005-MGT). It appears that this part has also been discontinued. I don’t know if it is a huge upgrade over the OE, but the all-aluminum hand construction certainly seems far superior to the thinner unit with plastic end caps. Typical for 'handmade' Ford parts, not all elements were welded and required a quick fix

IMG_3078.jpgIMG_2420.jpgRadiator weld fix (top tab was loose).jpg
IMG_5494.JPG

I also added the air-to-oil cooler I started back in September 2021, as I was never able to get the lines to navigate properly through the frame. Knowing that I was going to have professionals installing the system, I also opted for the Boss 302S radiator enclosure (WR-RADENCLOSURE). While the enclosure itself is not that special (custom is likely the better option), I selected it because it was OE on the 302S, has cutouts to accommodate the FRPP front bumper tow beam, the oil cooler lines, and custom notches for the OE 302S grill intakes. I certainly don’t regret the decision, as once in place, it is outstanding in appearance and function.

Minor adjustments needed to the enclosure to accommodate the OE mounting system
IMG_2523.jpg
Mounted with lines in place, with front bumper beam
IMG_5487.JPGIMG_5491.JPG
Added bonus to the enclosure is that it creates a clear funnel to the CAI
IMG_5489.JPG
Lines from underneath
IMG_5501.JPGIMG_5502.JPGIMG_5495.JPG
In place...
IMG_6019.JPG

To support the oil modification, I also opted for the Boss 302S/R 12QT racing pan (M-6675-M50BR). Similar to the enclosure, I am sure that aftermarket options are cheaper and provide as good, if not better, performance, but being OE on the 302S/R was special to me, and it perfectly fits the K-member for an enhanced flat bottom from the splitter. I believe the part is discontinued, but I would imagine that the FP350S unit would work similarly well. The greatest concern was the manufacturing errors highlighted by @captdistraction. Many thanks to him for his efforts, as I was able to have my pan and pickup tubes cleaned and enhanced prior to installation. I also need to send many thanks to @BigTaco. Having done a similar install, he was able to send me a modded Laguna Seca trans cooler scoop that mates to the racing pan.

IMG_5503.JPG
See the notch...
IMG_5504.JPG
Don't forget the oil level adapter...a new bung was needed
IMG_5509.JPG
Great fit...
IMG_5505.JPG

I also noticed that I was getting some slight rubbing in my front wheels when at full lock, so I opted for the Maximum Motorsports (MM5TR-2) units as they were purported to be used on the early 302S/302R cars.

IMG_5507.JPG

To support a future brake conversion, I also opted to have a standalone clutch reservoir and FRPP stainless steel clutch line installed (M-7512-A). This was the same line used on the FR500’s and Boss 302S/R cars. The dedicated reservoir is from a Pontiac GTO (#92065790). The final element was a custom bracket. Using a write-up on S197forum and TMO, I was able to measure the OE holes in the fender lip and build an L-bracket and have it powder-coated black. I am still not completely happy with the look, but it seemed better than the Shelby option that was available. To complete an OE look, I purchased the brake reservoir from the Mustang GT automatic (9R3Z-2K478-B). While you can certainly plug or block the nipple on the manual reservoir, it would not look OE in my view. Unfortunately, for those looking to perform this mod, I don’t believe the automatic brake reservoir is available any longer. My next step is to find a cap that does not have yellow highlights, as it distracts from the OE appearance next to the OE brake reservoir. Open to lid ideas...

IMG_5493.JPG

It was a big list, so having it all done over the winter when I would not miss the car was ideal for the project. The shop was able to come down with an enclosed trailer, install the parts, and bring it back to me.

  • Watson Racing Custom 302SX Roll Bar (WR_BOLTINCAGE)
  • FRPP Aluminum Radiator (M-8005-MGT) (Discontinued)
  • Custom FRPP Air-to-Oil Cooler (M-6642-MBA) (Discontinued)
  • Boss 302S/R 12QT Oil Pan (M-6675-M50BR)
  • Maximum Motorsports Bump Steer Kit (MM5TR-2)
  • Standalone Clutch Reservoir (GM #92065790)
  • Standalone Brake Reservoir (Ford # 9R3Z-2K478-B) (Discontinued)
 
Last edited:
I'm probably being pedantic, but that is a technically a roll bar, not a roll cage.

Nice work on all your modifications, very impressive. And it does look like the auto reservoir is unavailable - I'll probably have to try to find one at a junkyard.
 
I'm probably being pedantic, but that is a technically a roll bar, not a roll cage.

Nice work on all your modifications, very impressive. And it does look like the auto reservoir is unavailable - I'll probably have to try to find one at a junkyard.
That is not at all pedantic :) That is a great highlight as it certainly is a roll bar. When writing, I saw the part number (WR_BOLTINCAGE) and ran with it. I will see if I can edit the above for accuracy.

For the reservoir, yes, it is discontinued, so a yard, eBay, or search on Car-Part would likely yield the best results. If you are looking for it to appear OEM, the challenge is to find a unit with a similar patina to the rest of your engine bay.
 
Boss 302SX Brake Upgrade (12/26/2024)

This has been a project that I have been working on for quite some time. I know I have frustrated many TMO members with my questions regarding brakes and brake caliper/rotor options. Thanks to those of you who have consistently entertained my imagination. My initial plan was to mimic the plan outlined in ‘Huge Brake Upgrade for S197’ by using the S550 setup. So, in November 2018, I bought 2015 50th anniversary calipers, but decided shortly after that it was not the direction I wanted to go, as it would be mixing generations and could impact braking performance. I next reached out to @Paul@PAE in 2020. He went above and beyond to provide me options while also connecting me with Brembo so I could better understand the differences between race calipers and street calipers. While my original intention was to go with race calipers (Brembo XB105) as these were utilized on the Boss 302S, the noise and limited pad selection were my greatest concerns, so the search continued.

Brembo XB105 4 Piston Bolt-In Caliper.JPGBrembo 906570 Type III Rotor Ring.jpgBrembo Type III Rotor.jpg

My next thought was the Brembo M6 caliper released in 2016. Its touted attributes were that it had an aluminum body (race units are billet), is anodized for high temp resistance, has an engraved Brembo logo to avoid decals/paint fading, utilizes internal dust seals, anodized pistons, and vented radiators to dissipate heat. The challenge was that it would return me to the S550 approach. My greatest leap into the unknown was when I asked if Brembo 2-piece rotors could be utilized on OE calipers. @JAJ and @OPMustang Tim were great help. I also connected with Brembo US and was told the thermal capacity of the Brembo 2-piece rotor that would fit the GT500 calipers would be too low for anything other than surface street driving. While I don’t road race, I do participate in mountain rally drives and sprint races, and would not want the brakes to fail.

Finally, I recalled Dave Pericak, former head of FRPP and lead of the Boss 302 and GT500 programs, talking to folks at the Woodward Dream Cruise. I posted a video from 2011 showing his 2012 Boss LS was seam-welded like the race cars. At the Woodward Dream Cruise the following year, 2012, he was promoting the new ’13 -’14 GT500 with its Trinity engine (and Brembo 6-piston calipers). He mentioned FRPP engineers wanted the calipers to be an option on the 2013 Boss 302 Laguna Seca, but it couldn’t get approved. Not owning either at the time, my focus was elsewhere and on the 660+ horsepower, 200+ MPH claim of the GT500. Looking back, my thinking now is that with the S197 dropping from the lineup, Ford/SVT wanted to keep the special calipers just for the 13-’14 GT500. It doesn’t fully make sense from a cost standpoint to make a caliper for only one limited car, but not every corporate decision does.

That said, this recall was exactly what I was looking for and likely one of the ‘gut’ reasons I never felt 100% about the other options. Either way, this was my path forward. Dave Pericak and the FRPP engineering team wanted a 6-piston option for the ’13 Laguna Seca, and the calipers they had in mind are the same as on the '13-’14 GT500.

The next question was, how would I make them unique to the Laguna Seca. What components would FRPP hypothetically utilize if they had the chance? Fortunately, at an event, Ford had a display showing the ‘new for 2013’ setup, showing a M-2300-T brake kit with new 15” 2-piece rotors (M-1225-MSVT15). For a road race car, this is very likely what would have been offered on the 2013 Boss 302 Laguna Seca, as GT500’s were not intended for road racing, and a 2-piece rotor likely would not have appealed to most owners.

Front Brake Comparison 2013 Mustang GT v GT500 w 2-piece FRPP rotor.jpgIMG_6435.JPG
OEM 2013 GT500 Front Rotor Technical Specifications.JPGOEM 2013 GT500 Rear Rotor Technical Specifications.jpg

The first step was securing decent ’13-’14 calipers, which was not an easy task (RF DR3V-2B118-EB and LF DR3V-2B119-EB). The calipers were quite popular when they launched, so most salvage yards sell good ones quickly, and those that were on forums and eBay had mostly been cooked. Fortunately, I was able to find a decent set on the SVT forum. When they arrived, they had been well used but were not damaged and had not been overheated. I sent the calipers out to Funktion Performance for a cleaning, powder coating, and assembly. For those looking, I chose to match the red in the Laguna Seca logo. If you are using Prismatic Powders, their best match was with Firecracker Red (PSB-6500). I also created a custom logo using GM and other brands as guides for how the calipers could have looked.

IMG_4166.JPGBrembo Custom Decal_Holmes.jpg
Parts in process
IMG_4127.JPGIMG_9890.jpgIMG_9910.jpg
Finished design
IMG_9937.jpg

The GT500 calipers are pretty stout and offer some advantages over other caliper options. The biggest for me was that they utilize a retaining bolt and pins for the pads as opposed to the reinforced bridge seen on the GT350 and some other Brembo GTS setups. This makes pad swaps really easy. Other benefits were the aluminum body and suppliers being available for upgraded parts. I turned to @OPMustang Tim and secured new seals and high-temp dust boots. I also bought titanium shims for the GT350 from him and cut them to fit. For pads, I went with G-LOC GS-1 pads for daily use. For reference, the front Boss 302 caliper weighs 11.4 lbs (pads in place) on my scale, so figure 22.8 lbs for the pair, and the GT500 caliper weighed 15.6 lbs (pads in place) so 31.2lbs. More weights are listed below

S550 v S197 Brembo Anti-Rattle Spring.jpgS550 v S197 Brembo Pad Retention Pins.jpgS550 v S197 Brembo Retention Bolt.jpg

Upgrading to the GT500 6-Piston setup allows for 19% more swept area, resulting in 8% more effective radius, 31% more thermal capacity, and 33% more front pad area compared to the 14” OEM Brembo setup.

When considering rotors, I initially was going to use the 2-piece units offered by Ford (M-1225-MSVT15), but they were discontinued, and the remaining NOS is priced prohibitively high ($1500+); the FRPP units weigh 24.4 lbs each, the rotor faces are smooth, and replacement rings are non-existent. Fortunately, Girodisc had just completed a pair (F/R) of ’13-’14 GT500 2-piece rotors. The Girodisc was an easy decision; they cost $1100, the front rotors weigh just 21.8lbs, they are slotted and vaned for heat dissipation, and replacement rings are available. Thanks to Mike Owens and Robin Adrianse at Girodisc and @OPMustang Tim for their insights.

Griodiscs and Stahlbus Bleeders have arrived.JPGIMG_6426.JPG

  • Total Boss 302 OEM Weight of Caliper and OEM Rotor: 11.4 lbs (4- Piston Caliper w Pad) and 25.3 lbs (OEM 14” rotor) = 36.7 lbs per side
  • GT500 OEM Weight of Caliper and OEM Rotor: 15.6 lbs (6-Piston Caliper w Pad) and 32.4 lbs (OEM 15” rotor) = 48.0 lbs per side
  • Upgraded Brakes Weight of Caliper and Rotor: 15.6 lbs (6-Piston Caliper w Pad and Shim) and 21.8 lbs (15” 2-piece) = 37.4 lbs per side (about 11 oz heavier than Boss OEM and 10.6 lbs less than GT500)

With the setup complete, the remaining parts I chose were Goodridge braided stainless lines, Stahlbus M10x1.0x14mm rapid bleeders, and new mounting and pad hardware. I have only had the setup for a few winter months, so mileage has been short since installation. That said, they are just as smooth and quiet as OEM but clearly more capable.

IMG_6429.JPG

IMG_6458.JPGIMG_6479.JPG
IMG_6477.JPGIMG_6474.JPGIMG_6476.JPGIMG_6472.JPG
IMG_6636.JPGIMG_6637.JPGIMG_6638.JPGIMG_6639.JPG


IMG_6633.JPG
 
Last edited:
Finalizing the Custom Audio Project (October 2023 – August 2024)

To be honest, I am uncertain why the LS model did not have the radio delete option like the GT350R. Either way, while the Boss 302 certainly does not need an enhanced audio system given the amazing exhaust note we enjoy, on longer journeys to and from events, it is a nice-to-have option. Having already installed the ‘Electronics Package w Navigation (58N)’ from a 2014 Mustang GT back in 2017, the audio system was upgraded over the OEM unit. That said, OEM speakers are paper junk and not really meant to sound worthwhile. The same can be said for the ‘Premium Sound (913)’ option, where the drivers are a bit larger, but the speakers themselves just increase in number as opposed to quality. The easiest way to spot this upgrade is the door cards. I tried the dual speaker doors (see below), but the lower mid-range/bass speakers are weak, and the upper speaker just does not have the range needed to achieve something pleasant for the cost. Having sold the expanded door cards in 2024, I returned the door cards and speakers to OEM and went to a local audio shop (PDA Road Gear).

IMG_5042.JPGIMG_5041.JPG

In my meeting with them, I became more informed about the capability of the MATCH UP 7DSP I had installed in 2022.

IMG_6787.JPG

It was quite impressive and opened up some OEM appearance options while still improving the system in dramatic ways. Additionally, I could ditch the awful fuse holder that was visible in my engine bay from the first audio upgrade attempt.

Boss Engine Bay w Amp Fuse.jpg

The first purchase I made was a MATCH PP7S-D subwoofer. I chose this option as it would fit easily into the spare tire well, had a quick disconnect option if I ever needed to lose weight, and would provide the improved bass I was seeking.

IMG_6789.JPGIMG_6790.JPGIMG_6791.JPG

I am not someone who enjoys a heavy ‘thump’ that causes rattles, but I do want to reproduce the music as close as I can to what was intended.

The next step was to find an acoustic partner for the subwoofer. After listening to a variety of speakers, I settled on the BLAM Relax 570RCs. I placed four of these in the OEM locations (two in the door and two under the rear deck), all with similar quick disconnects like the subwoofer. While the MATCH UP amp had the power for the five-speaker setup, I have always preferred a dedicated amp for bass work so that separate control is an option. Fortunately, BLAM works really well with Audiotec-Fisher products (e.g., MATCH) and has a really small yet powerful amp called the RA 501D. This little amp tucked away perfectly well in the upper dash on the passenger side and allowed the controller to be mounted in the glove compartment.

IMG_6792.JPG

Once all components were installed, the OEM appearance was still key for me, so I had all of the wiring work for the new equipment tied along the OEM lines, and the fuse required for the amps was brought up through the firewall just behind the battery. This allowed the fuse to still be accessible on the battery tray but out of sight.

IMG_6798.JPG

The final step was programming the DSP to suit the interior of the Boss LS and its lack of sound deadening. Using the MATCH software within the amp, the installers were able to create a ‘center channel’ based upon the number of people in the car. Fortunately, with only two seats, only two programs were needed, and this was accommodated by the OEM navigation system. What happens is that they have a speaker calibration for when I am in the car alone, which gives me the impression that voices are being generated directly in front of me. Think just above the gauge cluster unless there is a unique left–right effect that is intended in the song. If I have a passenger, I select the second DSP option from the screen, and it places the voice in the center of the car, similar to where you would find the sunload sensor on the dash. It is pretty slick and reminds me a bit of my ATMOS home theater. Not nearly to that scale, but the effect is similar and very pleasing to the ears.

IMG_4226.JPG

All told, it was likely a longer and more expensive journey than many would want to take, but for me, it really enhances my enjoyment of the car. As an added bonus, when one of my kids wants to come along to a Cars & Coffee or show, the backup camera addition allows for DVDs and video files to be played while driving. Nothing screams muscle car like pulling into an event space with Bluey playing for a child in a booster seat :)

  • Custom Audio (MATCH, BLAM, OEM Panels)
 
Controlling the Side Exhaust (May 2024)

This was a fairly straightforward install that took far too long to accomplish. I bought the QTP 302 exhaust system back in 2019 and just did not have the motivation to get it done. Fortunately, or unfortunately, both of my kids and my wife were frequently commenting that the car was too loud for them. Having no plates or baffles in the side exhaust, it can get quite loud on the highway with the windows down. I ran a test with my decibel meter, and the steady noise level was around 90 dB. Under acceleration or near a retaining wall/barrier, and that jumps quickly. To protect my hearing and increase the likelihood of a passenger, it was time to complete the install. For my kit, I purchased the wireless remote as well (PN#10900).

The first step was setting up a 12V line that was triggered by the ignition on. While I doubt the motors draw current, I don’t need to have them active unless I am sitting in the car. I chose to tap into one of the lines behind the audio stack. I ran the wire along the console and under the rear carpet. My intention was to mount the system in the unused rear passenger area. This would allow for the system to be out of the way but still close enough to run the lines from the motors.

The motors themselves are pretty self-explanatory; they attach to built-in baffles that allow you to open or close the side exhausts. They take the place of the OEM spacer units. For the motor wiring, I ran it up and over the heat shield and into the shifter access. This allowed me to run the lines together to the controller unit while keeping everything away from sources of high heat or friction.

IMG_5612.JPGIMG_5616.JPGIMG_5617.JPG
IMG_5613.JPGIMG_5614.JPGIMG_5618.JPG

Once the lines were run, I made a logistical mistake that was quite annoying but easily fixed. I initially tried to make an aesthetic install in the rear passenger well and neglected to see how it would interfere with the LS cross brace. You can see in this image that while the controller is well mounted, there is no way to reinstall the X brace without hitting the control box. What I ultimately settled upon was placing the controller into the nest of spooled wires. I utilized some foam Velcro and secured the controller.

IMG_5619.JPGIMG_5620.JPGIMG_5621.JPG

IMG_5626.JPG

While I don’t have great hopes that the system will last years due to corrosion, I have enjoyed the added control it offers in terms of sound and hope to play with the side exhaust options more in the future.

  • QTP Electric Exhaust
 

Buy TMO Apparel

Buy TMO Apparel
Top