The Mustang Forum for Track & Racing Enthusiasts

Taking your Mustang to an open track/HPDE event for the first time? Do you race competitively? This forum is for you! Log in to remove most ads.

  • Welcome to the Ford Mustang forum built for owners of the Mustang GT350, BOSS 302, GT500, and all other S550, S197, SN95, Fox Body and older Mustangs set up for open track days, road racing, and/or autocross. Join our forum, interact with others, share your build, and help us strengthen this community!
BF6D9541.jpg

SN95 RinerAutomotive's CAM-T Mustang Build Thread Profile - SN95 Mustangs

This is my 94 Mustang that I've built to compete in the CAM-T autocross class

This site may earn a commission from merchant affiliate links, including eBay, Amazon, and others.

I pulled off the driver side upper bracket and there is a crack forming in the same location on it as well.

As mentioned above I have designed new plates that will use some tab and slots. It will also use carriage bolts that will snuggly fit into that square hole seen in post #212. This will allow me to mount the upper arm directly on the upper bracket and get the upper bracket closer to the frame. All of which will get me more negative camber. I just need to make sure there is space between upper arm pivot and frame. (maybe pocket the frame 🤔) I will also weld on both sides of the joint this time to, hopefully, eliminate any future weld failures.

Since I raised my roll center I was putting more force through the arms into the frame than previously. But the car seemed to handle better with the higher roll center which tells me I need to increase spring rate. I have purchased some 600# springs for the front to replace the 400#. The 600# springs will give me a higher frequency which more aligns with a race car than street car. I really was trying to do the soft spring big bar type of setup, but I just need more spring.
 
A lot to catch up on...

My Duramax starting making a creaking noise that sounds like it's from the transfer case area. I didn't see any leaks but the top was quite dirty. These trucks are known for a pump rub issue in the transfer case, which I have a kit that's been sitting on the shelf for awhile. Just haven't wanted to pull the transfer case. I bought a transfer case rebuild kit to replace all bearings and seals.

I started pulling everything apart with 2 weeks until next event. One u-joint was bad on the driveshaft, so replaced both ends on the driveshaft. Upon tearing down the transfer case, the pump rub was all good, but I'll put the kit in regardless. I did see some scoring on the driveshaft sleeve, so another part to order.

Wednesday before the event I get everything install back into the truck. Put in reverse, noise is fixed!!! Put in forward, no forward drive 😞. Time to tear it back down. While removing I noticed some oil in the transmission connector but I want to remove everything to make sure. Also during research my problem sounded like the transmission was in limp mode as I had park, reverse, and it rolled forward on jacks but wouldn't drive forward as it was in 3 rd gear. Limp mode was usually an electrical problem (remember that oil in the connector). I didn't find anything wrong, so reassembly time. I cleaned the oil out of the connector too. Success! It was now Thursday night. I'll test drive the truck driving to work on Friday.

I have one slight issue still though. When the truck is in Neutral it slowly goes in reverse direction. Not sure what is causing that. Onto the next issue now...

Leading up to my last event I pulled the front suspension apart to check the driver side upper control arm bracket, since the passenger cracked at Ford Fest. Sure enough there was a small crack starting to form. I was hoping to have the new brackets before the race but waiting on delivery. I decided to weld up the inner seam. No more breakages.

I've been getting feedback about spring rates and since I liked the car with the higher roll center but the car didn't like the higher roll center (breakage), I decided to change the spring rates. I am increasing the front from 400# to 600# and rear from 250# to 300#. The rear 300# spring was what I already had laying around. It may need more but this will be a good starting point. I finished that up at 8pm Friday night.

Just in time to leave Saturday morning at 4am for a double header autocross weekend....
 
Last edited:
All loaded up and ready to leave at 4am from VA to NC, heading down to Cherry Point.

No idea how the stiffer springs are going to feel, but ready to push it. Turnout was a little low so the club decided to do 2 heats with 3 runs in the morning then a lunch break, then 4 runs in the afternoon.

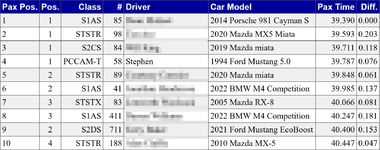
The car felt great. I was really able to push it. After the morning session I was sitting first in class and in PAX for the whole event. I was 3rd in raw time as well. I had a 53.6s raw time, while top time by a CSP Miata was 51.4s

Ashley felt good, but wasn't pushing it hard enough and was in the 58s. I worked on the course during her runs, so I wasn't able to give real time feedback. We reviewed the TrackAddict data and I gave her some pointers for the afternoon session.

For the afternoon session, me and the only other CAM-T driver decided to switch cars. He had a mostly stock SN95, I think just lower springs and 3.55 gears. Right off the start line I noticed the lack of power compared to my HCI 306. Then once getting on the throttle into the second obstacle noticed the lack of rear grip compared to my torque arm rear suspension. But I was still able to push the car to a low 57s time. I think a 56 would be possible with a little more seat time. We only did one run each. He jumped out of my car and said that thing can turn. I convinced him he needs a torque arm to really be able to put the power down. He's been wanting to build an engine, but that won't do anything if can't put it down. Here is a video comparison of me driving his and mine:

I didn't get any faster in the afternoon, but at the end of my heat I was still first in PAX.

Ashley really pushed herself with holding the throttle longer and trying to carry more base speed through obstacles. She was able to get down to the 56s, which netted her 3rd in ladies class.

I kept 3rd raw and 1st in PAX.
PXL_20231028_195707649.PORTRAIT.jpg

Full event video:

Now to pack up and drive back to VA for an event on Sunday
 
The event back in VA is my local club and the one I'm pushing for winning the championship, same for Ashley. I have too many jackets and trophies that say 2nd place. I want that 1st place trophy. This is the penultimate event for 2023 and at this point I have locked in 1st place in my class. Ashley is first in Ladies, but second place is very close behind. Additionally, I am first in the overall PAX championship but second, third, and fourth are close behind. It's anyone's game going into this event.

The weather is fantastic for a late fall event with temperatures of 80F, which brought out a lot of competitors, 110 to exact. There is some new competition that haven't been to any of the previous events and are very fast, perfect storm to mix up the standings. Oh, and the lady second in class behind Ashley traded in her DS classed Ecoboost PP Mustang for a FS classed Mach 1 :oops:

I ran in the 3rd heat and was feeling confident after the top PAX at the previous event. By my 3rd run I was first in class and 4th in PAX, with 2 more runs to go. However, I pushed too hard and got loose with resulted in a +1 and a DNF, respectively. The surface at this venue is bumpy and unsettled the car a lot. This was why I went softer spring initially, but overall I think the stiffer spring is going to be better and faster, once I get everything dialed in.

1699896623647.png

Ashley ran in the 4th heat and had the advantage of warm tires. Right out of the gate she set a blistering time that had her in first place in Ladies for a little bit. But remember how I said there was some competition that hasn't been to previous events? Yea one of those was a fast Lady in Ashley's class. Ashley pushed herself and only beat her first run's time by a few thousands by her 5th run. But that gave her 2nd in Ladies and more importantly kept her ahead of the new Mach 1!

1699897700815.png

With me finishing in 4th in PAX and behind drivers that are not normally at our events, I'm 99.9% sure I have locked in the overall PAX championship for 2023! Which means I get my name on a big trophy with all the previous year winners. I am way beyond stoked!
1699897937357.png

The 2024 Dark Horse is an awesome looking car and very quick. The driver of the one above is quite good, but only in his second year or so of autocross.

Video:
 
Congrats on locking up the win!

I definitely understand your 2nd place frustration. Mark Hill has won our PAX Championship every year for as long as I have been in this region. He's got multiple National Championships under his belt and I've beaten him exactly once. I'm pretty sure I'm stuck at 2nd place this year too for the PAX championship.
 
While the spring rate increase made improvements, could there be more improvements? Sway bars are good things to keep and I have several from different vehicles, since I don't have an adjustable sway bar. At the last autocross I was getting a hint of understeer. So at my last event I plan to drop the front from the Steeda 35mm to the GT 30mm and the rear from the GT 23mm to V6 21mm. The rear bar is in opposite direction for understeer, but I'm wanting to drop both together for now as it was fairly close to a good balance.

Won't really know until I try. Can think and theorize all day, but I like to test practically to see how it actually works.

Last event of the season coming up....
 
Do you know the lbs/in stiffness of the different bars? You can calculate using a standard formula or online calculator. If it's a hollow bar, calculate the stiffness of the OD, then calculate the stiffness of a bar with the ID, then subtract the ID stiffness from the OD stiffness. Note that stiffness increases at the fourth power of diameter.

Or you can measure yourself by clamping the endlink on one end in a vice (clamp the endlink close to the bar), supporting the bar with a 2x4 (where the "far" bushing from the vice would be), and then hanging a weight off the other end (through the endlink hole) and see how much it deflects.

Note that both the standard formula and the method above do not account for any stiction in the bushings. Some Mustangs have a rubber bushing molded to the bar that would change the force seen at the wheel for a given deflection. If using an aftermarket (urethane or delrin) bushing, you should be able to rotate the sway bar with easily when installed and both endlinks detached. On various cars, I've sometimes found it necessary to sand the ID of the bushing and/or shim the clamp up with washers to prevent the bushing from holding the bar too tightly.

Knowing the actual stiffness of each bar (and each setting for an adjustable bar) lets you determine the percentage difference in stiffness when making a change, and can help pick a setting/bar for the other end with the same percentage change, or more/less stiff.
Yeaaahhh....it's been on the to do list. I need to do that cause I'm thinking of figuring out a spline sway bar but I don't know what size to go with. The spline bar will need to be more forward so the end link arms will be longer and thus more leverage. Or go with the Kenny Brown or Griggs adjustable bars for a more bolt in solution.
 
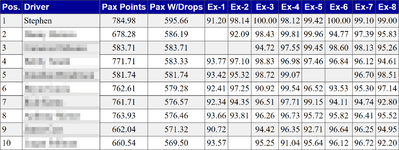
Last event of the year! I don't think I mentioned it previously, but going into this event I knew mathematically I had locked in first in class, first overall PAX, and Ashley had locked in first in her class. But that didn't mean we were going to slack, just meant no pressure.

Also I could try out the softer front and rear bars to see how they feel. For this event I had a co-driver (other than Ashley). He's driven the car before, but several events ago, which I have changed to the car quite a bit since then (tires, springs, sway bars, alignment). But he would be other another resource for how the car feels.

I'll jump right to results, I finished 1st in class out of 23, my co driver finished second in class, but was 1.3 seconds off of my fastest. He struggled with turn in and was overdriving the car. He thought it handled worse than when he last drove it. I also struggled with the handling of the car, but have more seat time. I did still finish 4th in raw and PAX, so the car is still quite fast. On my fastest run I had a big sideways moment that cost me a good amount of time.
PAX.png

Ashley also struggled with the car and getting the confidence back. She also coned away two of her fastest times, but those would not have been fast enough to beat the lady in first. She finished second in Ladies. But as I said luckily she had already locked in Ladies class championship, albeit by 0.21 points!

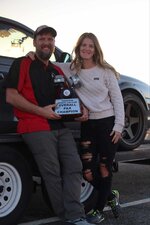
I get to keep the big trophy for a year and my name will be on the side of it forever
received_1934905610244352.jpeg

Ladies 2023 Championship:
Ladies_2023.png

2023 Overall PAX Championship:
PAX_2023.png

Video:
 
Congratulations to the both of you! 🥳

You set a goal at the start of the season of winning the big trophy, and you achieved it - very impressive. The work you did this year to design & build your own SLA front suspension is amazing. Like you said in the video, you got a lot of seat time this year, and that's always a good thing. Thanks for letting us peek into your world with such well-produced videos.
Thanks Dave. I forgot about mentioning wanting the big trophy at the beginning of the year. I really didn't think it would be possible, especially how the year started.

2024 here I come!! 😁
 
Although I'd rather not know, I finally decided to total up on the costs that went into designing and building my custom SLA last off season. For design work I bought the software Suspension Analyzer. Luckily, a limited version of Fusion360 is free for personal use. I was able to design most of the components prior to buying and building the suspension.

While, I'm not surprised by the total cost it was higher than I thought it would be. Definitely justifies the high costs that the aftermarket charges.

Note this does not include taxes and shipping, nor any labor (is my time really free 🤔).

Suspension components: $2343.77
Coilovers and springs: $2152.00
Other costs (Tools and R&D): $561.52

Total: $5057.29

Video for more details:
This is why its so hard to make money in this industry. Congrats on your success, its come with many lessons and you've persevered.
 
RinerAuto,

You showed courage to add up those costs, and as one who went down the mine shaft long ago ( a rabbit hole is just too small, ha ) I would congratulate you doing quite well keeping costs reasonable for a Double Championship -- yours and your wife's.
 
This is why its so hard to make money in this industry. Congrats on your success, its come with many lessons and you've persevered.
Cost of engineering and redesign is often overlooked cost that goes into products. In long run (currently in redesign phase) I could probably had saved costs by going with a system from the market but I like learning and building.
RinerAuto,

You showed courage to add up those costs, and as one who went down the mine shaft long ago ( a rabbit hole is just too small, ha ) I would congratulate you doing quite well keeping costs reasonable for a Double Championship -- yours and your wife's.
Thanks. Racing (and YouTube) aren't cheap, but winning is fun 😎
 
Need to do a little bit of catching up.

I've been needing to build new and improved upper control arm brackets. The new brackets will move the upper control arm rearward for better caster adjustments. Along with a different UCA bolt solution of using a carriage bolt which will allow the bracket to get closer to the frame rail for increased negative camber.


Next improvement is the front brakes, namely big brakes, but on the cheap. Cadillac ATS calipers have been all the rage lately, but there is an even bigger version from the Cadillac XTS. When paired with the rotors from an early GT500 and the S&S Engineering caliper install kit you get 14 inch brakes 😮 for less than $600 (not including pads). Is this overkill for a 3000 lb Mustang? Probably. Hopefully the ABS is up to the task of keeping the tires from locking up. (If not I have ideas of an improved ABS 🤐)

 
If you're changing the angle of the coilover much, remember to use the new angle to recalculate the motion ratio of the suspension to determine the new wheel rate for the same spring rate.

Also, I'm hoping you're using Grade 8 (or maybe Grade 5) carriage bolts in the new bracket design. If I'm thinking about it the right way, those upper arm bolts see a tension load on outside turns - the ground is pushing laterally against the contact patch to resist the inertia of the car and turn it, the lower ball joint is acting as a fulcrum and also creating a compression load on the lower A-arm, and (I'm thinking) the upper A-arm sees a tension load based on the tire/wheel/spindle acting as a lever arm. That's probably simplistic, and there's probably other geometry at work (like what creates jacking force), but it might be good enough for back-of-napkin calculation.

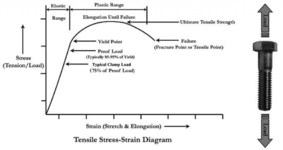
Taking a look at the link above for carriage bolt strength, it looks like a 1/2" bolt has a thread root diameter of 0.483" which is an area (pi * r^2) of 0.1832 sq.in. Proof load of a common carriage bolt is only 33,000 psi, so a 1/2" bolt should hold about 6,000 pounds in tension. Going to Grade 8, the proof load increases to 120,000 psi, so a 1/2" Grade 8 carriage bolt will hold just shy of 22,000 pounds in tension. Note that I'm using "proof load" as that gives about a 5-10% "safety factor" before the yield strength, when bolt transitions from elastic to plastic deformation (i.e., it starts to be permanently stretched).
1703897315615.png

McMaster-Carr sells Grade 8 carriage bolts if you need them.
 
If you're changing the angle of the coilover much, remember to use the new angle to recalculate the motion ratio of the suspension to determine the new wheel rate for the same spring rate.

Also, I'm hoping you're using Grade 8 (or maybe Grade 5) carriage bolts in the new bracket design. If I'm thinking about it the right way, those upper arm bolts see a tension load on outside turns - the ground is pushing laterally against the contact patch to resist the inertia of the car and turn it, the lower ball joint is acting as a fulcrum and also creating a compression load on the lower A-arm, and (I'm thinking) the upper A-arm sees a tension load based on the tire/wheel/spindle acting as a lever arm. That's probably simplistic, and there's probably other geometry at work (like what creates jacking force), but it might be good enough for back-of-napkin calculation.

Taking a look at the link above for carriage bolt strength, it looks like a 1/2" bolt has a thread root diameter of 0.483" which is an area (pi * r^2) of 0.1832 sq.in. Proof load of a common carriage bolt is only 33,000 psi, so a 1/2" bolt should hold about 6,000 pounds in tension. Going to Grade 8, the proof load increases to 120,000 psi, so a 1/2" Grade 8 carriage bolt will hold just shy of 22,000 pounds in tension. Note that I'm using "proof load" as that gives about a 5-10% "safety factor" before the yield strength, when bolt transitions from elastic to plastic deformation (i.e., it starts to be permanently stretched).
View attachment 92141

McMaster-Carr sells Grade 8 carriage bolts if you need them.
Thanks for the explanation. I am using the Grade 8 carriage bolts from McMaster Carr (love that site). To have those bolts fail would be very bad. Luckily when the bracket failed the bolts did not break or bend. So the control arm remained attached to the car and I could drive it from paddock back to my trailer, very slowly.

That's why I would not trust weld nuts in this application. At work we had weld nuts fail during a structural test of a support structure. Found out weld nuts are often a lower grade and then welding could also weaken the metal.

The new lower control arm will change the coil over angle as I need to get the spring away from the upper control arm. It's not changing much but yes motion ratio and spring rates will need to be recalculated.
 
Need to do a little bit of catching up.

I've been needing to build new and improved upper control arm brackets. The new brackets will move the upper control arm rearward for better caster adjustments. Along with a different UCA bolt solution of using a carriage bolt which will allow the bracket to get closer to the frame rail for increased negative camber.


Next improvement is the front brakes, namely big brakes, but on the cheap. Cadillac ATS calipers have been all the rage lately, but there is an even bigger version from the Cadillac XTS. When paired with the rotors from an early GT500 and the S&S Engineering caliper install kit you get 14 inch brakes 😮 for less than $600 (not including pads). Is this overkill for a 3000 lb Mustang? Probably. Hopefully the ABS is up to the task of keeping the tires from locking up. (If not I have ideas of an improved ABS 🤐)

I'm interested in what your plan is for the rear brakes. I've been debating the ATS brakes for a while now, I just haven't pulled the trigger due to possible wheel spoke clearance issues and not having a definite plan for the rear. I think my top option for the rears now is the Wilwood D154 calipers with detroit drift mounts, but then I lose my parking brake.
 
I'm interested in what your plan is for the rear brakes. I've been debating the ATS brakes for a while now, I just haven't pulled the trigger due to possible wheel spoke clearance issues and not having a definite plan for the rear. I think my top option for the rears now is the Wilwood D154 calipers with detroit drift mounts, but then I lose my parking brake.
I was concerned about wheel clearance as well, but I had plenty of spoke clearance. Additionally, I want to keep my park brake as well. The video for the rear brakes drops tomorrow. I really like how it turned out. Hopefully my bias is good, it calculated out to be 70/30 which is close to stock.

I'll give a sneak peak ;)
IMG_2685.JPG
 

TMO Supporting Vendors

Buy TMO Apparel

Buy TMO Apparel
Top