The Mustang Forum for Track & Racing Enthusiasts

Taking your Mustang to an open track/HPDE event for the first time? Do you race competitively? This forum is for you! Log in to remove most ads.

  • Welcome to the Ford Mustang forum built for owners of the Mustang GT350, BOSS 302, GT500, and all other S550, S197, SN95, Fox Body and older Mustangs set up for open track days, road racing, and/or autocross. Join our forum, interact with others, share your build, and help us strengthen this community!

SN95 LS3 Pony Build Thread Profile - SN95 Mustangs

This site may earn a commission from merchant affiliate links, including eBay, Amazon, and others.

PatientZero

@restless_performance
825
865
Exp. Type
Autocross
Exp. Level
10-20 Years
Kansas City, Missouri
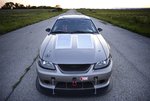
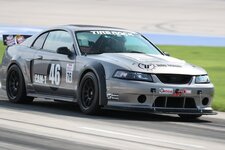
I wanted to redo some things on the front of the car to help cut weight and so I could box in the radiator so to help with that I ordered a tubular bumper support from MAF Racing.
20191023_125521.jpg

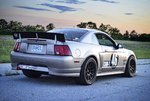
I was also never really happy with how flimsy the rear spoiler was. The 3d printed brackets that it came with were nice but started to warp after being out in the sun and I had to constantly retighten them because the material would compress and they would loosen up again. I make some new brackets out of aluminum that were better braced and also added a 3rd bracket in the middle of the trunk to get rid of the flex. This setup is pretty dang solid. With the car in neutral I could push it by the spoiler now.
20191026_181126.jpg
20191026_181142.jpg
20191026_181230.jpg


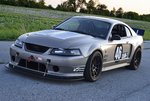
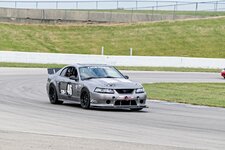
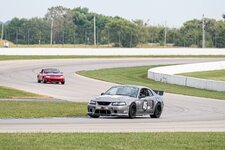
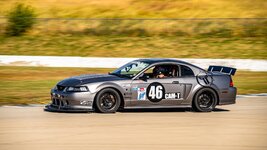
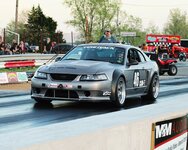
Last event of the season. We had 11 cars show up for CAM-C. Weather was beautiful. I was back in 3rd place until my last run. Last event of the year and last run of the day, just had to send it.
I got the win in CAM-C and 9th fastest RAW out of 136 cars.
Screenshot_20191101-001037_Facebook.jpg
<iframe width="560" height="315" src="
" frameborder="0" allow="accelerometer; autoplay; encrypted-media; gyroscope; picture-in-picture" allowfullscreen></iframe>


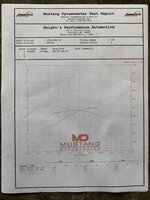
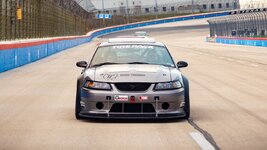
Now it was time to start the offseason upgrades. After running the car 6 times in 3 months plus a day-long Solo School I had a pretty good idea of the direction I needed to go with the car.

My main goals for this winter were:

1. More camber on the front and front end grip. Possibly higher spring rate.

2. Clean up the front end of the car. Simplify and drop weight.

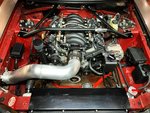
3. Increase cooling capacity
20191029_140617.jpg

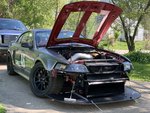
Next I started disassembly. I wanted to simplify the front end and remove weight. This is what I started with.
20191031_112107.jpg
20191031_111534.jpg
 

PatientZero

@restless_performance
825
865
Exp. Type
Autocross
Exp. Level
10-20 Years
Kansas City, Missouri
First on the agenda was some new control arms. The car had an AJE K-member and controls arms on it when I bought it. I felt that was good enough up until now and decided on some of MM forward offset control arms to try and help with the camber situation. The AJE control arms came off along with the STOCK rear control arms. I should have upgraded these long ago and just never got to it.
20191103_123208.jpg

The new control arms from MM seriously look fantastic. I upgraded to the delrin bushings on the front and bought their "road race" arms for the rear. This car see's little if any street driving anymore so NVH is not a concern. Lap times are #1 priority.
20191018_115807.jpg

Stock rear lower control arm compared to the Maximum Motorsports control arm. From the factory the rear sway bar bolts to the lower control arms on these car. Since I opted for the version that doesn't have this provision I will also have to change to an adjustable style sway bar.
20191106_104615.jpg

After several emails back and forth with Jack from Maximum Motorsports, he recommended I change sway bars to help eliminate some understeer. The Steeda bars came off and I ordered an Eibach to replace it. I will wait to order the rear bar once I get the car back on the ground and have my final weights and get those numbers to Jack. He also recommended I go down to a 275lb spring on the rear from my 325lb.
20191102_173128.jpg
20191112_083246.jpg

Keeping with my mission to simplify, I pulled all the brake lines off the front of the car. The ABS had been deleted long ago but now it was time to do something about all these extra brake lines.
20191117_102546.jpg20191117_102559.jpg

During teardown I found one of my soft lines had come into contact with the wheel and chewed up the outside plastic cover so I got an order in for some new longer lines so I could route them away from the wheels better.
20191118_113934.jpg

With the factory lines out of the way I got to work bending up some new lines and mounted my Baer proportioning valve that's been sitting on the shelf for 2 years. I only had to make 4 or 5 trips to Oreilly's and Napa to get all the fittings I needed, lol.
20191118_111415.jpg
20191118_111348.jpg
 

PatientZero

@restless_performance
825
865
Exp. Type
Autocross
Exp. Level
10-20 Years
Kansas City, Missouri
Factory bumper support removed and replaced with the MAF Racing piece. These are also available powdercoated but I'm going to be welding on some splitter support rods and a tow hook so I got the unfinished one.
20191108_124058.jpg


Another goal that I hadn't really mentioned yet is to improve cooling. The car never runs hot but it gets up to temp and the fan runs constantly, it doesn't cycle. Even in 90+ degree weather, the highest I've seen it is 208 but I'd feel better if the fan would pull it down more than 203ish. I want to start doing more track events with this car and eventually Time Trials so I want to make sure the cooling never becomes an issue. To help this I'm laying the radiator down and adding some more vents in the hood along with boxing the radiator in to the bumper to prevent air from going around it.

To be able to get the top of the radiator tucked under the core support I had to start out by cutting off the filler neck and filling the hole. I will relocate this later.
20191120_093811.jpg
20191120_093943.jpg
20191120_095008.jpg
20191120_100137.jpg
20191120_100811.jpg
20191120_103741.jpg


I also made a couple modifications to my overflow tank. The way it was, the radiator was just dumping into it. Once the coolant was in the overflow the radiator would be slightly low and the coolant could never get back. To make this work like a factory system I drilled and tapped a 1/8npt hole in the top and installed a fitting a had in my toolbox with a piece of tube already attached to it. This would get the overflow below fluid level so once the radiator cooled and pressure dropped it would draw coolant back into the radiator to keep it full.

The fitting on the bottom right in this picture has a tube that runs almost to the bottom of the tank. The tube in the opening of this picture is for overflow if the tank gets completely full. It allows it to vent to atmosphere also.
20191119_113407.jpg
20191119_113845.jpg

For the vent/overflow, I drilled a hole through the center of the drain plug on the bottom of the tank and welded a piece of tubing that goes almost to the top of the tank. This is the tube you can see in the first picture above.
20191119_113748.jpg
 

PatientZero

@restless_performance
825
865
Exp. Type
Autocross
Exp. Level
10-20 Years
Kansas City, Missouri
To mount the radiator I made an aluminum frame inside the core support to make it easier to transition the aluminum sheeting into the bumper.
20191124_133520.jpg

I welded these pieces of 1x3 rectangle tubing to the radiator for the top mounting brackets.
20191124_133632.jpg
20191124_134211.jpg

On the bottom side I made these little L brackets out of steel that bolt to the frame rails. Brackets made from some more pieces of 1x3 got welded onto the end tanks and the whole radiator is supported on rubber isolators to help prevent stress cracks from vibration.
20191124_134228.jpg
20191122_134652.jpg
20191120_120554.jpg
20191120_134614.jpg
20191120_134637.jpg

The final angle on the radiator is 20 degrees. I hoping this should help the air make the turn and get out the hood.
20191122_134105.jpg
20191122_134634.jpg

I needed to put a new filler neck on. It basically ended up in the stock location.
20191123_130420.jpg
20191123_134507.jpg
 

PatientZero

@restless_performance
825
865
Exp. Type
Autocross
Exp. Level
10-20 Years
Kansas City, Missouri
With the radiator mounted I needed to get the oil cooler and power steering cooler mounted. I didn't want them hanging out in no man's land again so I decided to tuck them in from of the radiator to keep them protected. Plus, they were previously behind the fog light holes but those were getting repurposed for brake cooling ducts.
20191202_130839.jpg
20191202_130739.jpg
20191205_100540.jpg
20191205_134721.jpg
20191205_134527.jpg

Then I started making templates for the sheet aluminum to box this all in and seal it up as best as possible.
20191206_130638.jpg
20191206_130645.jpg

Then I made templates for the front half that channels down to the bumper opening. This will be removable with 4 bolts.
20191129_173235.jpg
20191129_173249.jpg
20191129_173135.jpg
 

PatientZero

@restless_performance
825
865
Exp. Type
Autocross
Exp. Level
10-20 Years
Kansas City, Missouri
The new rules for CAM came out and my car got moved to CAM-T. I get a 300lb weight break now along with the ability to have a front splitter up to 6". I had to get supplies.
20191127_131617.jpg

I basically traced the shape of the bumper onto the 1/2" Birch plywood and squared up all the lines. Then I came forward 5 1/2" to make sure I'm within the rules.
20191207_122012.jpg
20191207_134427.jpg
20191207_134514.jpg

Here's the splitter mocked up on the car, It's just sitting on jack stands. The next step is getting the splitter mounted to the car and then water-proofing it and wrapping or painting it.
20191207_150229.jpg
20191207_150245.jpg

I found 4lbs by trimming some extra material off the bottom of the front bumper. This will at least help offset some of the weight of the splitter. I'll weight the splitter once I figure out how I'm going to mount it. I have a couple ideas but I want it to be quickly removable for loading on the trailer.
20191209_124430.jpg
20191209_124420.jpg

I wanted to add some additional bracing to my AJE k-member, mainly where the lower control arm mounts. It's just kinda hanging out in space and I can't imagine it's very rigid for the lateral loads this car sees.
1576136140_20191103_135918_mmthumb.jpg
1576136250_20191103_140007_mmthumb.jpg

20191103_153915.jpg

I cut a couple pieces of 1" .120" wall tubing and welded them in.
20191103_153640.jpg
20191103_142914.jpg
20191103_153832.jpg
20191103_194247.jpg
 

PatientZero

@restless_performance
825
865
Exp. Type
Autocross
Exp. Level
10-20 Years
Kansas City, Missouri
Then I ran into a hiccup with the new front lower control arms. The AJE control arms and K-member use a little 1/2" bolt where as the Maximum Motorsports control arms(and factory) use a 5/8" (16mm) bolt. So, the MM control arms won't bolt up to the AJE k-member and there is no good way to modify it. You could possibly have spacers made to fit in the MM arms and use a 1/2" bolt but that seems sketchy at best.
20191104_130409.jpg
20191104_130357.jpg

The head of the 5/8" bolt wont even fit inside the tubing this K-member is made out of.
20191104_130518.jpg

And there isn't much material here to drill out either. Really the best option here is switching to the MM k-member. It wasn't what I had planned to do this winter but I think it will be best in the long run. Another issue I've suspected with the AJE k-member is that the track width is more narrow than factory. The reason I believe this is because my MM camber plates are maxed out and I can only get about -2.2 degrees of camber. I should be able to get -3-4 degrees.
20191104_130456.jpg
 

PatientZero

@restless_performance
825
865
Exp. Type
Autocross
Exp. Level
10-20 Years
Kansas City, Missouri
I did lots of measuring and started drilling holes in the bumper.
1576462141_20191212_095251_mmthumb.jpg
1576462164_20191212_100526_mmthumb.jpg
1576462186_20191212_095437_mmthumb.jpg


I made some tabs out of 1/8" x 1" steel and got them welded to the bumper support to attach the support rods.
1576462330_20191212_120118_mmthumb.jpg
1576462360_20191212_121057_mmthumb.jpg
1576462379_20191212_122451_mmthumb.jpg
1576462406_20191212_123415_mmthumb.jpg

This washer happened to be the same diameter as my bumper support.
1576462469_20191212_123544_mmthumb.jpg

Now I have 4 identical tabs.
1576462529_20191212_124951_mmthumb.jpg

More measuring then got them tacked in place.
1576462570_20191212_131711_mmthumb.jpg

Finish welded.
1576462624_20191212_132836_mmthumb.jpg
 

PatientZero

@restless_performance
825
865
Exp. Type
Autocross
Exp. Level
10-20 Years
Kansas City, Missouri
Then I had to enlarge the holes in the bumper for them to peek through.
1576462726_20191214_123332_mmthumb.jpg
1576462711_20191214_123321_mmthumb.jpg

No matter how nice I make the holes it never going to look that pretty so I drew up some trim rings and 3d printed them.
1576462811_20191214_132053_mmthumb.jpg
1576462847_20191214_132819_mmthumb.jpg
1576462877_20191214_142653_mmthumb.jpg

Screwed in place. I think this looks 100x better than just having a hole there.
1576462905_20191215_155127_mmthumb.jpg
1576462958_20191215_155118_mmthumb.jpg
 

PatientZero

@restless_performance
825
865
Exp. Type
Autocross
Exp. Level
10-20 Years
Kansas City, Missouri
Started working on a way to attach the splitter. I just sandwiched the wood with a piece of 1/8" aluminum strap on bottom and 1/8" aluminum angle on top.
1576463128_20191215_153753_mmthumb.jpg1576463111_20191215_153744_mmthumb.jpg1576463085_20191215_162011_mmthumb.jpg

I countersunk the bolts into the the bottom to give the most ground clearance possible.
1576463177_20191215_161930_mmthumb.jpg
1576463218_20191215_163132_mmthumb.jpg
1576463239_20191215_163410_mmthumb.jpg

I had a couple scraps of 1x2" aluminum that I cut down to make the splitter rod brackets.
1576463308_20191215_164158_mmthumb.jpg
1576463327_20191215_171333_mmthumb.jpg

I cut off a couple pieces of stainless tubing to make spacers to keep the heim joint center in the bracket.
1576463349_20191215_172647_mmthumb.jpg

Here is the front of the splitter bolted up. Next I need to work on attaching the back side.
1576463475_20191215_194023_mmthumb.jpg
1576463456_20191215_194012_mmthumb.jpg
 

PatientZero

@restless_performance
825
865
Exp. Type
Autocross
Exp. Level
10-20 Years
Kansas City, Missouri
One of my limitations for the splitter is that it absolutely had to be quickly detachable. I don't want to mess with bolts, I don't want to have to jack the car up, I don't want to remove wheels, etc. The support rods outside the bumper were easy, they will just have pin rather than a bolt. The back side was more tricky. There are a dozen ways to do this but this is what I decided on to give me maximum strength with minimal added weight.

I happened to have some 3/4" solid rod and some 1" .120" wall tubing that gave me a perfect slip fit.
1576609029_20191216_100744_mmthumb.jpg

I welded the pins into some 3/16" plate with 1/8" sticking out the back so I could weld both sides.
1576609116_20191216_101958_mmthumb.jpg
1576609130_20191216_102017_mmthumb.jpg
1576609150_20191216_102913_mmthumb.jpg
1576609185_20191216_104245_mmthumb.jpg
1576609212_20191216_105333_mmthumb.jpg
1576609248_20191216_112737_mmthumb.jpg

I welded the 1" tubing to some 1/8" strap for the hangers. I plan to add some additional support to these later with more mounting points.
1576609316_20191216_114529_mmthumb.jpg
1576609364_20191217_103142_mmthumb.jpg


The pins are just tack welded to the core support. I have to drill a couple holes in the core support to make room for the 1/8" I left sticking out the back side of the plate.
1576609458_20191217_103152_mmthumb.jpg
 

PatientZero

@restless_performance
825
865
Exp. Type
Autocross
Exp. Level
10-20 Years
Kansas City, Missouri
After making sure the pins were level and square to each other I could go ahead and weld them in completely.
1576609528_20191217_111008_mmthumb.jpg

Now the splitter is hanging completely by the pins and support rods. It is surprisingly strudy like this but I am going to add more support on the sides and possibly another support in the middle so it will pass the standing test(probably not by me, but somebody will stand on it. haha) Then I will seal the bottom edge of the bumper to the splitter either with aluminum or garden edging. I'm undecided on that.
1576609723_20191217_122743_mmthumb.jpg
1576609709_20191217_122732_mmthumb.jpg
1576609692_20191217_122225_mmthumb.jpg

I cut a couple more pieces of 1/8" and triangulated the mounts.
1576975417_20191218_112029_mmthumb.jpg

Tacked in place and then TIG welded.
1576975466_20191218_112046_mmthumb.jpg
1576975489_20191218_113602_mmthumb.jpg

Bolt holes drilled and mounted back on the car.
1576975547_20191218_115232_mmthumb.jpg
1576975527_20191218_115224_mmthumb.jpg
 

PatientZero

@restless_performance
825
865
Exp. Type
Autocross
Exp. Level
10-20 Years
Kansas City, Missouri
I cut a couple shorter pieces of the angle and flat just like the main mounts.
1576975699_20191218_131601_mmthumb.jpg

Mounted in place
1576975725_20191218_131943_mmthumb.jpg
1576975747_20191218_131951_mmthumb.jpg


The plan was to attach support rods to these spots too but they would be hidden behind the bumper rather than exposed. I had some 6" square plates of 3/16" steel that I used to make brackets that mount to the factory bumper support bolts.
1576975898_20191221_090221_mmthumb.jpg

I don't have a torch so I thought maybe my propane torch would get hot enough to bend this stuff. I was absolutely wrong.
1576975967_20191221_102259_mmthumb.jpg

I ended up scoring a line with a cutoff wheel and then welded it back up.
1576976027_20191221_123249_mmthumb.jpg
1576976055_20191221_123649_mmthumb.jpg

I used some bushings and welded into the holes to help distribute the weight and keep the holes from getting wallowed out.
1576976134_20191221_130614_mmthumb.jpg
1576976148_screenshot_20191221-132535_gallery_mmthumb.jpg

Bolted up to the car.
1576976175_20191221_134448_mmthumb.jpg

With the support rod attached. I'm waiting on some more heim joints and this portion will be wrapped up. Then I need to waterproof and wrap the wood. Tomorrow I'm going to start on the tow hooks for the front and rear.
1576976291_20191221_180717_mmthumb.jpg
 

PatientZero

@restless_performance
825
865
Exp. Type
Autocross
Exp. Level
10-20 Years
Kansas City, Missouri
With the splitter wrapped up it was time to start on some tow hooks. Cars are required to have a front and rear tow hook for some of the events I plan on going to so I started on the front.

I started by finding the center on the bumper again because I already took my tape off like a dummy. Then I drilled a little hole through the bumper and into the bumper support so it would match perfectly.
1577060811_20191222_120804_mmthumb.jpg


Then I pulled the bumper support off the car and drilled it out to 1" to accept a piece of pipe.
1577060962_20191222_123832_mmthumb.jpg

I cut down a piece of 1" tube so that it would stick out of the bumper far enough for a cotter pin so this would be quick detachable too.
1577061042_20191222_130601_mmthumb.jpg
1577061060_20191222_130607_mmthumb.jpg

I 3D printed a drill jig a couple days ago and used it to make sure I drilled through the center of my tubing for the cotter pin.
1577061562_20191216_134947_mmthumb.jpg
1577061590_20191217_004420_mmthumb.jpg
1577061608_20191217_004447_mmthumb.jpg
1577061640_20191222_125039_mmthumb.jpg

After welding it in.
1577061665_20191222_131852_mmthumb.jpg
 

PatientZero

@restless_performance
825
865
Exp. Type
Autocross
Exp. Level
10-20 Years
Kansas City, Missouri
Then I made a pin out of 3/4" solid stock to fit inside of the receiver so the hook can be removed easily.
1577061780_20191222_135425_mmthumb.jpg

Test fit in the receiver to measure length before cutting.
1577061817_20191222_135549_mmthumb.jpg

Cut to length then I welded a cut down bolt to the end to give the hook something to screw on to. Not my first choice on how I wanted to do this but the hook is aluminum so without a custom machined adapter this gave my the cleanest look(at least that I thought of).
1577061868_20191222_143541_mmthumb.jpg

Hook installed on the car.
1577061986_20191222_145041_mmthumb.jpg

Next will be getting one installed on the back of the car too.
1577062028_20191222_145214_mmthumb.jpg

Here is a video of how the splitter goes on. To put the bumper on too would probably take an extra minute, it attaches with Dzus fasteners. I'll take a video of that at some point when I get stuff finished up.
<iframe width="560" height="315" src="
" frameborder="0" allow="accelerometer; autoplay; encrypted-media; gyroscope; picture-in-picture" allowfullscreen></iframe>

And here is me standing on it. I'm (was 245lbs) in my birthday suit. Down to 213lbs.
<iframe width="560" height="315" src="
" frameborder="0" allow="accelerometer; autoplay; encrypted-media; gyroscope; picture-in-picture" allowfullscreen></iframe>

For the rear tow hook I used another one of the cheapies from Amazon. This is the same hook I used for the front. These are designed to screw in to the factory tow point in the bumpers of newer cars.
1577198617_20191223_100949_mmthumb.jpg
1577198598_20191223_100803_mmthumb.jpg

The Mustang is a little old to have the tow point in the bumpers so I needed to make a mount. I started by getting a bolt that screwed into the hook. It ended up being 12mm x 1.75.
1577198777_20191223_101024_mmthumb.jpg
1577198795_20191223_101052_mmthumb.jpg

I used a piece of 1" tube and welded a nut to the end. The head of the bolt fits inside this tubing almost perfect.
1577198871_20191223_110130_mmthumb.jpg
1577198915_20191223_110222_mmthumb.jpg

I changed my mine halfway through on where I wanted the hook mounted so I had to add an additional piece to lengthen it out.
1577198993_20191223_123022_mmthumb.jpg

I made a plate out of 3/16" and used rivnuts to attached it to the factory bumper support.
1577199081_20191223_132946_mmthumb.jpg

Then I just needed to weld them together. The plan is to get all this stuff powdercoated.
1577199147_20191223_145143_mmthumb.jpg
1577199193_20191223_145124_mmthumb.jpg
 

PatientZero

@restless_performance
825
865
Exp. Type
Autocross
Exp. Level
10-20 Years
Kansas City, Missouri
I usually buy my metal through the company where my brother works because they have a fabrication shop and I can basically get everything at cost. I tried to order a sheet of .032" aluminum to box in the radiator. Well, they went back and forth for about 3 weeks before they finally refused to deliver it because they were concerned it would get damaged. So I went down to Menards and picked up some .025" decorative aluminum sheets. It has some kind of pattern pressed into it so it is actually more rigid and being .025" vs .032" it's lighter too. It looks a little goofy but I don't care a great deal. It won't be that visible once everything is together.
This whole front piece is removable with 4 bolts to access the oil and power steering coolers if needed.
1577772121_20191228_184629_mmthumb.jpg
1577772154_20191228_184642_mmthumb.jpg
1577772216_20191228_184653_mmthumb.jpg

Fits like a glove to the back of the bumper.
1577772255_20191228_185354_mmthumb.jpg

The upper grill will no longer feed the radiator, it will get a blocked off completely.
1577772314_20191228_185404_mmthumb.jpg

On my trip to Menard's I also picked stopped in the speed shop in the back to pick up some of the latest bumper to splitter sealing material.
1577772439_20191228_204218_mmthumb.jpg

Mounting holes drilled every 3". The screws are getting replaced with #6 machine screws and nylocs but it was much easier to get it lined up and mounted with the screws.
1577772533_20191229_115957_mmthumb.jpg

I also got a trim ring 3D printed for the tow hook to match the trim rings around the splitter support rods and clean it up a little.
1577772614_20191230_101557_mmthumb.jpg
1577772671_20191230_110907_mmthumb.jpg
 

PatientZero

@restless_performance
825
865
Exp. Type
Autocross
Exp. Level
10-20 Years
Kansas City, Missouri
With the slight position change of the top radiator hose my intake no longer fits so a new one will have to be made. This time out of aluminum. When I made this back in 2017 I was on a time crunch, I couldn't weld Aluminum at the time, and I already had stainless, so that's what it got made out of.

I ordered up a few 4" bends and a fresh filter.
1578765907_20200108_105336_mmthumb.jpg


Mocking up with the bends taped together.
1578765983_20200110_114207_mmthumb.jpg
1578766026_20200110_114435_mmthumb.jpg

I ordered a 90, a 60, and a 45. The 60 ended up being too much so I cut it back to 45 degrees.
1578766092_20200110_112326_mmthumb.jpg
1578766215_20200110_113259_mmthumb.jpg

Started welding it together.
1578766283_20200110_120340_mmthumb.jpg

Together and mocked up on the car. Still need to add a bracket where it goes through the fender.
1578766415_20200110_122056_mmthumb.jpg

It basically matched the old intake just tweaked slightly.
1578766559_20200110_124029_mmthumb.jpg

The aluminum is 6lbs lighter than the stainless which is a bonus.
1578766635_20200110_123817_mmthumb.jpg
1578766604_20200110_123919_mmthumb.jpg

I also got a weight on the splitter while I had the scales out. 24lbs. This is 1/2" birch plywood. It could probably be cut down a little more.
1578766726_20200110_124158_mmthumb.jpg
 

PatientZero

@restless_performance
825
865
Exp. Type
Autocross
Exp. Level
10-20 Years
Kansas City, Missouri
I'm still waiting on the new k-member but I do know it uses a stock style Mustang motor mount. The AJE k-member is a bolt through bushing style. I can't find anyone who makes an adapter mount for this application only adapter plates for a stock mount. I picked up a set of solid 4.6 mounts and some adapters from Trans Dapt.
1578767000_20200110_204629_mmthumb.jpg

I'm not thrilled with the fitment of these mounts or adapters. All the holes had to be drilled out to give enough wiggle for them to bolt up. One bolt whole in the block was halfway covered with the other three bolts in. Not to mention it really looks like these mounts are going to push the motor forward which I don't want. I may end up making own mounts. I will have to wait and see how everything lines up once the new k-member gets here.
1578767275_20200110_211918_mmthumb.jpg
1578767294_20200110_211925_mmthumb.jpg


About a year and a half ago I decided to drive the car to work one day. About 1hr 20min one direction. On the way home I got caught in a DOWNPOUR. Like doing 40mph and still couldn't see the car in front of you. I almost drowned my car. Since then I've been meaning to make a shield for the air filter since it's directly in front of the tire. Finally got around to it, lol.

I don't have a bead roller so I put a bead down the middle of it by hammering it into one of the slots in my welding table. It's not the prettiest thing in the world but it definetly stiffened it up. I put some rubber edge trim around the edge to clean it up and help seal it to the fender.
1579114429_20200115_122413_mmthumb.jpg
1579114539_20200115_122430_mmthumb.jpg


I wanted larger vents than than what are currently available for my hood. I bought some of the Trackspec Motorsports vents but they werent really as big as I want and I'm not a fan of the two piece design or having to spend another $220 on the smaller vents to replace the factory ones.
Solution, make my own vents. These are just a prototype to check fitment and make corrections if I need to. The final vents will be made out of aluminum.
1579114702_20200114_134334_mmthumb.jpg
1579114729_20200114_134535_mmthumb.jpg

This is how they compare to the Trackspec vents. These vents are MASSIVE.
1579114852_20200115_092610_mmthumb.jpg
1579114874_20200115_093816_mmthumb.jpg

Has anyone ever cut this big of a hole in your car?
1579114999_20200115_115610_mmthumb.jpg
1579115020_20200115_115619_mmthumb.jpg

Fitment is great. One small revision to make and then I plan on cutting out a whole batch of these.
1579115116_20200115_114612_mmthumb.jpg
1579115132_20200115_114601_mmthumb.jpg
1579115156_20200115_114548_mmthumb.jpg
 

PatientZero

@restless_performance
825
865
Exp. Type
Autocross
Exp. Level
10-20 Years
Kansas City, Missouri
I coated the splitter with some polyurethane to waterproof it.
1584233485_20200201_124051_mmthumb.jpg

Then I got some more Vivvid vinyl and transformed it into carbon fiber. I'm pretty sure it even weighs less with the vinyl on it.
1584233561_20200215_190221_mmthumb.jpg
1584233892_20200223_120128_mmthumb.jpg
1584233648_20200215_190209_mmthumb.jpg

I made a block-off plate for the upper grille. The radiator will only be fed from the lower grill. I had some carbon wrap left over so this got the treatment too.
1584233728_20200221_125000_mmthumb.jpg
1584233773_20200221_131117_mmthumb.jpg

There is a little slot on the back side of the grille that this fits into to keep it pushed against the back.
1584233854_20200221_131532_mmthumb.jpg
1584233831_20200221_131523_mmthumb.jpg
 

PatientZero

@restless_performance
825
865
Exp. Type
Autocross
Exp. Level
10-20 Years
Kansas City, Missouri
Here is what it looks like with the front end back together.
1584233987_20200217_122855_mmthumb.jpg
1584233943_20200217_122908_mmthumb.jpg

I had a batch of hood vents laser cut out of aluminum. Then I finally got around to cutting other other hole in the hood.
1584234046_20200224_103832_mmthumb.jpg
1584234174_20200224_103920_mmthumb.jpg

The aluminum louver weighs a full pound less than the fiberglass. I rechecked on a more precise scale.
1584234244_20200223_230542_mmthumb.jpg
1584234269_20200223_230617_mmthumb.jpg

Here is both louvers temporarily installed in the hood. I'm still undecided on if I want to powdercoat them or leave them bare to match the spoiler brackets.
1584234344_20200225_131703_mmthumb.jpg

I used a DA on the one on the left and not the right one. If I leave them bare they will both be DA'ed.
1584234366_20200225_131829_mmthumb.jpg

The new K-member finally showed up after 2 1/2 months so I got a cheap engine lift bar from Amazon.
1584234443_20200305_131803_mmthumb.jpg

Compared to the AJE k-member, the Maximum Motorsports piece is BEEFY. Don't forget that I added the diagonal braces to the AJE. It's laughable how flimsy it is in comparison. Drag racers don't care.
1584234585_20200305_131649_mmthumb.jpg
1584234629_20200305_131717_mmthumb.jpg
1584234606_20200305_131709_mmthumb.jpg
 

TMO Supporting Vendors

Top