The Mustang Forum for Track & Racing Enthusiasts

Taking your Mustang to an open track/HPDE event for the first time? Do you race competitively? This forum is for you! Log in to remove most ads.

  • Welcome to the Ford Mustang forum built for owners of the Mustang GT350, BOSS 302, GT500, and all other S550, S197, SN95, Fox Body and older Mustangs set up for open track days, road racing, and/or autocross. Join our forum, interact with others, share your build, and help us strengthen this community!

SN95 LS3 Pony Build Thread Profile - SN95 Mustangs

This site may earn a commission from merchant affiliate links, including eBay, Amazon, and others.

PatientZero

@restless_performance
825
865
Exp. Type
Autocross
Exp. Level
10-20 Years
Kansas City, Missouri
On the scale. 18lbs vs 35lbs. Much more metal there.
1584234695_20200305_132811_mmthumb.jpg
1584234723_20200305_132848_mmthumb.jpg

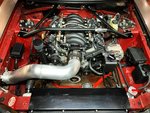
Unfortunately all that extra metal didn't leave room for headers. I was able to cut off one of the primaries on the driver side and get it in with a little bit of Hammer Time. It likely wouldn't be too difficult to rebuild and make work.
1584234845_20200310_134205_mmthumb.jpg

The passeger side however. Hell, I cut one tube off, and used my 4lb hammer in 3 different spots. I then had to remove the starter, lift the engine as high as possible and then pry it toward the driver side to get the mangled header in the car. It's not going to work. I REALLY want to keep the long tubes but it's going to be a pain. Then it's going to suck anytime I have to work on it. Maximum Motorsports recommends the Hooker Blackheart headers to fit but they are $1000+, that's not gonna happen. I ordered a set of shorty's and I'll keep my fingers crossed they fit. Then I'll have to remake or add to the front portion of my exhaust. Oh yea, I have 2 weekends until Kansas City Event #1.
1584235161_20200313_165603_mmthumb.jpg


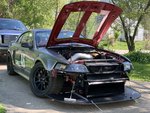
After I got the K-member in and squared to the car I started getting the front suspension put back together.
First I did new ARP wheel studs that have been sitting on the shelf for AT LEAST 3 years.
1585769335_20200315_122709_mmthumb.jpg
1585769353_20200315_122600_mmthumb.jpg
1585769380_20200315_122739_mmthumb.jpg
1585769411_20200315_160822_mmthumb.jpg

While the spindles were off I took them to a local old guy that does a lot of machine work for dirt track cars. I had to have the holes for the tie rods drilled to 5/8" so I could swap over to a bolt-through style tie rod rather than the tapered style.
1585769549_20200322_115522_mmthumb.jpg

Spindles bolted up on the car. I left the spring off the coilover so I could measure and set bumpsteer.
1585769615_20200318_135758_mmthumb.jpg

I ended up using many many more spacers than this. The wheel is pushed forward 1 1/2" inches from stock so I have gratuitous amounts of caster. And the lower control arm mounts higher on the k-member than stock.
1585769639_20200322_120003_mmthumb.jpg
 

PatientZero

@restless_performance
825
865
Exp. Type
Autocross
Exp. Level
10-20 Years
Kansas City, Missouri
This is what I came up with to check bumpsteer. The pencil line is "ideal". I adjusted it to give me the best curve from -2" to +2" from ride height.
1585769898_20200322_153402_mmthumb.jpg

With bumpsteer set I got the rest of the front end bolted together and torqued to spec with all new hardware.
1585770047_20200323_120443_mmthumb.jpg
1585770074_20200323_133024_mmthumb.jpg

Next on the list was getting the sway bars done. I started with the rear because it was (mostly) bolt in.
1585770310_20200326_124211_mmthumb.jpg

I say "mostly" because I still had to weld the tabs on the frame that the endlinks bolt to. Welding on these frames is one of the worth things I've ever tried to weld.
1585770412_20200327_130617_mmthumb.jpg
1585770453_20200328_141116_mmthumb.jpg
1585770493_20200327_130641_mmthumb.jpg
 

PatientZero

@restless_performance
825
865
Exp. Type
Autocross
Exp. Level
10-20 Years
Kansas City, Missouri
The front sway bar was not nearly as straight forward. The mounts had to be relocated because of the new control arm location. Maximum Motorsports sells brackets to relocate it but they are ugly, still use the factory carriage bolts, and I wanted to keep my Steeda billet mounts.
1585771438_swaybar-mount_mmthumb.jpg

My solution. I made these plates to weld to the bottom of the frame.
1585771509_20200328_195724_mmthumb.jpg

My billet mounts will bolt to these.
1585771561_20200328_195827_mmthumb.jpg
1585771891_20200328_200059_mmthumb.jpg

For reference, this is how the factory mounts bolt up.
1585771819_20200328_200307_mmthumb.jpg
1585771858_20200328_200258_mmthumb.jpg

I mocked everything up with the sway bar and tacked the new mounts into place. The sharpie marks show how far forward the sway bar had to move from the factory position. It ended up being about 1 1/4".
1585771951_20200329_122937_mmthumb.jpg
1585771982_20200329_122948_mmthumb.jpg
1585772050_20200329_142644_mmthumb.jpg

Finish welded before the coat of Rustoleum. I left the sway bar off at this point to make it easier to work on the headers...
1585772100_20200329_143242_mmthumb.jpg
 

PatientZero

@restless_performance
825
865
Exp. Type
Autocross
Exp. Level
10-20 Years
Kansas City, Missouri
The damn headers. What a nightmare. At this point I've bought two new sets of headers in hopes I could just bolt something on. Nope.

These are the first set of headers I bought. I could have made these work without too much trouble. However, they are only 1 5/8" primaries, this was going to choke the engine too much in my opinion especially if I go to a bigger cam in the future or possibly more cubic inches. They look really nice though and can't be beat for the price. I will likely hold on to these to use on my C10.
1585772479_20200320_125324_mmthumb.jpg

The floor could have been clearance with a hammer to make these fit but that isn't my style.
1585772526_20200320_125857_mmthumb.jpg
1585772551_20200320_125839_mmthumb.jpg

The second set of headers I bought cost twice as much as the first set and looked like absolute garbage. The welds were horrible. The ports were filled with welding slag that wasn't even attempted to clean up, and they were steel instead of stainless. I didn't get a picture because I unboxed them, did a test fit, and sent them right back for a refund. The passenger side actually fit PERFECT but the driver side was directly in the way of the steering shaft.
1585772972_screenshot_20200401-152634_samsung-internet_mmthumb.jpg


This gets us back to modifying my original headers.
1585773138_20200328_183402_mmthumb.jpg

On the driver side only one tube was really an issue. The front primary was hitting the motor mount. Unfortunately, there wasn't a good way to remake the #1 primary without also moving the #2 primary to make room.
1585773263_20200329_172721_mmthumb.jpg

I had to make this thing to get around the steering shaft and the motor mount.
1585773419_20200329_212624_mmthumb.jpg

It was a pain but I got it back together.
1585773505_20200331_095927_mmthumb.jpg
1585773483_20200331_095900_mmthumb.jpg

Here is the peep hole for the steering shaft to sneak through.
1585773547_20200331_095916_mmthumb.jpg

Installed back on the car. I plan to get these Cerakote'd again once they are finished.
1585773831_20200331_142317_mmthumb.jpg

Clearance around the motor mount.
1585773865_20200331_100538_mmthumb.jpg
 

PatientZero

@restless_performance
825
865
Exp. Type
Autocross
Exp. Level
10-20 Years
Kansas City, Missouri
The driver side was the easy one. The passenger side is not going to be easy. The headers basically stick out from the motor too far. It interferes with the k-member, the motor mount, the strut tower and bell housing while you're trying to get it in the car. And, I also have the starter to contend with on this side. I'm pretty sure I will have to move at least 3 of the 4 primaries if not all of them.
1585774308_20200331_142941_mmthumb.jpg

So far I have it jigged up on my table and I think I have a plan of attack.
1585774360_20200331_195734_mmthumb.jpg

I moved a couple of the primaries at the collector to get it away from the k-member. I think I can keep the last primary tucked in on the front side to clear the motor mount.
1585774440_20200401_133824_mmthumb.jpg


I finally got the passenger header to fit. It was not going in without a fight. I moved 3 of the primaries, had to lift the motor, remove the motor mount, and wiggle the starter in with the header unbolted. It was a complete pain in the berkeleying ass. If I ever had to take that header off I'm selling the car. I had planned to get them recoated but I'm not at all happy with how they look so I'm not going to waste the money. Maybe next winter I'll try making a set of custom headers.
Welding dirty headers IS NOT FUN. Even though they have clearance in the car I still had to beat the crap out of them in a few places to be able to get them in.
1586319092_img_0008_mmthumb.jpg
1586319151_img_0010_mmthumb.jpg
1586319182_img_0011_mmthumb.jpg

In the car, finally. Not proud of these.
1586319347_img_0016_mmthumb.jpg

With the header on I could finally start getting some things knocked off the list.
1586319495_img_0021_mmthumb.jpg
1586319547_img_0022_mmthumb.jpg

I also made some adjustable sway bar endlinks. I used some heavy duty teflon coated heim joints with B7 Alloy threaded rod. I think these should be plenty strong enough. The the mount I overlapped two pieces of 3/16" angle iron and welded them together to make a "U" shape.
1586321614_img_0025_mmthumb.jpg
1586321650_img_0027_mmthumb.jpg
1586321795_img_0039_mmthumb.jpg
1586321702_img_0038_mmthumb.jpg

Finished product1586321746_img_0040_mmthumb.jpg
 

PatientZero

@restless_performance
825
865
Exp. Type
Autocross
Exp. Level
10-20 Years
Kansas City, Missouri
I also made this closeout panel for below the oil and power steering cooler to keep air from pushing out the bottom and forcing it through the radiator.
1586321898_img_0020_mmthumb.jpg

I pressure tested the radiator after doing all the welding on it and I was amazed it didn't have any leaks.
1586321984_6b8558bd-3064-4938-bd43-8177cc999412_mmthumb.jpg

I had to trim the front fenders and bumper to accomidate the new wheel position. The new control arms and K-member pushed the wheels forward 1.5 inches. I started by making a template of the back of the wheel opening. I wanted to try to mirror this as much as possible so it didn't look funny.

1589172920_img_0090.jpg

This is after trimming the bumper. I didn't cut anything off of the wheel opening of the fender.
1589173059_img_0098.jpg

After trimming the bumper I had to trim the lip off of the inside of the fender. Then I hammered the remaining lip flat.
1589173169_img_0095.jpg

1589173224_img_0096_mmthumb.jpg

This was still not enough. Then I made the turnbuckles out of some 1/4" allthread, a couple heim joints, and some aluminum tubing. This pushed the front of the fender outward about 1".
1589173369_img_0085_mmthumb.jpg

Always trying to lose more weight I spent a couple hours to drop the tank and remove the charcoal canister that isn't doing anything.
1589174127_img_0141_mmthumb.jpg
1589174186_img_0143_mmthumb.jpg

Not bad for free.
1589174251_a81b2eca-6501-46f9-967a-b8eed806f4f9_mmthumb.jpg

I got the brakes bled with some fresh Motul 600 (my wife's FAVORITE thing). I also swapped out the rear springs from 325# to 275# at the recommendation of Maximum Motorsports.
1589173681_img_0058_mmthumb.jpg


I pulled it outside and started working on the alignment, corner weight, and adjusting swaybars.

This is after setting cross weight to 50% with me in the driver seat and 10 gallons of fuel. I'm about 225lbs for reference.
1589173846_efae59ae-919d-4e63-a8ae-51af6544e4f0_mmthumb.jpg

After corner weights came the alignment. Strings and random junk to tie them to is all you need.
1589174404_img_0196_mmthumb.jpg

All the camber.
1589175713_img_0195_mmthumb.jpg
 

PatientZero

@restless_performance
825
865
Exp. Type
Autocross
Exp. Level
10-20 Years
Kansas City, Missouri
I still needed to cover up the ugly where the console used to be.
1589174547_img_0126_mmthumb.jpg

I started by making a paper template then cut my shape out of a piece of aluminum.
1589174635_img_0174-1_mmthumb.jpg

It ended up being two pieces that I riveted together.
1589174760_img_0176_mmthumb.jpg

I had some old fake leather material that we tried covering it in but once we got done my wife and I gave each other a look and we tore it off. I ended up spraying it with some bedliner to give it texture and then used some SEM over the top. It looks okay... For all the E36 M3 I can do pretty well, I'm not an interior guy. It's good enough for a race car I guess.
1589174917_0d0d7515-2e41-4b39-9f80-a66e7a2cdfbf_mmthumb.jpg

I had to check the tire to splitter clearance.
1589175905_img_0310_mmthumb.jpg

I ordered a Stroud 5# fire suppression system with 3 nozzles. This uses Dupot FE-36 which is a "clean" agent. It is also legal for SCCA Time Trials.
1593402858_img_0348_mmthumb.jpg

I mounted the bottle in the rear seat bottom area.
1593403096_img_0350_mmthumb.jpg

So far I have one nozzle right next to the driver. It is a 360 degree nozzle that should cover the driver and passenger. The 2nd nozzle is mounted pointed toward the battery and would also cover a fuel cell if I ever go that route. The 3rd nozzle will be in the engine bay pointed at the top of the motor/fuel rail area. The kit didn't come with enough tubing to run the last nozzle so I'm waiting for more tubing to come in so I can finish.

1593403282_img_0445_mmthumb.jpg
1593403395_img_0446_mmthumb.jpg
1593403481_img_0449_mmthumb.jpg

I also got my brake ducts put in. I'm using Full Tilt Boogie spindle plates and 3" tubing from Summit. I used a combination of 3" aluminum HVAC ductwork and a couple cut up funnels to attach to the bumper.
1593403855_img_0419_mmthumb.jpg
1593403761_img_0417_mmthumb.jpg
 

PatientZero

@restless_performance
825
865
Exp. Type
Autocross
Exp. Level
10-20 Years
Kansas City, Missouri
This weekend was the SCCA ProSolo and CAM Challenge at Heartland Motorsports Park. We had 32 cars in CAM and I finished the first heat at #16. I had optimism that I could pick up some more time but it started fading. I put down a pretty good time on the left course but the right course was giving me tons of problems and would eventually be my downfall. This was my first ProSolo and I've never been to a drag strip so I was pretty happy with my .550-.650 reation times (.500 is perfect) and 2.1-2.2 60 ft times.
1593404001_img_0470_mmthumb.jpg

My first run Sunday morning (on the right course, of course) my transmission decided it didn't need 3rd gear anymore so this is where my weekend ended. I managed to pick up about 1/10th of a second but it just wasn't enough and I got pushed all the way back to 22nd, ouch. I'm pretty certain my diff is in dire need of a rebuild and I absolutely have to get more rubber on the ground. At this level of competition the 295's aren't getting it done when everyone else is on 315's or 335's. I'm also a little undecided on what to do with the transmission issue. This transmission was originally an option because it was dirt cheap and allegedly could handle the amount of power I'm making. They have since TRIPLED in price and it obviously can't handle the power so I'm not sure what the next step is. T56 is the easy answer if I had $3k to spend on one, maybe TKO? T-10? I don't know at this point what I'm going to do.
1593404403_7bd734ab-41a4-43e6-8cac-ee4646751426_mmthumb.jpg

I picked up another transmission this morning. I doubt I'll get it put in this weekend with the holiday activities but possibly next week or weekend.
1593538682_f97cbfe9-f181-4508-8da6-03dc413ca885_mmthumb.jpg

Instead of messing around with rebuilding the Trak-Loc I'm just going to do it right the first time. I've read alot of good things about the Eaton Truetrac from road course and AutoX guys. It would also be the perfect time to step up to the 31 spline axles.
1593538851_capture_mmthumb.jpg

I was also playing with the gear ratio calculator and I'm going to swap to 3.27 gears. This will get me to 74mph in second gear shifting at 7000rpm and I could even bump the limiter to 7200rpm to get me to 76mph. This will keep me from ever having to shift to 3rd during autocross and make this transmission live longer. It will also help make 1st gear useable since it's so short. (3.75:1)
1593539333_capture2_mmthumb.jpg
 

PatientZero

@restless_performance
825
865
Exp. Type
Autocross
Exp. Level
10-20 Years
Kansas City, Missouri
My dad just had a new 32'x48' shop built out at his house which is less than 5 minutes away from my house. Lucky for me he also had a lift put it. My dad is by no means a car guy, he wanted the lift for his lawnmower and to do oil changes. Either way I'm free to use the shop so I took my spare tool box over with a bunch of my old or extra tools. I'd love to have my SnapOn box over there with ALL my tools but my dad has a problem with organization and leaving things unlocked so I'm not risking that.
1594518559_img_0495_mmthumb.jpg

The new 10,000lb lift from Champion. The lift seems nice, the guys that installed it left something to be desired...
1594518647_355c32ea-33d8-4ab8-b310-c632a936f8bc_mmthumb.jpg

I took the car over this morning and finally got it off the trailer. It's been sitting on the trailer since the ProSolo two weekends ago. I got it up on the lift and plan to go back over bright and early in the morning to get the transmission swapped out. A Track Night in America is coming up in a few weeks and I want to try to make that. I still need to order my axles and bearing kit but hopefully I can get the new TrueTrac in before then also.
1594518807_216438e3-a2df-41fe-8a9f-182c6a18b089_mmthumb.jpg


So I spent all day yesterday fighting this car. We pulled the exhaust, crossmember, etc and everything went pretty smooth until we tried to pull the transmission. When I originally put this transmission in I did it on jackstands by myself in my driveway. Went right in, easy. Now, with the new k-member the motor sits higher in the car which leaves zero room around the bellhousing to pull the trans back far enough for the input shaft to clear the clutch. To get it out we had to unbolt the clutch with the transmission still in place.
1594664357_img_0561_mmthumb.jpg


We "clearanced" the tunnel with a BFH but there is just not physically enough room. This leaves a couple options.

1. Burn this berkeleying car to the ground and start over. (this is the least fiscally responsible option.)

2. Drop the k-member, bolt up the trans, and reinstall. All the fluids would need to drained, all the wiring disconnected, and I would have to re-square the k-member and redo the alignment. Time consuming and frustrating but doable.

3. To avoid have to do option 2 again in the future when I inevitably break another transmission(I'm on #4 in 3 years). I'm going to pull the motor mounts and modify them so the engine sits back down where it did with the old k-member. This is going to cause issues with the headers so I'm going to swap to the set of shortys that I have and modify the front of the exhaust to bolt up.

I'm seriously considering biting the bullet on a T56 or TKO to stop fighting these stupid problems so I can actually drive and enjoy the car. I want to focus on being a better driver, not worry about something breaking on the car everytime I drive it.
1594664803_img_0563_mmthumb.jpg

In related news, we pulled the old transmission apart to see what broke. These gears seem to be missing a few teeth.
1594664856_img_0565_mmthumb.jpg
1594664891_img_0566_mmthumb.jpg
 

PatientZero

@restless_performance
825
865
Exp. Type
Autocross
Exp. Level
10-20 Years
Kansas City, Missouri
So, yesterday I pulled the headers, motor mounts, and adapter plates. Took the motor mounts back to my house to modify them and use the 5.3 block I have as a jig. I then learned something new about the LS. Not all blocks have the same motor mount provisions.

I cut the rear bolt hole off the mounts and extended it to match up to the bolt hole on the LS3 block. The 5.3 block doesn't have this bolt hole.
1594925143_img_0570_mmthumb.jpg

5.3 for reference.
1594926052_img_0571_mmthumb.jpg


I had to bolt them to the LS3 and tack them in place then finished them with a couple pass on the TIG. Not my prettiest work.
1594925244_img_0568_mmthumb.jpg
1594925278_img_0567_mmthumb.jpg

With the modified motor mounts and getting rid of the adapter plates the engine was able to drop about an inch.
1594925352_img_0574_mmthumb.jpg

Transmission slid right into place. No drama.
1594925436_img_0576_mmthumb.jpg

With the motor lowered back down the long tube don't clear the k-member, they didn't have much if any room in the first place. I still have a set of shortys that I bought during the first header saga. I threw them on but they fit much worse than I remembered. They hit the floor on both sides, interfere with my power terminal, and don't clear the steering shaft. I could make them work but it's just another bandaid. Modifiying my long tubes is another option but they are already a hack job that I want to replace. No sense in putting more time into them either. I think I'm just going to pull the trigger on the Hooker Blackheart headers. They are designed to fit my k-member, and all Tremec transmissions if I go that route in the future. AND, they don't require dropping the k-member to install. They are a big chunk of change but I think in the long run it will be worth it.
1594925822_img_0589_mmthumb.jpg
1594925849_img_0590_mmthumb.jpg
1594925876_img_0593_mmthumb.jpg
1594925909_img_0594_mmthumb.jpg

I guess I'm just waiting on new headers now. I should have just bought them 3 months ago, oh well.
1594925979_1338aee8-2421-48b2-a3ad-46483dc189fe_mmthumb.jpg
 

PatientZero

@restless_performance
825
865
Exp. Type
Autocross
Exp. Level
10-20 Years
Kansas City, Missouri
The Hooker headers came in. They fit exactly how a set of $1100 headers should fit. Really impressed by that. The only real issues are that the stock LS3 dipstick doesn't fit and my plug wires were against the primaries. Both have been ordered.
1595659250_img_0631_mmthumb.jpg
1595659319_img_0633_mmthumb.jpg
1595659349_img_0635_mmthumb.jpg
1595659377_img_0642_mmthumb.jpg

I did cut on them already though.
1595659406_img_0647_mmthumb.jpg

I had to weld on the vbands.
1595659448_img_0652_mmthumb.jpg


TIG welding on fresh stainless is so satisfying.
1595659465_img_0663_mmthumb.jpg
1595659509_img_0665_mmthumb.jpg

The headers are installed. Nearly everything is back together. I need to bleed the clutch and modify the exhaust to match up to the headers. I also used a ton of head shielding on all my battery cables close to the headers.
1595659642_img_0669_mmthumb.jpg
 

PatientZero

@restless_performance
825
865
Exp. Type
Autocross
Exp. Level
10-20 Years
Kansas City, Missouri
I got the header install wrapped up today. I had to cut the exhaust off from the x-pipe forward and move everything around a little bit to match up to the headers.
IMG_0672.JPG

I had planned to tack everything in place with the MIG at the shop and then take it home to finish it with the TIG but I got lazy and just used the MIG on all of it. The rest of the car will likely fall apart or get wadded up into a wall before I have a problem with the exhaust. I did TIG the vbands and flex couplers though.
IMG_0673.JPG

This is basically what I had to cut off. Then I cut this into a couple pieces and just trimmed a little here and there. Making a small change at the joint makes a pretty big change a the other other end 12" away.
IMG_0676.JPG
IMG_0675.JPG

All done. Now I'm waiting on a new dipstick and spark plug wires to get this thing back on the road and make sure there aren't anymore issues. Still trying to make Track Night in America on Aug 12th.
IMG_0678.JPG
 

PatientZero

@restless_performance
825
865
Exp. Type
Autocross
Exp. Level
10-20 Years
Kansas City, Missouri
I did get a good deal on a MyLaps X2 transponder the other day with a year left on the subscription so that's another thing checked off the list for running Time Trials. Next I need to get a new helmet. I'm trying to hold off as long as possible for the new Snell rating to come out.
DAC2BD7E-3E54-4943-9E04-6550ACD232E5.jpg
 
One thing I am REALLY bad about is getting so caught up in things that I don't take pictures. Your car is basically what my end goal is, so this is absolute inspiration for me.

Even the engine (maaaaybe)...driving my cousin's LS3 Trans Am the other day was pretty special...he's got that car down to a science; me, not so much. The LS3 makes so much power everywhere. He has only 3rd and 4th in the T56, with a 5.67 rear gear. You take off and never leave 3rd on the AutoX course and you never wish you had more power either 🤯
 

PatientZero

@restless_performance
825
865
Exp. Type
Autocross
Exp. Level
10-20 Years
Kansas City, Missouri
The new plug wires came in. They were supposed to be here yesterday but that's a different story...


Anyway, I went with some Taylor 10.4mm wires because that's what I could get quickly with the right boot on it.
IMG_0696.JPG
IMG_0697.JPG


Here you can see the difference in the boots. Much more compact.
IMG_0704.JPG


Side by side shot. The old wires were laying directly on the headers.
A90C2C6E-7ADA-425E-89A9-385140BE4A81.jpg


All the rest installed. Now I'm just waiting on a dipstick.
IMG_0707.JPG
IMG_0708.JPG


I also got registered for my first Track Night in America.
IMG_0694.jpg
 
Just read your full thread over on Grassroots - this is a truly amazing build. As a fellow person who likes to make different things work in New Edges' (though I lack the skills/experience/patience to accomplish what you've done here), the car body looks good, though not as good as all the handiwork hiding beneath it.

I am working on attacking boxing up the front rad / oil cooler setup on my car, and will definitely be using some of your setup pictures for reference. That front splitter is a work of art as well!

Best of luck at the TNIA event, I have attended a few of those in the past and (at least in the Great Lakes) were always well-run and professional. Not a lot of issues with on-track behavior of vehicles. Hope you have some fun!
 

TMO Supporting Vendors

Top