The Mustang Forum for Track & Racing Enthusiasts

Taking your Mustang to an open track/HPDE event for the first time? Do you race competitively? This forum is for you! Log in to remove most ads.

  • Welcome to the Ford Mustang forum built for owners of the Mustang GT350, BOSS 302, GT500, and all other S550, S197, SN95, Fox Body and older Mustangs set up for open track days, road racing, and/or autocross. Join our forum, interact with others, share your build, and help us strengthen this community!

8.8 build ratech vs old tech

This site may earn a commission from merchant affiliate links, including eBay, Amazon, and others.

Side to side was pretty snug, it took a bit to pry out the carrier. I double checked my pinion depth and I'm .005 shallow from original setup, so I'm tearing it down to adjust. When I turn the pinion with my drill I can hear a throbbing sound that matches ring gear rotation too, pretty sure that's not right. I never checked ring gear run out because everything is new, guess I need to, and check my pattern in a few different spots as well.
 
Side to side was pretty snug, it took a bit to pry out the carrier. I double checked my pinion depth and I'm .005 shallow from original setup, so I'm tearing it down to adjust. When I turn the pinion with my drill I can hear a throbbing sound that matches ring gear rotation too, pretty sure that's not right. I never checked ring gear run out because everything is new, guess I need to, and check my pattern in a few different spots as well.
They Ford gears?
 
I pulled my pinion back out and was fortunate enough to press off my new pinion bearing without mangling it, unlike the original. Changed shims and reinstalled the bearing. It's good that both the ring/pinion set & the installation kit each have a new crush sleeve & nut, I needed them. Pinion depth is now spot on with my original depth. A couple of observations: The crush sleeve takes a crap load of torque to begin moving, much easier after it starts to give.
Preload is damn sensitive. I was at 15 lb-in and gave it a barely perceptible snug more, ended at max limit, 29!.

I'm still at a loss to explain why I had a difference between my setup bearing pinion depth & the final bearing pinion depth. Is it possible that the bearing cone & cup are a matched pair? I used the same new outer race with both bearing cones.
 
I pulled my pinion back out and was fortunate enough to press off my new pinion bearing without mangling it, unlike the original. Changed shims and reinstalled the bearing. It's good that both the ring/pinion set & the installation kit each have a new crush sleeve & nut, I needed them. Pinion depth is now spot on with my original depth. A couple of observations: The crush sleeve takes a crap load of torque to begin moving, much easier after it starts to give.
Preload is damn sensitive. I was at 15 lb-in and gave it a barely perceptible snug more, ended at max limit, 29!.

I'm still at a loss to explain why I had a difference between my setup bearing pinion depth & the final bearing pinion depth. Is it possible that the bearing cone & cup are a matched pair? I used the same new outer race with both bearing cones.
The preload sensitivity is why I could not get the Yukon crush sleeve eliminator to work. The shims provided did not allow me to get the correct preload. It was either too loose or too tight. It was either try to file the spacer down or use a crush sleeve. I chose the crush sleeve.

It is strange that things changed between your initial set up and final assembly. When I did mine last year it was spot on. I didn't use an old bearing for set up. I bought two new bearings from the same manufacturer (Timken) and took a flapper wheel to one to make a set up bearing. . I used the same races and did the set up without the crush sleeve in place. I oiled the bearings and races snugged up the pinion nut each time checking the preload with a dial torque wrench to make sure it was within spec. When I did the final assembly everything came out. I guess I got lucky.
 
Another trick for using crush sleeves. Get the crush started by using a hyd press if you have one. Measure how much crush it needs and just use the press to get it partially started. These integral diffs are a pain to do, especially in the vehicle.
 
Another trick for using crush sleeves. Get the crush started by using a hyd press if you have one. Measure how much crush it needs and just use the press to get it partially started. These integral diffs are a pain to do, especially in the vehicle.
Good idea. I will remember that for next time.
 
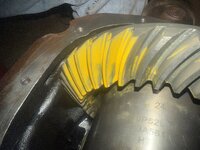
Well, my bad for assuming anything ! After getting my pinion depth spot on to original depth and cranking down my last crush sleeve & nut, my pattern appears to me to indicate pinion depth needs to be increased. Am I reading correctly?

20240921_123338_(1).jpg20240921_123406.jpg

No more single use parts get installed till my pattern checks out. I'll need another crush sleeve & nut and want to use Ford parts. None available nearby, and one dealer wants upwards of $90 for the AR3Z-4C121-A kit!!! Ordered it online for $18 but gotta wait till Wed or Thurs to get 'em. 😠
 
Well, my bad for assuming anything ! After getting my pinion depth spot on to original depth and cranking down my last crush sleeve & nut, my pattern appears to me to indicate pinion depth needs to be increased. Am I reading correctly?

View attachment 98648View attachment 98649

No more single use parts get installed till my pattern checks out. I'll need another crush sleeve & nut and want to use Ford parts. None available nearby, and one dealer wants upwards of $90 for the AR3Z-4C121-A kit!!! Ordered it online for $18 but gotta wait till Wed or Thurs to get 'em. 😠


Stop!
That looks pretty good to me, as long as you have the backlash dialed in. That is pretty much what mine look like..
The drive side is the important one, and I would live with that. It's going to creep out a bit with wear, anyway.

Screenshot_20240926_143446_DuckDuckGo.jpg
 
Last edited:
OK... back from Indy.
Pulled the ring n pinion out again, re installed same with about .050 shim just to see what was going on... what was going on is still a crappy pattern. I have now walked the pinion shims from 0 to .050 without getting a decent result.
SOMETHING is hosed up...
disassembled the entire diff, removed the after pinion bearing and race, purchased a new one. Checked to make sure the race was seated, i threw in .032 for a pinion shim and magically.. got a decent pinion depth pattern. Set the backlash to .008. All is good now.. for some reason. Either there was some kind of funk hiding behind the bearing seat, or the bearing was a different length.
I will check thar next time for sure..
With regards to the Ratech tool, I will never use it again, except maybe as a paper weight.Even when I was somewhat lost and decided to start over using 2 references, the Blacksheep tool and the Ratech tool, I could not get the Ratech to register properly on the bearing seat. So you're holding the tool with your left hand, it doesn't register on the bearing seat at all, so you have to guess where the center of the bearing cap actually is. Then you have to cram a vernier into that little hole in the tool...etc...etc.
By this time, I was way too **** ed off to fool with that Mickey Mouse stuff.
I went back to the BS tool to get a reference and built from that.
In the end, it was an aftermarket bearing ( @DaveW ) that was the issue, and caused all the problems. I will never make that mistake again, once that was taken care of, it took the normal 2 attempts to get it right.
So.. I thought I knew where I needed to be based on passed experience, and I was right, I was misled by the Ratech tool and a funky aftermarket bearing.

BTW.

For those scoring at home.

3.55 gear........ . .025 to .028 pinion shim
3.73 gear.......... .. 031 to .035 pinion shim.
3.90 gear .....,........ .036 to .040 pinion shim
4.10 gears ............. .040 to .043 pinion shim

If you are not in that range, definately start looking at issues with bearing thicknesses, or debris in a bearing seat.
 
Last edited:
Stop!
That looks pretty good to me, as long as you have the backlash dialed in. That is pretty much what mine look like..
The drive side is the important one, and I would live with that. It's going to creep out a bit with wear, anyway.

View attachment 98813
Too late!

I took everything apart and started over, just much more methodically this time:

 
OK... back from Indy.
Pulled the ring n pinion out again, re installed same with about .050 shim just to see what was going on... what was going on is still a crappy pattern. I have now walked the pinion shims from 0 to .050 without getting a decent result.
SOMETHING is hosed up...
disassembled the entire diff, removed the after pinion bearing and race, purchased a new one. Checked to make sure the race was seated, i threw in .032 for a pinion shim and magically.. got a decent pinion depth pattern. Set the backlash to .008. All is good now.. for some reason. Either there was some kind of funk hiding behind the bearing seat, or the bearing was a different length.
I will check thar next time for sure..
With regards to the Ratech tool, I will never use it again, except maybe as a paper weight.Even when I was somewhat lost and decided to start over using 2 references, the Blacksheep tool and the Ratech tool, I could not get the Ratech to register properly on the bearing seat. So you're holding the tool with your left hand, it doesn't register on the bearing seat at all, so you have to guess where the center of the bearing cap actually is. Then you have to cram a vernier into that little hole in the tool...etc...etc.
By this time, I was way too **** ed off to fool with that Mickey Mouse stuff.
I went back to the BS tool to get a reference and built from that.
In the end, it was an aftermarket bearing ( @DaveW ) that was the issue, and caused all the problems. I will never make that mistake again, once that was taken care of, it took the normal 2 attempts to get it right.
So.. I thought I knew where I needed to be based on passed experience, and I was right, I was misled by the Ratech tool and a funky aftermarket bearing.

BTW.

For those scoring at home.

3.55 gear........ . .025 to .028 pinion shim
3.73 gear.......... .. 031 to .035 pinion shim.
3.90 gear .....,........ .036 to .040 pinion shim
4.10 gears ............. .040 to .043 pinion shim

If you are not in that range, definately start looking at issues with bearing thicknesses, or debris in a bearing seat.
Did you have end up going with ford oe bearing on reassembly. Think I have ran into the same bearing issue from a LMR kit. .028 out the gate ran up to .043 not much of a change and terrible issues trying to get my backlash properly set

IMG_4782.jpeg

IMG_4781.jpeg
 
Hello! Could someone please help with any pointers or tips?

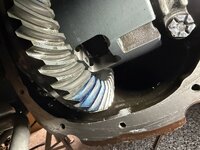
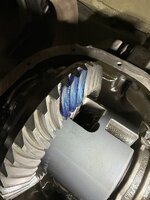
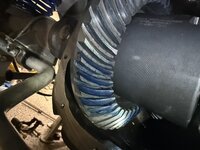
I feel like I’m running into a similar problem where I can’t get my pattern to be right and noise free. Ive had my diff apart now three times and don’t seem to be getting into a “noise free” territory with my frpp 4.10 gears. Tried reading some manuals and looking at everyone’s patterns but there seems to be some variance on what “good patterns” and “noise free” looks like…. Which is leaving me stumped. Do I just start over with a fresh set of gears + bearings since this set has already been broken in? Or do I just live with the noise until it explodes lol.

Pinion preload set to 22 inch lbs originally with Ratech crush sleeve eliminator. Now that the bearings are used it’s settled in at around 12 inch lbs preload. All backlashes were set to .011”

Third and current: Settled on this pattern at .355, decel whine didn’t go away but now there’s whine on both accel/decel after a track day.
IMG_7769.jpegIMG_7768.jpeg


Second pattern: Replaced all bearings w/ timken and tried following advise on the pinion shim thickness and my result at .041 was here drive was quiet but whining badly. Thought the coast pattern was too close to toe so I reduced pinion shim size next and focused on coast side.
IMG_7759.jpeg
IMG_7751.jpeg

Original was .025 shim w/ Koyo bearings. Minimal noise initially (only minor accel whine at 60-70mph) but after 1k mile roadtrip got terrible bearing groan, clunking, and accel/coast whine which I chalked up to my error of not seating a bearing race correctly…
IMG_7475.jpegIMG_7476.jpeg
 
Let me look this over when I get back from Road Atlanta. The 8.8 tends to be noisy to begin with, and of course spinning a higher gear will pro.ote that, but it shouldn't be excessive.
 

Buy TMO Apparel

Buy TMO Apparel
Top