The Mustang Forum for Track & Racing Enthusiasts

Taking your Mustang to an open track/HPDE event for the first time? Do you race competitively? This forum is for you! Log in to remove most ads.

  • Welcome to the Ford Mustang forum built for owners of the Mustang GT350, BOSS 302, GT500, and all other S550, S197, SN95, Fox Body and older Mustangs set up for open track days, road racing, and/or autocross. Join our forum, interact with others, share your build, and help us strengthen this community!

Out of the ashes, a Phoenix is born

This site may earn a commission from merchant affiliate links, including eBay, Amazon, and others.

I ordered a whole bunch of stuff for the Black Friday specials that have been going on to try and help alleviate the cost of the build. Parts have been trickeling in and I have been gathering them in the garage for now. Considering it has been fairly cold and the garage isn’t heated I haven’t been able to put away the parts like I have wanted to so the garage is really starting to get pretty crowded.


Anyway, I picked up the following parts:


  • 2013 GT500 Cooling Fan – Part# M-8C607-MSVT
  • Aeroforce Interceptor Single Gauge – Part# CN101
  • Aeroforce Black Bezel –Part# AF-BEZEL-BLACK
  • Aeroforce Black Boss 302 Gauge Face – Part# AF-LOGO-BOSS302
  • Aeroforce 5V regulator kit – Part# AF-SENS010
  • BMR K-Member - Part #KM018
  • BMR Tubular A-Arms – Part # AA021
  • BMR Radiator Support – Part # RS003
  • Kooks Long Tube Headers 1 7/8ths – Part# 11412400 Supersedes Part #60-41-188
  • McLeod RST Clutch with Lightweight Steel flywheel Package – JPC Racing Part # 1124
  • Moroso Race Oil Pan – Part # 20572
  • Oil Pan Gasket – Part# BR3Z-6710-A
  • Oil Pickup Tube – Part# BR3Z-6622-A
  • Oil Pump – Part# BR3Z-6600-A
  • Roush Vent Pod – Part# 404470
  • TSS Billet Oil Pump Gears – JPC Racing Part # 1760 (It may be the same as TSS’s but I couldn’t find a part number on their website)


I got sorta bored just doing nothing so I went out and grabbed the Gauge bezel off of the car so I can put in the Roush vent pod and drop in the Aeroforce gauge to see what it looks like.


20141222_191717_zpsd0ec7e3f.jpg


20141222_191722_zpse41f4b46.jpg


I was trying to keep it somewhat sleeper where if you weren’t looking for it you wouldn’t really notice it in there. I may take the black gauge face that came with it and remove the Aeroforce logo and put a Red Boss 302 logo in that one and see what it looks like.


First Post updated with a Parts List
 
Here are some pics of the Moroso Race Pan since it is such a work of art. I have seen a lot of Boss 302 guys running the Moroso Race Pan as well as the Canton unit (In fact that is what Kenny Brown uses on his line of cars). When asking about it I just kept getting the same answer about the Moroso Race Pan. The internal baffling and trap door setup works to keep the oil where it should be and will prevent any oil starvation issues when braking and in mid turn. It also has a bung on it for an oil temperature sensor which is an excellent tool to have for when you are going around the track to keep an eye on things and just a great idea in general. You will need the 5V regulator to run it with the Aeroforce gauge though so don't forget to either buy the one Aeroforce sells or makeone yourself. I just have to figure out which oil temperature sensor to get and get it all wired to the Aeroforce gauge. I believe Aerofroce has one but I will email them after the holiday and see if that is what I should be using.

20141223_183747_zps0f41b3d5.jpg

20141223_183756_zpse071687e.jpg

2014-12-17172555_zpscc65213a.jpg

It is supposed to be beautiful out this weekend so I plan on getting the BMR pieces installed as well as clean up a lot of the items in the garage and putting them in bins for storage until it comes time to re assemble the engine.

Speaking of which I started to get things finalized with the gentleman at JPC regarding the build of the shortblock. I will be using a 2013 block in which they will be using the Darton Hat Style Sleeves with an offset ground crank creating approximately 326CI (so much for the 302 in Boss 302 lol). Internals will be custom Diamond Pistons, Total Seal Rings AP finish, Manley Lightweight I beam rods, King HP Series Mains, Clevite Rod Bearings, and ARP Hardware along with Teflon Skirt coating on the Pistons. I will keep the stock compression ratio as I plan to run it on pump gas until I can find a reliable place for E85. I just put down the deposit to get started on the pistons so I will be working pretty much every day for the foreseeable future in order to get everything completed. I am hoping to have everything done before Carlisle in June but funding will be the deciding factor in whether or not that will actually happen. If not it's ok no biggy but it would be kind of nice.


Sean
 
Sean said:
I was trying to keep it somewhat sleeper where if you weren’t looking for it you wouldn’t really notice it in there. I may take the black gauge face that came with it and remove the Aeroforce logo and put a Red Boss 302 logo in that one and see what it looks like.
Did you buy the Boss 302 gauge face from Aeroforce?
 
NFSBOSS said:
Did you buy the Boss 302 gauge face from Aeroforce?

I got it from Lethal Performance. They have pretty much everything that you would need for the gauges so I picked it up when I bought them.
 
ArizonaBOSS said:
I really appreciate you giving me your brand new motor until mine gets built hahaha. Very nice dude! Glad to see you got it all up and running! Are you still racing down in Arizona?
 
I got some assembly lube in the mail on Saturday and got to work putting in the TSS Oil Pump gears. While digging through some threads I found a post by Chris (BadPiggy) on S197. On the TSS Oil Pump Gears they have the number for what gears go into which kind of oil pumps as well as a set of numbers on the bottom. Here I thought that they were just a batch number but that doesn’t appear to be the case.

BadPiggy;2000517 said:
Interesting.
Just called TSS.

They place those lot numbers on the rings just before shipping.
They record who received what lot numbers when sent out.
If they catch a bad gear going out...or a gear fails after it's gone out...they know who to contact.

Sounds to me like it's one way for them to lookout for us, the end user.

Anyway, onto the pictures I guess. Due to the fact that I have little flakes of metal throughout my entire engine I am going to be replacing most of the internal engine parts. So I hit up Steve over at Tasca and they got me a new Oil Pump.

20141223_184206_zps91d61ba1.jpg

I opened up the oil pump and pulled out the cast oil pump gears and grabbed the Permatex Assembly Lube and coated the news gears in some lube. I oriented them in the same way as the old gears came in. It took a bit of persuasion to get them in as they didn't just drop in like the stock gears. I put a light coat of assembly lube on the new gears so that the rotating surfaces were red and covered but not too covered where you had these giant globs of lube on the gears. After rotating the gears by hand a couple of times to make sure that the assembly lube worked its way into everything I closed it up and torqued the screws to 90in./lbs. When I tightened up the backing plate I rotated the gears as well to ensure that there were no issues or binding. I forgot to mention to make sure you either buy a new oil pump pickup tube gasket or reuse the old one from the oil pump if you decide to buy a new oil pump.

Old
20141227_144811_zps14d4a3fa.jpg

New
20141227_151341_zps0ff4c23c.jpg

Parts used
  • TSS Billet Oil Pump Gears (JPC Racing Part #) – 1760
  • Ford 5.0 Oil Pump Part # - BR3Z-6600-A
  • Permatex Ultra Slick Assembly Lube Part # - 81950
Tools Needed
  • T30 bit
  • 3/8in. socket
  • Torque Wrench
Torque Specs
  • 90in./lbs.
 

ArizonaBOSS

Because racecar.
Moderator
8,730
2,734
Arizona, USA
Sean said:
I really appreciate you giving me your brand new motor until mine gets built hahaha. Very nice dude! Glad to see you got it all up and running! Are you still racing down in Arizona?

It's the least I could do...

Yeah our season starts here January 10th, first race for me Jan 24.
Putting this thing back together is a lot less complicated than it seems--just follow the directions.
 
  • Holy schnikes dude, I don't think I ever said anything over here about the new engine.

    Anyway, After talking to the guys at JPC we came up with a good game plan. I am pretty much trying to make the engine as bullet proof as you can Here is just the rundown on it.
    • Used 2013 Block; Decked, line honed, bore honed w/ torque plates & Competition Balanced
    • Darton Hat Style sleeves ( increases the regidity and there will be less deflection compared to the factory style sleeves since I will be going with a big bore block siimilar to those on the Cobra Jets)
    • Offset Ground crank with a 3.800 stroke (creating approximately 326 CI thanks to the Darton Sleeves. It would have been 318 if I tried to use the factory sleeves. So much for the 302 in Boss 302 haha)
    • Custom Diamon Pistons lightened for N/A combo w/ a polymer teflon side skirt coating and a gold thermal ceramic top coating
    • Total Seal Rings (AP Finish, I'm not sure what that means to be honest)
    • King HP Series Main Bearings (coated bearings)
    • Clevite Rod Bearings
    • ARP Hardware
    • TSS Billet Oil Pump gears
    • MMR Billet Crankshaft Sprocket
    • Boss Tensioners and timing components etc.
    • Canton Race Oil Pan


    I'm not sure on heads and cams as of yet. I am just focusing on the shortblock for now but once I get that paid off which should be by the end of January I will talk about the heads and cams. I would like to go with a custom grind cam similar to the ones that Darren put in his car but I know that would require the MMR springs and my biggest fear is having PTV contact and having to do some work to the pistons in order prevent it from happening.
 
Sounds like an awesome build

I'm curious as to why you decided to go with a Canton oil pan instead of the Moroso you showed earlier

Will you be using piston oil squirters?

I didn't see them listed, but I'm guessing you'll probably be going with an ATI damper and CJ pulse ring, as well

Since JPC is handling the shortblock, topping it off with some JPC/RGR heads must be a tempting choice
 
VTBoss302 said:
Sounds like an awesome build

I'm curious as to why you decided to go with a Canton oil pan instead of the Moroso you showed earlier

Will you be using piston oil squirters?

I didn't see them listed, but I'm guessing you'll probably be going with an ATI damper and CJ pulse ring, as well

Since JPC is handling the shortblock, topping it off with some JPC/RGR heads must be a tempting choice

Doh! I always get Canton and Moroso mixed up for some reason. It isthe Moroso Race Pan that I have not the Canton one, my apologies.

That is a really good question and one that I forgot to ask about when I was talking about the guys at JPC. I would imagine that we would delete the oil squirters like the stock Roadrunner does and since it is a 2013 block they are more than likely going to do so. Either way, I am now curious and I should ask that when I talk them again.

See, I knew I was forgetting something haha. Yes, I plan to add the ATI Super Damper along with the Cobra Jet pulse ring to the build. It certainly is a tempting proposition to add the heads on there as well. The first thing that they told me (I forget if it was Aaron or Eric) was that Rich is excellent with heads. It is his forte and what he does best with and that I should send them the heads since there is no use replacing them if they are not garbage. If they are good they are going to look and see what Rich wants to do with them since the Boss heads don't have nearly as much meat on them as the GT heads do so they can't get too aggressive with them. I mean it would be nice to get some good heads on there and the 2015 heads were stupid cheap last I looked ($1250 for the pair). I even brought that idea to them to see what they wanted and that was their suggestion to me. I mean they certainly could have sold me the $3,000 stage 2 heads but I think they feel it is best to try and keep the original heads on the car.

twistedneck said:
So in the end was the root cause a spun rod bearing? if so was that a result of oil starvation from low oil level or was it due to over rev?

Excellent thread and your new setup its going to fly.

It certainly looks it as I really haven't been able to find any evidence to the contrary. There was some talk on SVTP of checking the wrist pins for any signs of detonation but I wouldn't even have any idea of what to look for if I did pull the wrist pins out. That being said, I'm not certain why the bearings spun since I pulled out 8 quarts of oil from the engine.

Thanks! I sure hope it will fly. Right now my expectations are pretty high as JPC had a car with 318 CI making around 550, so I am hoping that my car will be able to make that much and any more than that would be icing on the cake.

Here is a video of that car.

https://www.youtube.com/watch?v=X1dP4B7DVcQ
 
Great write up here. We drove both of the 2012 LS's they had (and the 13). They had a higher mileage one and a lower mileage one. We did quite a bit of research on where those MP cars had been and who had them. One of the 12's was a exec daily driver, and the other was a press car that was passed around to all the magazines for review.

Definitely subscribing to your thread, thanks for sharing all the documentation!
 
Hi everyone, back from the dead finally!! I forgot to update the thread here but I got the engine home this weekend for final assembly :) bear with me as I will update with the events of this weekend and lunch time haha.

I just want to say that my Boss was built in December of 2010 so the part numbers may vary from what you might have. The best thing to always do is give your VIN# to your favorite Ford Store (in my case Steve@Tasca) and let them look up the parts for you.

Back in May, I got a call from Eric at JPC letting me know that Rich was coming to MD for his nephews graduation from Annapolis and had dropped off my shortblock and that it was all ready for whenever I would want to come and pick it up. Not long after I sent a couple of my guys down to MD and had them pick up the motor for me and it has long since sat under a rack in one of our warehouses until I had the funding to finish the rest of the motor. Fast forward to this weekend and I almost at the finish line! The only things that I am currently missing are the heads, head gaskets, lockouts, cams, engine sensors and I’m sure a bunch of miscellaneous odds and ends. I got ahold of Eric late on Friday and he told me the head gaskets and heads shipped from them on Friday, so I should hopefully have them on Tuesday and I will be that much closer to getting this completed.

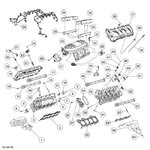
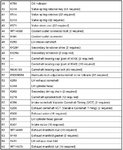
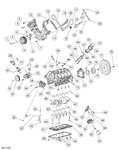
On to the good shiznit! For anyone interested I have these exploded view of the parts list for the Boss and GT motors (this one is the Boss motor but they mostly share the same components, just different parts and subsequently, part numbers) if you want the GT version, let me know and I can get that to you.

20189707216_1380c3de34_b.jpg

20027951560_c24390a804_b.jpg
19595005523_d3b759a9f8_b.jpg


19593321674_e7db78c27b_b.jpg

20027971858_31e2dfe02d_b.jpg
20189706896_1a4c07c38a_b.jpg
19595005233_f4b4606f40_b.jpg
 
That being said, I got to work on getting the engine on the stand …. Although I jumped the gun a little :/ I wanted to go ahead and put the Rear main seal and retainer plate in before I bolted it up to the stand, but I didn’t have the rear main seal tool or the old seal, nor could I find a piece of PVC that was the same size so I can always put that on when I get the tool. As is, the shortblock isn’t that heavy so I can put it back up on the tailgate of the pickup in its crate and put it on then.

20025586228_c1b9934e0e_b.jpg

Retainer plate

20025589828_8ff23840d0_b.jpg

Rear Main Seal

  • Rear Main Seal Plate (Retainer) - BR3Z-6K301-A
  • Rear Main Seal - AT4Z-6701-A
 
That was the first bit of misfortune, so I went on ahead and grabbed my oil pump. I looked at the crankshaft to locate the orientation of the two flat parts on my crankshaft. In the picture you can see that the flat part is at an 11:58 position, so what you do is you rotate the gears in the oil pump so that the subsequent marks align with the flat pieces on the crankshaft.

20213607615_7f1ef1dc75_b.jpg

From there all you do is slide the oil pump flat up against the block and you can put your oil pump bolts and studs into place. I even had my helper with me today! :D

20187339696_aa2bf9566e_b.jpg

Here I ran into my second bit of misfortune, my torque wrench only goes down to 240 in/lbs. and 24 ft./lbs. so I can’t torque the bolts down on the oil pump. Well, that sucks but I can torque those down later. No biggie there, shiznit happens I guess. That’s what I get for not planning accordingly. Proper preparation prevents piss poor performance!

19592630143_dc0462f175_b.jpg

I will go over the torque sequences once I get the torque wrench as the oil pump has some specific requirements for the torque settings.
 
So I turned my attention next to the head studs. At least I can get those in without any issue. I grabbed the dowel pins for the heads (you should always get news ones for your build, they were like 4 bucks) and tapped them into place with my hammer. Once they reach the bottom they make a different sound when you hit them.

20025591528_19140e2f55_b.jpg

I ordered the block back in January and in the subsequent 5 months JPC and myself had forgotten if I actually had a 2013 block like the invoice stated or if that was just a place holder signifying a used black was used on the invoice so I talked to Eric at JPC about head bolt options and while he agreed that I would probably be fine with the TTY bolts, it never hurts to go with the ARP head studs. I agreed with that sentiment but my wallet was none too happy about hearing that haha. So I went and grabbed a head bolt from the Boss and proceeded to screw it into the block to see if it would go in. Sure enough it screwed in hand tight without issue. Well I guess that solves that debate!

19593793743_8edc043e87_b.jpg

Or so I thought …..


I went to go put the ARP studs in and they drop right to the bottom of the hole without touching a single thread ….. ****ING ****ING DICKHEADED FAT LEASBIAN WHO SEXUAL ASSAULTED A PENGUIN!!!!

****

19590934374_d95ba761b4_b.jpg

I can’t win, Uncle Murphy has struck again. Anything that could have gone wrong went wrong. I hope this isn’t a sign of things to come. I am thinking maybe either ARP labeled the wrong box or for whatever reason the 2012 head bolts will fit in the hole for a 2013 block after being stretched? Or if you see that I ****ed something up, speak up and call me the retard.

  • Dowel pins - FA8Z-6AA008-AA
  • 11-12 ARP Head Studs - 256-4702
  • 13-14 ARP Head Studs - 256-4301
 
Well after today I was sort of bummed and I remember what Matt Dasilva said in his Coyote swap thread on S197:

Matt D;773543 said:
Let me start off by saying... when doing a big or decent size build the main key (other then running out of money) is to not loose motivation!

So, I ran into my bedroom and stared at Mt. Car parts and grabbed the 3 boxes at the bottom of the pile. I figured I shouldn’t lose motivation so let me see this beautiful thing on the motor. Too bad you are never going to see it once it is in. I dug through my parts bin and pulled out the baggie labeled Oil p/u tube and spacer and I threw those in “my parts washer” tubs and cleaned them off with some dawn, clean water and coffee filters since they are cheap and lint free. I went ahead and put the pickup tube spacer on, and then I grabbed my oil pan gasket/windage tray. While I am modeling my thread off of tmcolegr’s awesome build thread, you will notice no bare feet here! Only how ****ing poor I am right now and hoping my shoes will last me another couple of weeks -_-

20027005349_acaffd51e6_b.jpg

I took a look at it along with most every part I have put on to ensure there was no dust or debris that could get into the motor and cause damage and would you look at that … dust and junk!

20219357871_f0b6fc66e6_b.jpg

One of the many things I distinctly remember from tmcolegr’s build thread is cleanliness is very important as well as check all your parts even new ones so I am being careful with the items I put on there. I wiped off the dirt and lubricated the gasket on both sides of the windage tray. Remember, the convex side faces up (just as it is in the picture. I then proceeded to grab my oil pump pick up tube and lubricated the gasket on that as well and put it into place.

19592637043_4188b80d6f_b.jpg

I didn’t torque any of the pickup tube bolts or the spacer bolt as those are in/lbs. as well so I will get those specs when I do that. I then put the pièce de résistance on and turned the shortblock around and looked at it. It is starting to look like a real engine again!!!! Motivation returned!

20021456090_8ce8869ca2_b.jpg

I did not check pickup tube clearances yet as I didn’t torque anything down but once I do I will highlight the method in doing that as well.

  • Oil Pan gasket/Windage Tray - BR3Z-6701-A
  • Oil Pump Pickup Tube & Gasket - BR3Z-6622-A
  • Moroso Race Oil Pan - 20572
 

TMO Supporting Vendors

Top