- Welcome to the Ford Mustang forum built for owners of the Mustang GT350, BOSS 302, GT500, and all other S550, S197, SN95, Fox Body and older Mustangs set up for open track days, road racing, and/or autocross. Join our forum, interact with others, share your build, and help us strengthen this community!
You are using an out of date browser. It may not display this or other websites correctly.
You should upgrade or use an alternative browser.
You should upgrade or use an alternative browser.
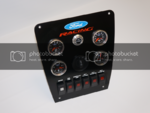
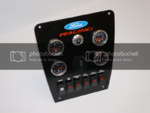
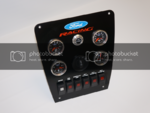
Confluence - The Gauge Page
- Thread starterJimmy Pribble
- Start date
This site may earn a commission from merchant affiliate links, including eBay, Amazon, and others.
More options
Who Replied?VTBoss302 said:
Whoa, is that for sale somewhere????? I need that.
ArizonaGT said:Whoa, is that for sale somewhere????? I need that.
Watson (not the IBM supercomputer) Engineering...
VTBoss302 said:
I like it a lot
VTBoss302 said:Watson (not the IBM supercomputer) Engineering...
Already bought the base (empty) panel from them!
Nice right up Jimmy, I always enjoy reading your articles because you put out a lot of info with out sounding like a tech manual.
One thing I noticed when I swap my center console for the Metra is if the controls are disconected the fan will blow on high all the time. This is probably not an issue most on the track but just thought I throw it out there.
One thing I noticed when I swap my center console for the Metra is if the controls are disconected the fan will blow on high all the time. This is probably not an issue most on the track but just thought I throw it out there.
- Thread starter
- #49
racered302 said:Nice right up Jimmy, I always enjoy reading your articles because you put out a lot of info with out sounding like a tech manual.
One thing I noticed when I swap my center console for the Metra is if the controls are disconected the fan will blow on high all the time. This is probably not an issue most on the track but just thought I throw it out there.
Thanks for the hat tip! I am genuinely encouraged to do good work for you guys. Cheers!
I noticed that issue with the fan, but I thought it was simply because I already had my fan on when I unplugged the controls. Also, I had left the radio blaring. I assumed (did not test) that if I set the radio and HVAC to off, it would stay off when I unplugged the panel. I might even be working on this a little even today, so I will experiment.
- Thread starter
- #50
I need to program my water temp alarm. Any suggestions for my top temp? I will cross-post this question in the track cooling thread. Thanks!
Jimmy
I set mine at 235, above that the Limp Mode starts. Oil Temp I have at 265. What is remarkable is the temps drop right down when you keep the revs below 7000 for a lap.
Steve
I set mine at 235, above that the Limp Mode starts. Oil Temp I have at 265. What is remarkable is the temps drop right down when you keep the revs below 7000 for a lap.
Steve
- Thread starter
- #52
steveespo said:Jimmy
I set mine at 235, above that the Limp Mode starts. Oil Temp I have at 265. What is remarkable is the temps drop right down when you keep the revs below 7000 for a lap.
Steve
Thanks, Steve.
- Thread starter
- #53
VTBoss302 said:
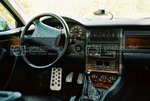
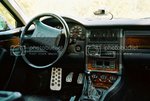
It's relevant, because that Audi setup is exactly what I talk about in my article. Not-ideal, but at least a full compliment of gauges, even on an 80 hp 1970's Audi Fox. For a RCWALP, it is inexcusable to omit such things, but I guess they needed more stuff to differentiate the LS. Two of those Audi 90's (your photo) are what my team runs in LeMons/Chump and my other personal track car is the coupe version of that car. In all of those cases, the gauge pack has been moved up where those dash vents are for better readability. Sheesh, we need to grab a beer sometime.
- Thread starter
- #54
Got a data logger. Full write-up on my blog here: http://www.jimmypribble.com/blog/2013/08/boss-ch-14-ford-racing-gauge-pod-part-2/
As usual, I welcome peer review and even editing notes. Thanks for reading!
As usual, I welcome peer review and even editing notes. Thanks for reading!

(Boss Ch.14) Ford Racing Gauge Pod, Part 2
Innovate PL-1 Pocket Logger
The dog days of another Texas Summer has inspired me to begin working on an upgraded oil cooler for the Boss. The new oil temp gauge shows just how quickly oil temps rise even on an ordinary work commute with steady highway driving in a lower than normal gear. Driven in anger on a hot Texas road course, the Boss will send oil temps high enough to destroy the best synthetic oil that science can develop.
It should be enough to install an oil cooler and make sure that the oil temp holds at an acceptable level. But, that's not my way. Since I will be assembling the oil cooler myself, I am going to want some data to show how much improvement the oil cooler makes, as well as what kind of oil pressure loss there is across the oil cooler. Luckily, Innovate makes a data logger for its gauges.
The Innovate PL-1 Pocket Logger ($99) is a small data logger that records from any Innovate gauge, or multiple daisy-chained gauges, onto an SD card. The data can then be easily imported into Innovate's LogWorks 3.0 software for playback and analysis.
Installation
This will probably disappoint some people, but the PL-1 is designed to be hardwired into the car. There is no battery or 12V power port option, which seems more suitable for a tuning tool such as this. Still, installation is straightforward. I used a Bussmann Add-A-Fuse in the passenger kick-panel fuse box to provide power in the same way I powered the gauges. I secured the ground wire to a good ground source and I connected the signal cable to the data OUT cable of the MTX-D oil temp and pressure gauge.
Then I went for a test drive and everything was great.
The Real Installation
Haha! Of course that's not what happened! Is anything I do ever that easy? Two problems:
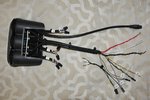
1. I could not daisy-chain the gauges. In the photo above, you can see that each gauge has a pair of wires coming from it (here labelled 1, 2, and 3). These are the Data IN and Data OUT wires. They are designed to be daisy-chained together, but they all use female connectors. That means they have to be daisy-chained with serial cables (same as the one that goes from the gauge to the PL-1), each of which is almost four feet long! That means packing almost eight feet of extra wire into the gauge pod, which is already at capacity. Impossible. So for now, I chose to only read data from the oil temp/pressure gauge.
Honestly, I don't understand the thinking here. Aren't most gauges arranged together in a cluster? In what application will gauges be four feet away from each other? Obviously, the smartest solution would be to make the Data IN be one gender and the Data OUT be another. Innovate could still sell jumper cables to those who need them.
2. The serial cable (4-pin to 4-pin) did not reach to where I wanted to mount the PL-1. This one had me stumped for awhile, because I wanted to mount the PL-1 in the center console bin and I did not see any other acceptable options. Then I realized that each of the three gauges came with its own serial program cable (4-pin to serial connector) to use when programming the gauges. If I set one aside to use for programming, that left me with two four-foot cables to use.
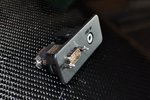
I found a serial adapter in my box-o-vintage-computer parts and mounted it next to the LINE IN connector in the center console bin. This location is not only logical, but it would be easy to revert the car back to stock, if needed. Then I slotted the other removable plastic piece from the bin and ran the power cable through. I buttoned everything up, connected the power and data, and then mounted the PL-1 using Velcro.
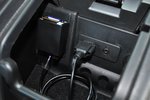
The finished installation.
Using the serial connector and the two redundant cables not only allowed me the length I needed to mount the PL-1 exactly where I wanted, but it also allows for an easy way to program the gauge by connecting the computer via the serial connector, instead of having to open-up the gauge pod.*
Recording Data
Recording data couldn't be easier. There is one button with a status light. Push it to start recording, push it again to stop. The light will fast blink to let you know the PL-1 is recording. Multiple sessions can be recorded to the SD card and amended to a single file. If there is a problem with recording the status light has the ability to blink diagnostic codes.
Data Playback
Download the Log.d32 onto a computer with Innovate's LogWorks 3.0 and open the file for playback and analysis.
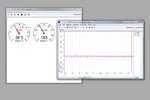
An example log file showing two minutes of a Boss Mustang warming-up on a 96 F degree afternoon. The car had already been idling for 10 minutes when this sample was taken, but in this four minute segment, the oil pressure still dropped from 51 psi to 36 psi and the oil temp rose from 176 F to 187 F.
Conclusion
The Innovate PL-1 is simple and inexpensive, but will be a valuable tool as I test ways to keep the Boss's temps under control on the track.
J I M M Y
* The Innovate gauges cannot be programmed while daisy-chained. They must each be connected directly to a computer for programming. With my current setup, I would only be able to program the last gauge in the chain by connecting to the serial connector in the center console bin.
- Thread starter
- #56
PJWANNABE said:I don't know if it something you want to do, but if you removed that jacketing and wrapped the leads in friction tape you could probably pack more wire into the pod.
My feelings exactly - not sure I wanted to do that at the time. If I am going to go to that trouble, then I will probably just take the still unused M-M patch cord that came with the logger and use the connectors to change the gender on two of the gauge inputs. Less overall wiring and I don't have to buy anything else. I have already mutilated these gauges anyway.
Or, I could decide that I don't need to log my water temps and battery. :
- Thread starter
- #57
racered302 said:One thing I noticed when I swap my center console for the Metra is if the controls are disconected the fan will blow on high all the time. This is probably not an issue most on the track but just thought I throw it out there.
Here is what I observed. I made sure that all HVAC was absolutely turned off, before I removed the control panel. When I turned the car on, all was silent for a couple of minutes(?) and then the defrost blew on high. If that is by design (and it seems that it must be), then it is probably an "arrive alive" kind of fail-safe, wherein if there were a problem with the controls, the HVAC defaults to a setting that could keep the windshield clear in inclement weather conditions. That's clever thinking on Ford's part.
Jimmy Pribble said:Here is what I observed. I made sure that all HVAC was absolutely turned off, before I removed the control panel. When I turned the car on, all was silent for a couple of minutes(?) and then the defrost blew on high. If that is by design (and it seems that it must be), then it is probably an "arrive alive" kind of fail-safe, wherein if there were a problem with the controls, the HVAC defaults to a setting that could keep the windshield clear in inclement weather conditions. That's clever thinking on Ford's part.
That's what I was talking about. I didn't pay attention to where it came from only that it did it. I'm not sure what the fix is out side of stashing a Metro display module in the dash after it's adjusted or integrate it in the gauge panel. Maybe there's a loop back plug that can be used so it doesn't start it's sub routine, Roush might be a good starting point for after market gizmo's. Good luck
- Thread starter
- #59
I finally got around to installing my water temp sensor. Full write-up on my blog is here:
http://www.jimmypribble.com/blog/2014/05/boss-ch-16-ford-racing-gauge-pod-part-3/
I cannot stress enough how much of a PIA this was. No room to see, no room to work.
Peer review is welcome.
http://www.jimmypribble.com/blog/2014/05/boss-ch-16-ford-racing-gauge-pod-part-3/
I cannot stress enough how much of a PIA this was. No room to see, no room to work.
Peer review is welcome.
Ford Racing Gauge Pod, Part 3
Water Temp Sensor Installation
In which I finally get my Innovate water temp gauge to work.
Warning!
In concept, this is a very easy job. But visibility and room to work is very limited. I cut my hands up and just generally found this job to be a pain. Also, because you are screwing a fitting into the block, you run the risk of not making a watertight seal and worse, you could cross-thread or strip the threads in the block. This is unlikely to happen if you are careful, but it is a risk.
Overview:
Part 1: Installation of Ford Racing Gauge Pod and multi-function Innovate gauges.
Part 2: Installation of Innovate Data Logger.
Part 3: Installation of water temp sensor for the Innovate water temp gauge.
On the driver’s side of the 5.0 Coyote/Roadrunner block is a port for an optional engine block heater. Using an adapter fitting, a water temp sensor can be screwed into this port. The sensor cable runs very close to the headers, so the use of a protective heat sleeve is recommended.
Tools and Supplies:
A 14 mm internal hex socket isn’t something that everyone has in their toolbox, so make sure you get that ahead of time. Get the proper Motorcraft coolant, too. Here is what you need:
10 mm socket
14 mm hex drain plug socket
High-temp RTV
Motorcraft coolant (check your owner’s manual)
Parts:
3/4″ NPT x 1/8″ FNPT Hex Bushing
The key to this project is this adapter fitting. This should work for most applications, but please check your sensor thread size and get the proper fitting. I also recommend a protective heat sheath and stainless steel ties. A complete parts list is at the bottom of the page.
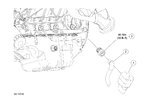
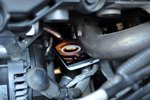
This is the only way I could see the block heater plug. Once I established its location, all work was done by touch.
Procedure:
1. Route sensor from the gauge and through the firewall (see Part 1).
2. Thread sensor and cable through protective heat sleeve and set it aside.
3. Use 10 mm socket to remove airbox.
4. Use 14 mm internal hex socket to remove block heater plug. Clean-up the coolant you just spilled everywhere.
5. Screw sensor into adapter fitting. Use high-temp RTV on threads (follow RTV instructions).
6. Screw fitting/sensor into block. Use high-temp RTV on threads (follow RTV instructions).
7. Use stainless steel tie wraps to secure protective heat sleeve over sensor cable.
8. Attach airbox to intake, but do not bolt it down. Leave it so you can observe the new plug/sensor and check for leaks.
9. Start car, check for leaks, and refill coolant as needed. Check gauge to make sure it works.
10. Use 10 mm socket to secure airbox.
Good luck!
J I M M Y
Appendix A – Parts List
3/4″ NPT x 1/8″ FNPT Hex Bushing
14 mm Hex Drain Plug Socket
Permatex 81878 Ultra Copper Maximum Temperature RTV Silicone Gasket Maker, 3 oz. Tube
DEI 010403 0.75″ Aluminized Sleeving Heat Sheath – 3′
DEI 010201 8″ Stainless Steel Locking Ties – Pack of 8
TMSBOSS
Spending my pension on car parts and track fees.
Jimmy Pribble said:I finally got around to installing my water temp sensor. Full write-up on my blog is here:
http://www.jimmypribble.com/blog/2014/05/boss-ch-16-ford-racing-gauge-pod-part-3/
I cannot stress enough how much of a PIA this was. No room to see, no room to work.
Peer review is welcome.
Jimmy
I did the same install from below. Removing the block plug and installing the sensor was a huge PIA!!
Works great....just a pain. Antifreeze in the armpits can't be avoided.
