I understand, thank you. Do the s550 pedal electronics plug into the s197 harness? And does the s197 clutch master cylinder work with the s550 pedals?Booster has studs that pass through the firewall and marry to the pedal support, nuts secure it all together. There are additional mounting bolts that secure the back end of the pedal support (Closest to the driver) to the car inside. These mount points are different from S197 to S550 so adding some rivnuts to accept the bolts in the correct location is needed. See picture of S550 pedal assembly, you can see the 4 vertical mount holes for the booster studs and two of the 4 horizontal holes, the other two are by the clutch location. These holes are over size so there is a little tolerance for locating the added rivnuts or other mounting nuts you may use.
- Welcome to the Ford Mustang forum built for owners of the Mustang GT350, BOSS 302, GT500, and all other S550, S197, SN95, Fox Body and older Mustangs set up for open track days, road racing, and/or autocross. Join our forum, interact with others, share your build, and help us strengthen this community!
You are using an out of date browser. It may not display this or other websites correctly.
You should upgrade or use an alternative browser.
You should upgrade or use an alternative browser.
Huge brake upgrade for S197 chassis
- Thread startersteveespo
- Start date
This site may earn a commission from merchant affiliate links, including eBay, Amazon, and others.
More options
Who Replied?Would someone care to try the challenger/charger SRT-8 booster/master cylinder? These cars consume more fluid with their big 6piston brembo calipers so this might be something that could bolt on and work. I remember being in a junkyard and looking at a base car and the booster M/C looked almost the same as our cars.
Can you further explain how you got the S550 MC mounted to the S197 Booster? I thought the bolt holes would not align. Also heard it was not easy to get a seal between the booster and MC due to different O-ring designs.Laugh if you want. I made an adapter from an old wheel lock key I had laying around. Just kept rough cutting it with a cutoff wheel until I got it close. Then I had my boss chuck it up in his lathe to flatten the bottom, we put a little chamfer on the edge so it would fit in the pocket in the bottom of the master cylinder piston. The piston is not flat. I left it deep so it would capture the pushrod inside the booster.
I cut the key down to 2.450 inches total length. The empty space between the top of the key to the bottom of the key is 1.415 inches. This make the actual space used to take up the gap 1.035 inches. I was going for a 0.020-0.030 gap between the booster pushrod and the bottom of the key. I hope that's clear....
I used three 14mm x 1.50 male flare nuts. Two for the S550 master cylinder and one for the ABS pump. I used 5/16" brake line from the rear port on the master cylinder to the ABS pump to plumb the front brakes. I used 1/4" brake line from the front port, farthest from the brake pedal, to the ABS pump. Like I said, one 14mm x 1.50 male flare nut on the master cylinder. Because the 1/4" inch line is just a hair smaller than the fitting, I used electrical heat shrink tubing to center the fitting better on the line. At the ABS pump I used one 12mm x 1.50 male flare nut.
I did use the high dollar hydraulic brake line flaring tool because I had it. It makes perfect double flares.
So far I have 200 street miles on it since I did it. Multiple hard ABS stops from 70 MPH. No drama so far, just an awesome pedal. It may move 1/4-3/8 of an inch during ABS stops. That dead spot at the top is completely gone. My street testing is on Gloc GS-1 pads. I have some R16 on order along with R12 for the rear. That should put me through the windshield.....
Parts List:
2017 Mustang PP1 master cylinder. I bought one for a manual transmission and just blocked off the clutch port because I have a divorced clutch reservoir
6 feet 5/16 steel brake line
6 feet 1/4 steel brake line
Three 14mm x 1.50 male flare nuts
One 12mm x 1.50 flare nut
View attachment 91490
View attachment 91491
View attachment 91492
I don't know if it has been done yet but, I have successfully married a S550 PP1 master cylinder to the S197 booster. So far I'm going to give it a hard 90% success. I'm saving the other 10% for February when I go to the track again.
It's basically a bolt in. Yes there are new brake lines to bend and flare and fittings to buy. The hard part was making the adapter for the master cylinder piston. That took me about two full days. My boss, employer not the car, figured out an ingenious way to measure the old master cylinder and transfer that measurement to the adapter.
If anyone here has had a chance to drive a new Mach 1, the brake pedal is now the same as that car. I like a hard pedal so I'm happy with it.
Once I get to work I'll post up a picture of the adapter and measurements along with a list of parts if anyone wants to duplicate it.....
I did it a while ago, but could not get brakes bled, and ended up going back to stock master.
S550 PP master on S197
Stumbled on this site and some threads about the S550 PP master, searching for spongy pedal issues. Read all the threads about possibly using S550 master, but didn't see anyone who had done it.So here goes.S550 has fittings on opposite side of, and one fitting larger than S197 (both S550 PP...
 trackmustangsonline.com
I still may go back and try it again, seeing someone else now have success.
What did you do with the rubber disk between booster rod and booster?
I always thought it was strange to put that rubber in there, but no one ever
gave me an answer as to why it's there. I've always guessed NVH, but it almost
has to add to the spongy pedal affect.

I made my booster rod long enough (and adjustable) to not put rubber disk back.

Also, what did you do with MC level sensor. I just removed it from S197 MC reservoir, and left it hang. Stability/traction control was
not happy, unless it was at least hooked up. I think the S550 level sensor was 3 wire, IIRC, so I did not know how to make that work
correctly with sensor in S550 reservoir.

Last edited:
Can you further explain how you got the S550 MC mounted to the S197 Booster? I thought the bolt holes would not align. Also heard it was not easy to get a seal between the booster and MC due to different O-ring designs.
It bolts right up, but I did have to use gasket material between master and booster. Neither O-ring, or even both, worked for me.
WiIl be cool to see how someone else attacked it.

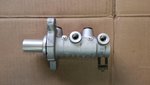
The S550 master cylinder will bolt right up. I do have a smoke machine so I tested the booster. No leaks. The brake lines on the S550 are on the opposite side so new brake lines will have to be run from the master to the ABS pump. The attached picture is of my S197 master cylinder. It goes just over one inch deeper into the booster than the S550 master cylinder. I just made a sleeve/adapter the slips into the end of the S550 master cylinder to take up the gap.Can you further explain how you got the S550 MC mounted to the S197 Booster? I thought the bolt holes would not align. Also heard it was not easy to get a seal between the booster and MC due to different O-ring designs.
I bench bled the master cylinder. Did multiple ABS bleeds with my scan tool. I would do an ABS bleed, then bleed all four wheels with a helper pumping the brakes. I probably repeated this four times. Took 2 full quarts of brake fluid. Used the cheap stuff. Now that it works I'll go back with Motul 600 before my next track day.I did it a while ago, but could not get brakes bled, and ended up going back to stock master.
Right now a paper clip is doing the job. I'll get a pigtail for the S550 and wire it in later. The S197 sensor is a three wire, S550 is a two wire.Also, what did you do with MC level sensor.
Didn't touch the booster. I was following your posts and decided it wasn't worth it.....What did you do with the rubber disk between booster rod and booster?
So far I've got at least 200 miles on the set up, no issues so far. Multiple ABS stops from 70-80 mph. Stops straight and hard. This is all on GLoc GS-1 pads. I've got GLoc R16 pads on order with R12 pads for the rear

The S550 master cylinder will bolt right up. I do have a smoke machine so I tested the booster. No leaks. The brake lines on the S550 are on the opposite side so new brake lines will have to be run from the master to the ABS pump. The attached picture is of my S197 master cylinder. It goes just over one inch deeper into the booster than the S550 master cylinder. I just made a sleeve/adapter the slips into the end of the S550 master cylinder to take up the gap.
I bench bled the master cylinder. Did multiple ABS bleeds with my scan tool. I would do an ABS bleed, then bleed all four wheels with a helper pumping the brakes. I probably repeated this four times. Took 2 full quarts of brake fluid. Used the cheap stuff. Now that it works I'll go back with Motul 600 before my next track day.
Right now a paper clip is doing the job. I'll get a pigtail for the S550 and wire it in later. The S197 sensor is a three wire, S550 is a two wire.
Didn't touch the booster. I was following your posts and decided it wasn't worth it.....
So far I've got at least 200 miles on the set up, no issues so far. Multiple ABS stops from 70-80 mph. Stops straight and hard. This is all on GLoc GS-1 pads. I've got GLoc R16 pads on order with R12 pads for the rear
View attachment 91658
Thanks!! I did tons of bleeds, everything from bench to ABS (with Autel scan tool). I even went so far as to use an old AC vac pump hooked up to
top of MC resvr (like many auto factories do it, so I'm told). May give the whole thing a shot in the spring again, still have all the parts.
What is your plan to reconcile the 2-3 wire difference on level sensors?
Don't remember if I ever looked at both wiring diagrams.
You are 6 piston fronts now?
Yes sir.You are 6 piston fronts now?
Right now I have jumped the Grey/Violet and the Yellow/Grey wires together with a paper clip. The third wire on the S197, Black/Yellow, goes to ground.
On a S550, the Grey/Violet wire comes from the BCM, same as the S197. The second wire, Black/Green, goes to ground. Low fluid grounds the switch.
I may just tape up the jumper paper clip. I can check fluid.
Mad Hatter
Gotta go Faster
Oh boy... thats quite the job!
SOS, I bought an S550 pedal assembly and I’m not sure how you possibly mated them to the S197. The pedal assembly and the curvature of the firewall are completely different. How did you do it?Booster has studs that pass through the firewall and marry to the pedal support, nuts secure it all together. There are additional mounting bolts that secure the back end of the pedal support (Closest to the driver) to the car inside. These mount points are different from S197 to S550 so adding some rivnuts to accept the bolts in the correct location is needed. See picture of S550 pedal assembly, you can see the 4 vertical mount holes for the booster studs and two of the 4 horizontal holes, the other two are by the clutch location. These holes are over size so there is a little tolerance for locating the added rivnuts or other mounting nuts you may use.
View attachment 91501
View attachment 91502

Does anyone know what the piston sizes are for the S650 Brembo 6-pot fronts? I've heard some rumblings they are not the same as the S550 6-pot front calipers, and may be better suited for the stock S197 MC.
While doing some internet shopping (always dangerous...it's how I ended up buying my Boss), I came across the complete S550 PP1 kit, advertised as designed for S197s, available from Late Model Restoration. It includes the calipers, rotors, pads, braided SS lines w/mounting brackets, dust shields and all the necessary hardware (banjo bolts, crush washers, caliper bolts, the whole sheebang).
Thought it might be worthwhile to post it here for those that would prefer to buy a complete kit instead of piecing it together.
IMO, it's reasonably priced @ $1000, with free shipping.
Thought it might be worthwhile to post it here for those that would prefer to buy a complete kit instead of piecing it together.
IMO, it's reasonably priced @ $1000, with free shipping.
Last edited:
Bill Pemberton
0ld Ford Automotive Racing Terror
Wow, no kidding, that is extremely reasonable and I am sure quite few folks will be in your debt for this ---- as it won't put them in debt chasing down all the parts and paying for a myriad of shipping fees!
That's not too bad for everything you get. Here's the pieced out version for around 800. I was cheap and did that way. There is always a Rock Auto 5% discount code available. You just have to do a web search. That helps pay for the shipping. The pads and dust shields are not needed since track pads will probably be needed. I swapped pads 1 time from street to track and never did again... The savings helped pay for a motive pressure bleeder and motul 600 flush. The banjos in the picture are needed with the Russell lines. If someone wanted the Goodridge lines and reuse banjos it's about 80 more without having to purchase banjos.While doing some internet shopping (always dangerous...it's how I ended up buying my Boss), I came across the complete S550 PP1 kit, advertised as designed for S197s, available from Late Model Restoration. It includes the calipers, rotors, pads, braided SS lines w/mounting brackets, dust shields and all the necessary hardware (banjo bolts, crush washers, caliper bolts, the whole sheebang).
Thought it might be worthwhile to post it here for those that would prefer to buy a complete kit instead of piecing it together.
IMO, it's reasonably priced @ $1000, with free shipping.


I just looked at my order from 2021. RO shipping was $22.That's not too bad for everything you get. Here's the pieced out version for around 800. I was cheap and did that way. There is always a Rock Auto 5% discount code available. You just have to do a web search. That helps pay for the shipping. The pads and dust shields are not needed since track pads will probably be needed. I swapped pads 1 time from street to track and never did again... The savings helped pay for a motive pressure bleeder and motul 600 flush. The banjos in the picture are needed with the Russell lines. If someone wanted the Goodridge lines and reuse banjos it's about 80 more without having to purchase banjos.View attachment 93008View attachment 93009View attachment 93010
I've used the piece-it-together approach in the past to get an upgrade paid for, especially when I don't want to use a credit card. It allows me to buy parts over a period of time, which takes the sting out of an all-in purchase. In some cases, I paid a bit more for ALL the parts to get an upgrade done, particularly WRT shipping costs, but it was the only way. When I did the T5>Tremec upgrade on my CMC car, it took 6-8 months to piece it all together, as I couldn't buy everything at once.
Wife, kids, house, daily drivers, work.....many know what I'm talking about.")
Wife, kids, house, daily drivers, work.....many know what I'm talking about.
mmm upgrade my 4 piston brembos to these 6 piston or get some 14 inch Girodiscs…
- Thread starter
- #618
Upgrade to these and get GiroDisc 15" anyway. I have a set of used calipers from my PP2 car. I could let them go for $250+ actual shipping because of the weight. Also have some 1/2 life Pagid pads I can throw in the box as free demos.mmm upgrade my 4 piston brembos to these 6 piston or get some 14 inch Girodiscs…
Steve
Bill Pemberton
0ld Ford Automotive Racing Terror
Yes, Steve is that nice of a guy ......bargain and nice way to get an upgrade from a super reliable TMO member!
If someone else doesn’t take the calipers I could use a spare set. I am close enough do no shipping. I’ll pick them up.Upgrade to these and get GiroDisc 15" anyway. I have a set of used calipers from my PP2 car. I could let them go for $250+ actual shipping because of the weight. Also have some 1/2 life Pagid pads I can throw in the box as free demos.
Steve
TMO Supporting Vendors


