Stealthy 
- Welcome to the Ford Mustang forum built for owners of the Mustang GT350, BOSS 302, GT500, and all other S550, S197, SN95, Fox Body and older Mustangs set up for open track days, road racing, and/or autocross. Join our forum, interact with others, share your build, and help us strengthen this community!
You are using an out of date browser. It may not display this or other websites correctly.
You should upgrade or use an alternative browser.
You should upgrade or use an alternative browser.
Out of the ashes, a Phoenix is born
- Thread starterford20
- Start date
This site may earn a commission from merchant affiliate links, including eBay, Amazon, and others.
More options
Who Replied?- 451
- 0
Sean,Sean said:Sorry about the delay!! I took these 4 days ago I think and have been completely forgetting to post them!! I also found my receipt for the headers. The coating was $700.00 while the shipping was $60.XX for those who are interested.
It is hard to make out but in between the last two primaries on the right is my serial number with Jet-Hot if I ever have to do a warranty claim.
Some close ups of the coating to show its rough texture.
Bye bye pretty Kooks label
No issue between the driver side header and the steering column shaft to the rack? Enough clearance?
- Thread starter
- #143
patrickshelby said:Sean,
No issue between the driver side header and the steering column shaft to the rack? Enough clearance?
There should be, but I don't know as of yet. Once I can get the headers installed I will confirm. I don't suspect there will be any issues as the coating is probably less then a 16th of an in. thick and I don't recall hearing or seeing of many fitment issues with the Kooks headers as is.
302 Hi Pro
Boss 302 - Racing Legend to Modern Muscle Car
Sean:
You shouldn't have any clearance issues. Looking at my street header install, (if they are any indication), you'll have plenty of room to clear the Jet Hot coating.
Do you have the engine back from your builder? If not, do you have a pick up date?
With all of the time, research, money, etc, you have in this build project, you must be very excited to have a completion date in mind, or planned. I'd be like a 6 year old waiting for Santa to arrive!
Good luck and wishing you all the best in completing this project successfully.
302 Hi Pro
- Thread starter
- #145
302 Hi Pro said:Sean:
You shouldn't have any clearance issues. Looking at my street header install, (if they are any indication), you'll have plenty of room to clear the Jet Hot coating.
Do you have the engine back from your builder? If not, do you have a pick up date?
With all of the time, research, money, etc, you have in this build project, you must be very excited to have a completion date in mind, or planned. I'd be like a 6 year old waiting for Santa to arrive!
Good luck and wishing you all the best in completing this project successfully.
302 Hi Pro
Thanks Dave! I am certainly anxious about getting it back. Everyone is setting up cruises and car shows and it is driving me nuts especially with the nice weather.
I want this to be done by the end of May, if it gets done before that time frame the better IMO. I dropped the engine off at JPC on Friday the 18th and they dug into it on the 22nd. They said the engine spins freely without any issues so hopefully it will be back up and running in no time!
I did get this picture from them when they were checking the cams making sure I got the cams degreed properly. I got the intake cam good, but not so much on the exhaust cam :/

- Thread starter
- #146
Since my car has been sitting for so long I definitely needed a new battery and I wanted to go ahead and go with something a little bit lighter than stock. JPC Racing built this really cool looking and functional battery tray and breather combo right here and used a Braille B2015 battery.
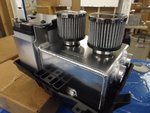
Considering I already have my Peterson Breather Can, I couldn’t justify spending all of the money on the new setup right away. I might go ahead and grab it in the future, but as of now I couldn’t do it. So I went out and bought the same Braille B2015 battery which should be perfect for what I will use it for. It is very small and compact and only weighs 15 lbs. which will save me about 16lbs. off the front end and have enough CCA to get the car up and running without issue. The problem is that the battery is MUCH smaller than the factory battery so I would have to fabricate a way to keep it in place. Since weight savings is life bc racecar I decided to make it out of Carbon fiber. So I went out and bought a 12” x 24” sheet of Carbon fiber and some carbon fiber 1” angle to make and reinforce the battery box with. After taking my measurements I went ahead and fabricated the box. Here it is with the front and back all mocked up followed by the sides.


In order to cut the carbon fiber I used a hacksaw and a tungsten carbide blade as it will not cause the carbon fiber to chip or splinter as you cut it like it would with a wood cutting or metal cutting blade. You should also wear gloves and a long sleeve shirt when cutting carbon fiber as in my research, it is very much like fiberglass as the particles can get stuck in your pores and cause all sorts of itching everywhere and it is a worse sensation than fiberglass is. Also, some sort of mask would be advisable as well as safety goggles just in case. I’m still sneezing Carbon Fiber dust out of my nose 4 days later so it would be a nice thing to have thought about at the moment.
From there I cut the bottom of the carbon fiber piece to fit in the battery tray to give it a sort of finished look to it. After a lot of sanding I got it to sit nice and flat in the tray


I still have to cut the bottom try so that I can put the bolts in and take them out with ease as well as cut the insert for the nylon strap to go through since I am changing the way it mounts. I am thinking of mounting it to the battery tray down here with 2 rivets in the same way that the factory strap is mounted assuming I can fit a rivet gun in that space so that the rivet is mounted directly to the strap the way it is from the factory.

I ended up buying these rivets from McMaster-Carr and looking at the material thickness range I think I will be in good hands considering the plastic at that spot I believe is .118” judging by the plastic closest to it where I could take a measurement and the nylon strap is .074-.080” so with any luck this will work. This rivet appears to be almost the same rivet used ts the factory except that the factory one has a large washer for lack of a better term built into the back of the rivet where this one doesn’t.
Anyway, I got the box all mocked up and grabbed my 3M 110 Epoxy and started epoxying the Carbon Fiber angle onto the sheets of Carbon Fiber. I opened up the box a little bit more to allow the battery to be put in easier so there is a little bit of a gap where you can see the carbon fiber angle, but nothing too bad. Here is where I ran in to a bit of an error as per the norm with me. When I got my epoxy, they sent me a mixing nozzle for a 200ml tube which has a large round ended hole when I actually got a 50 ML tube which has a rectangular attachment that fits into a slot. So I ended up modifying it and it sort of worked. The epoxy barely made it through the tube before leaking out on me so I aborted that idea and cleaned everything off. So I went to the Home Depot and grabbed some Loctitie Epoxy which has a mixing nozzle in it that is a similar mounting design, only problem is that it was too small :/. So I finally got the correct ones from the vendor yesterday and went ahead and started epoxying all of the pieces together. Today I will go ahead and finish the supports for the bottom so that I can mount it to the bottom tray once I cut all my holes and put the strap into the battery tray etc.

Considering I already have my Peterson Breather Can, I couldn’t justify spending all of the money on the new setup right away. I might go ahead and grab it in the future, but as of now I couldn’t do it. So I went out and bought the same Braille B2015 battery which should be perfect for what I will use it for. It is very small and compact and only weighs 15 lbs. which will save me about 16lbs. off the front end and have enough CCA to get the car up and running without issue. The problem is that the battery is MUCH smaller than the factory battery so I would have to fabricate a way to keep it in place. Since weight savings is life bc racecar I decided to make it out of Carbon fiber. So I went out and bought a 12” x 24” sheet of Carbon fiber and some carbon fiber 1” angle to make and reinforce the battery box with. After taking my measurements I went ahead and fabricated the box. Here it is with the front and back all mocked up followed by the sides.


In order to cut the carbon fiber I used a hacksaw and a tungsten carbide blade as it will not cause the carbon fiber to chip or splinter as you cut it like it would with a wood cutting or metal cutting blade. You should also wear gloves and a long sleeve shirt when cutting carbon fiber as in my research, it is very much like fiberglass as the particles can get stuck in your pores and cause all sorts of itching everywhere and it is a worse sensation than fiberglass is. Also, some sort of mask would be advisable as well as safety goggles just in case. I’m still sneezing Carbon Fiber dust out of my nose 4 days later so it would be a nice thing to have thought about at the moment.
From there I cut the bottom of the carbon fiber piece to fit in the battery tray to give it a sort of finished look to it. After a lot of sanding I got it to sit nice and flat in the tray


I still have to cut the bottom try so that I can put the bolts in and take them out with ease as well as cut the insert for the nylon strap to go through since I am changing the way it mounts. I am thinking of mounting it to the battery tray down here with 2 rivets in the same way that the factory strap is mounted assuming I can fit a rivet gun in that space so that the rivet is mounted directly to the strap the way it is from the factory.

I ended up buying these rivets from McMaster-Carr and looking at the material thickness range I think I will be in good hands considering the plastic at that spot I believe is .118” judging by the plastic closest to it where I could take a measurement and the nylon strap is .074-.080” so with any luck this will work. This rivet appears to be almost the same rivet used ts the factory except that the factory one has a large washer for lack of a better term built into the back of the rivet where this one doesn’t.
Anyway, I got the box all mocked up and grabbed my 3M 110 Epoxy and started epoxying the Carbon Fiber angle onto the sheets of Carbon Fiber. I opened up the box a little bit more to allow the battery to be put in easier so there is a little bit of a gap where you can see the carbon fiber angle, but nothing too bad. Here is where I ran in to a bit of an error as per the norm with me. When I got my epoxy, they sent me a mixing nozzle for a 200ml tube which has a large round ended hole when I actually got a 50 ML tube which has a rectangular attachment that fits into a slot. So I ended up modifying it and it sort of worked. The epoxy barely made it through the tube before leaking out on me so I aborted that idea and cleaned everything off. So I went to the Home Depot and grabbed some Loctitie Epoxy which has a mixing nozzle in it that is a similar mounting design, only problem is that it was too small :/. So I finally got the correct ones from the vendor yesterday and went ahead and started epoxying all of the pieces together. Today I will go ahead and finish the supports for the bottom so that I can mount it to the bottom tray once I cut all my holes and put the strap into the battery tray etc.
- Thread starter
- #147
In other news, if you remember I had the rusting issue with some of the items on the inside of the engine, so I went ahead and sprayed them down with some WD-40 and used a brass wire brush to remove the layer of surface rust that I had on those parts and so that I didn’t do any to damage any of the aluminum parts on the engine or the engine itself.

Sorry no after pics haha.
Everything came out looking perfect so I went ahead and grabbed my front cover and VCT actuators and installed those. It was a very easy process although I couldn’t find any torque specs on them so I used the German Specs for the Actuators.
These are the actuators that you have to use with the wiring harness that I got from Ford Racing. They were from cars built after 2/27/12 so they looked different than what I had previously in my engine since it was built on 12/30/2010.


So once I got those bolted in I went ahead and grabbed my gaskets for the front cover and put them on as such:

Then I went ahead and put the engine mount brackets on the engine as such since you have to use a combination of studs and bolts. I will get the part numbers for the studs and for the bolts when I can get my notebook back since I sent it down there with the engine so they can use that for reference. I think the front cover & the engine mount brackets are two of maybe 15 items that aren’t brand spanking new for this engine. That is one reason why this has been taking so long to get done. Damn near every nut, bolt and whatever else has been bought from Ford or JPC so that added to the expense for sure.

Here it is in all its glory! I wish I took a picture of the front cover with all the bolts in the correct place as it took me a while to figure out where they all went from a variety of pictures, but these are just the 8 10mm bolts that are installed along with the 2 studs IIRC.

From there I put the engine on the pallet and screwed it into the wood than strapped it to the pallet and sent it down on one of our trucks that was heading down to DC. You could throw this thing off an airplane and the motor wouldn’t budge haha.


So the motor got to JPC and they got to work on it. The intake cam was degreed correctly and the exhaust cam was off by a few degrees if I am remembering correctly. They said that the motor rotated freely and they had no issues so I have no idea what the heck the case was. I swear to God this thing stopped rotating on me. The good news though was that it rotated freely without issue. I just spoke with Eric and the motor is now done so I will have to figure out how to get my car down there. I tried renting a trailer from UHaul and they said my truck wasn’t good enough to tow my car so I will have to find another trailer to tow it down there soon.


Sorry no after pics haha.
Everything came out looking perfect so I went ahead and grabbed my front cover and VCT actuators and installed those. It was a very easy process although I couldn’t find any torque specs on them so I used the German Specs for the Actuators.
These are the actuators that you have to use with the wiring harness that I got from Ford Racing. They were from cars built after 2/27/12 so they looked different than what I had previously in my engine since it was built on 12/30/2010.


So once I got those bolted in I went ahead and grabbed my gaskets for the front cover and put them on as such:

Then I went ahead and put the engine mount brackets on the engine as such since you have to use a combination of studs and bolts. I will get the part numbers for the studs and for the bolts when I can get my notebook back since I sent it down there with the engine so they can use that for reference. I think the front cover & the engine mount brackets are two of maybe 15 items that aren’t brand spanking new for this engine. That is one reason why this has been taking so long to get done. Damn near every nut, bolt and whatever else has been bought from Ford or JPC so that added to the expense for sure.

Here it is in all its glory! I wish I took a picture of the front cover with all the bolts in the correct place as it took me a while to figure out where they all went from a variety of pictures, but these are just the 8 10mm bolts that are installed along with the 2 studs IIRC.

From there I put the engine on the pallet and screwed it into the wood than strapped it to the pallet and sent it down on one of our trucks that was heading down to DC. You could throw this thing off an airplane and the motor wouldn’t budge haha.


So the motor got to JPC and they got to work on it. The intake cam was degreed correctly and the exhaust cam was off by a few degrees if I am remembering correctly. They said that the motor rotated freely and they had no issues so I have no idea what the heck the case was. I swear to God this thing stopped rotating on me. The good news though was that it rotated freely without issue. I just spoke with Eric and the motor is now done so I will have to figure out how to get my car down there. I tried renting a trailer from UHaul and they said my truck wasn’t good enough to tow my car so I will have to find another trailer to tow it down there soon.

Looks great. Those are the good VCT solenoids, as well--you'll have no issues with those.
- Thread starter
- #149
- Thread starter
- #150
So I would like to make some custom coil covers for my car and this is one of the designs that I liked. I am probably going to have the Boss 302 slant whatever way the lettering on the fenders is. So the drivers side would look like this:

The Passenger side would look like this:

Since I will also be removing the Boss intake manifold and the Boss 302 plaque that comes on it I was thinking of maybe doing something with the vehicle number on it since you always get asked that question from Boss owners. I will have to come up with a design tomorrow.
What say you folks?
The Passenger side would look like this:
Since I will also be removing the Boss intake manifold and the Boss 302 plaque that comes on it I was thinking of maybe doing something with the vehicle number on it since you always get asked that question from Boss owners. I will have to come up with a design tomorrow.
What say you folks?
302 Hi Pro
Boss 302 - Racing Legend to Modern Muscle Car
Sean:
I like your designs, but how will this attach to the coil cover? Will you route out a rectangle in the coil cover to allow a recessed install?
Just thinking, how it is applied to the coil cover will have a big impact on the overall look.
Please keep us posted,
Dave
I like your designs, but how will this attach to the coil cover? Will you route out a rectangle in the coil cover to allow a recessed install?
Just thinking, how it is applied to the coil cover will have a big impact on the overall look.
Please keep us posted,
Dave
- Thread starter
- #152
Hey Dave,
I was going to fill in the Powered by Ford as well as those line with some Everclear Polyfill and sand it down smooth. From there I was thinking of either Gloss Black or Carbon fiber Vinyl with the design printed on it and a few coats of clear over that. I still have to talk to some body shops to see if that is possible.
Or I was going to fill it and just paint it gloss black and stick the decal right on there that way.
TymeSlayer
Tramps like us, Baby we were born to run...
Sean said:Hey Dave,
I was going to fill in the Powered by Ford as well as those line with some Everclear Polyfill and sand it down smooth. From there I was thinking of either Gloss Black or Carbon fiber Vinyl with the design printed on it and a few coats of clear over that. I still have to talk to some body shops to see if that is possible.
Or I was going to fill it and just paint it gloss black and stick the decal right on there that way.
Sean,
If you go the decal route, check with PeteInCT at Trackdaysolutions.com - He did a great job for me on some custom decals.
Kirk
- Thread starter
- #154
This happened on Wednesday the 20th, but I have just been so slammed at work that it has taken me a while to get this all written up.
First things first, I needed to get the car washed. It had been sitting outside for about 6 or 7 months since its last wash and was look pretty crappy, so I gave it a bath and realized how much correction I am going to have to do to this car once I get it back. It is bad!!

Although it does look good in the shade!!

I also got to cleaning my wheels with Polish Angel Mint+ and I have to say HOLY CRAP!! I used nothing but the Mint+ on one wheel and went through too much product doing it that way, but the wheels came out amazing! The pictures don't really do it justice IMO.
You can see how nice the face of the wheel looks compared to the barrel of the wheel before cleaning it.

Don't mind the black mark, that is just old glue from the old wheel weights. The wheels looked unbelievable when I was done with them. Like they were brand new, I was impressed.

Even though I have been told by a couple of people that I didn't have to worry about supporting the front of the transmission, I figured it best to do so. I just grabbed a 2x4 and some zip ties and supported the front of the transmission.

I have a new slave cylinder so the old one will be replaced shortly. I loaded up the trunk with everything I could fit in there and then put the driveshaft and over axle pipes in the back of the pickup, ran down to U-Haul and grabbed the trailer. I have to say, it certainly was an adventure getting the car onto the trailer but it went on haha.
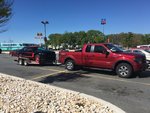
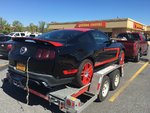
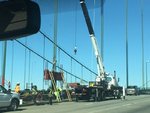
Me and my buddy Franky Lap (Paladin LL 06) got up at 5 to bring the trailer down to JPC in Maryland. It is about a 4 1/2 hour drive from NY down to there. The only issues was that a cable snapped on the Delaware Memorial Bridge and they only had one lane open so it took us 2 hours to go all of 8 miles which sucked balls. We should have been down there at around 9:45, but got there at 11:30 instead.
We got down there and Aaron was nice enough to give us a tour of their shop and I have to say that this place is the real deal. The amount of cars they have there and the projects they had going on was crazy. They had a couple cars getting some hellion kits installed, one S550 was having his motor rebuilt looking for a 4 digit power number, another one was getting the rearend tubbed so he could tuck 315s under the fenders, one was a turbo or twin turbo lightning, they just did a GT500 with custom grind cams and finished the tuning on it a few days before hand, then he went on pointing out the cars they had there saying this is an 8 second car, that is an 8 second car, 8 second, 9 second 3V, 8 second cars here there & everywhere! Jeff Polivka's Boss was getting some work done to it and looking for win #2 in Maple Grove, Jesse Porter's GT500 was there with the exhaust coming out the hood which was badass! John Kauderer had his Cobra Jet there, Lance Rainey had his Boss at JPC for some work (You might remember him from the GTR vs. Boss 302 video that caused a lot of butt hurt GTR fans), Clint Bates was getting his Blue Boss worked on with a setup that was similar to Jeff Polivka's if I am remembering correctly. TJ Lapinski had his Coyote swapped New Edge there for some work. Ronnie Reynolds car was just hanging out in the background. They had everything there, a bunch of coyotes, a couple 3V's, a classic (67 IIRC), some GT500's, a lightning, a few motors being built (my motor, 2 other coyotes from what I can remember, I thought I saw a 2V there as well but I'm not 100% certain about that), they had a Viper, a SRT8 Grand Cherokee and a Dakota pickup as well. They work on anything and everything! Tommy was wrapping up some of their turbo kits for shipping and everyone was pretty busy. I wish I took some pictures though. This was the one that Franky got after we unloaded the car.
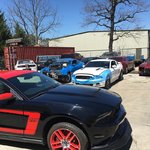

They have the most badass Boss on the planet there so lets hope that when they are done with it, mine will be the most badass N/A Boss as well. Now we just play the waiting game. They had a few cars to finish up before Maple grove along with the cars that were there before me. I am just waiting on D Mark Performance to send me back my intake manifold so I can get it back down to them for the motor.I told them that I would like the car back before Carlisle this way I can finally have it back. I don't want to have to go to Carlisle again without my car. It really sucked the first time. I will have them do 2 tunes for me. One, 93 octane w/ cats and the second E85 without cats for my racing tune. I'm probably conservatively expecting like 520-530 on the 93 tune, but if I can get 580 out of the E85 tune I will happier than a pig in shiznit for sure!!
First things first, I needed to get the car washed. It had been sitting outside for about 6 or 7 months since its last wash and was look pretty crappy, so I gave it a bath and realized how much correction I am going to have to do to this car once I get it back. It is bad!!

Although it does look good in the shade!!

I also got to cleaning my wheels with Polish Angel Mint+ and I have to say HOLY CRAP!! I used nothing but the Mint+ on one wheel and went through too much product doing it that way, but the wheels came out amazing! The pictures don't really do it justice IMO.
You can see how nice the face of the wheel looks compared to the barrel of the wheel before cleaning it.

Don't mind the black mark, that is just old glue from the old wheel weights. The wheels looked unbelievable when I was done with them. Like they were brand new, I was impressed.

Even though I have been told by a couple of people that I didn't have to worry about supporting the front of the transmission, I figured it best to do so. I just grabbed a 2x4 and some zip ties and supported the front of the transmission.

I have a new slave cylinder so the old one will be replaced shortly. I loaded up the trunk with everything I could fit in there and then put the driveshaft and over axle pipes in the back of the pickup, ran down to U-Haul and grabbed the trailer. I have to say, it certainly was an adventure getting the car onto the trailer but it went on haha.


Me and my buddy Franky Lap (Paladin LL 06) got up at 5 to bring the trailer down to JPC in Maryland. It is about a 4 1/2 hour drive from NY down to there. The only issues was that a cable snapped on the Delaware Memorial Bridge and they only had one lane open so it took us 2 hours to go all of 8 miles which sucked balls. We should have been down there at around 9:45, but got there at 11:30 instead.

We got down there and Aaron was nice enough to give us a tour of their shop and I have to say that this place is the real deal. The amount of cars they have there and the projects they had going on was crazy. They had a couple cars getting some hellion kits installed, one S550 was having his motor rebuilt looking for a 4 digit power number, another one was getting the rearend tubbed so he could tuck 315s under the fenders, one was a turbo or twin turbo lightning, they just did a GT500 with custom grind cams and finished the tuning on it a few days before hand, then he went on pointing out the cars they had there saying this is an 8 second car, that is an 8 second car, 8 second, 9 second 3V, 8 second cars here there & everywhere! Jeff Polivka's Boss was getting some work done to it and looking for win #2 in Maple Grove, Jesse Porter's GT500 was there with the exhaust coming out the hood which was badass! John Kauderer had his Cobra Jet there, Lance Rainey had his Boss at JPC for some work (You might remember him from the GTR vs. Boss 302 video that caused a lot of butt hurt GTR fans), Clint Bates was getting his Blue Boss worked on with a setup that was similar to Jeff Polivka's if I am remembering correctly. TJ Lapinski had his Coyote swapped New Edge there for some work. Ronnie Reynolds car was just hanging out in the background. They had everything there, a bunch of coyotes, a couple 3V's, a classic (67 IIRC), some GT500's, a lightning, a few motors being built (my motor, 2 other coyotes from what I can remember, I thought I saw a 2V there as well but I'm not 100% certain about that), they had a Viper, a SRT8 Grand Cherokee and a Dakota pickup as well. They work on anything and everything! Tommy was wrapping up some of their turbo kits for shipping and everyone was pretty busy. I wish I took some pictures though. This was the one that Franky got after we unloaded the car.


They have the most badass Boss on the planet there so lets hope that when they are done with it, mine will be the most badass N/A Boss as well. Now we just play the waiting game. They had a few cars to finish up before Maple grove along with the cars that were there before me. I am just waiting on D Mark Performance to send me back my intake manifold so I can get it back down to them for the motor.I told them that I would like the car back before Carlisle this way I can finally have it back. I don't want to have to go to Carlisle again without my car. It really sucked the first time. I will have them do 2 tunes for me. One, 93 octane w/ cats and the second E85 without cats for my racing tune. I'm probably conservatively expecting like 520-530 on the 93 tune, but if I can get 580 out of the E85 tune I will happier than a pig in shiznit for sure!!
- Thread starter
- #155
Yesterday I had gotten these pictures from Eric saying they were getting to work on putting the car back together
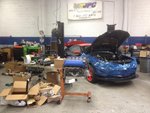
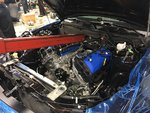

Right now I am ****ing chomping at the bits!! Eric was hoping for 600+WHP and I was hesitant at first, but after a few changes I am confident we will be over the 600 mark.
From the sounds of things they are just finishing up the little details of the motor. Stupid me forgot to send them down some bolts they needed to finish the car off so they are gathering the bolts for me and will put them in the car. This car is going to be a ****ing MONSTER when it is done. The engine is going to be insane and then it is time to hook up the suspension to handle all the power.
600whp? What did I miss?
- Thread starter
- #158
Sounds decent right about now.
https://www.youtube.com/watch?v=FVJhFFymtYg
Sounds rowdy ;D ... We will see if that goes away once it is tuned though
https://www.youtube.com/watch?v=k-GQyuSqtlc
We are going to be trying some purple power for those extra special days. Right now I'm using Darren's engine as my benchmark. I think we are pretty even on cams though since his are much larger than mine, but I have more duration then he does which I'm hoping will negate the lift, his heads I think flow slightly better than mine do right now plus the extra compression he is running is important. So if I can get to his mark on E85 then we should hit 600.
No sir, RWHP on an All Motor build. No Boost, No bottle, No B.S.
https://www.youtube.com/watch?v=FVJhFFymtYg
Sounds rowdy ;D ... We will see if that goes away once it is tuned though
https://www.youtube.com/watch?v=k-GQyuSqtlc
ArizonaBOSS said:600whp? What did I miss?
We are going to be trying some purple power for those extra special days. Right now I'm using Darren's engine as my benchmark. I think we are pretty even on cams though since his are much larger than mine, but I have more duration then he does which I'm hoping will negate the lift, his heads I think flow slightly better than mine do right now plus the extra compression he is running is important. So if I can get to his mark on E85 then we should hit 600.
TMSBOSS said:Turbos??
Crank HP?
No sir, RWHP on an All Motor build. No Boost, No bottle, No B.S.
- Thread starter
- #160


