- Thread starter
- #421
- Welcome to the Ford Mustang forum built for owners of the Mustang GT350, BOSS 302, GT500, and all other S550, S197, SN95, Fox Body and older Mustangs set up for open track days, road racing, and/or autocross. Join our forum, interact with others, share your build, and help us strengthen this community!
You are using an out of date browser. It may not display this or other websites correctly.
You should upgrade or use an alternative browser.
You should upgrade or use an alternative browser.
Where's Wally
- Thread starterBlack Boss
- Start date
This site may earn a commission from merchant affiliate links, including eBay, Amazon, and others.
More options
Who Replied?- Thread starter
- #422
tuckersmg said:10 seconds is a lot of time. Nice work!
How is the new pavement?
New pavement is fantastic! Very smooth, all the bumps are gone. And it's fast. I'd guess that 2-3 seconds of the delta was pavement, probably 4-5 the car and about another 2 from having some coaching and improving my lines...
- Thread starter
- #423
Just finished with the Watson rear Tow Hook install:
The rear facia is way heavier and takes a little more time to remove than the S197/Boss:
1) Remove 8 Push pins from rear diffuser facia at rear:
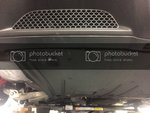
2) Remove (3) Push pins from Left and Right rear aft lower fender:
3) Remove 3 push pins from Rear Inner fender liner (L&R) and fold forward to expose Rear spat moulding (L&R)
4) Remove 1 Push pin and 4 screws to remove moulding (L&R):
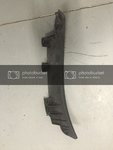
5) Remove screw (vertical orientation) above spat connecting plastic bracket to facia
6) Remove 1 Push pin Left and Right attaching Inner facia diagonal brace to Diffuser bracket (takes patience):
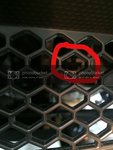
Here's a view of the lower part of the brace with the facia removed:
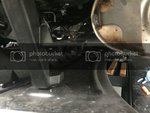
7) Remove Rear tail lights (on non-R's you need to take out the trunk trim first) then disconnect the wiring harness, remove the top trim plate and remove 3 securing nuts each side: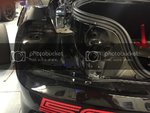
8 Release facia, starting by peeling back from the rear wheel arches, and working rearwards. Once the facia is free, move rearwards 2" and disconnect the harness (RHS just above exhaust). Remove Facia (it's heavy).
9) Remove Stock Bumper beam (2 bolts each side):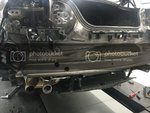
10) The Watson instructions call for trimming the inner facia support (highlighted in Red) to package the hook and the tubular bumper bar:
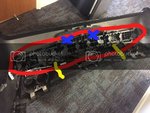
I decided to remove it instead. It's secured by 2 clips at the Blue locations and eliminates the need to re-secure the diagonal braces shown in yellow. I believe it's main purpose is low speed impact absorption and it also is used to secure the rear facia wire harness -- I used zip ties and some tape.
11) The Watson bar is secured using additional bolts, so drilling is required: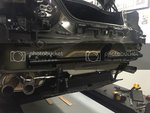
12) The Template for cutting the slot in the facia was accurate, but needed enlarging a little.
13) Assembly was straightforward and a little easier with the reduced weight from elimination of the facia inner molding:
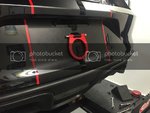
The rear facia is way heavier and takes a little more time to remove than the S197/Boss:
1) Remove 8 Push pins from rear diffuser facia at rear:

2) Remove (3) Push pins from Left and Right rear aft lower fender:

3) Remove 3 push pins from Rear Inner fender liner (L&R) and fold forward to expose Rear spat moulding (L&R)
4) Remove 1 Push pin and 4 screws to remove moulding (L&R):

5) Remove screw (vertical orientation) above spat connecting plastic bracket to facia
6) Remove 1 Push pin Left and Right attaching Inner facia diagonal brace to Diffuser bracket (takes patience):

Here's a view of the lower part of the brace with the facia removed:

7) Remove Rear tail lights (on non-R's you need to take out the trunk trim first) then disconnect the wiring harness, remove the top trim plate and remove 3 securing nuts each side:

8 Release facia, starting by peeling back from the rear wheel arches, and working rearwards. Once the facia is free, move rearwards 2" and disconnect the harness (RHS just above exhaust). Remove Facia (it's heavy).
9) Remove Stock Bumper beam (2 bolts each side):

10) The Watson instructions call for trimming the inner facia support (highlighted in Red) to package the hook and the tubular bumper bar:

I decided to remove it instead. It's secured by 2 clips at the Blue locations and eliminates the need to re-secure the diagonal braces shown in yellow. I believe it's main purpose is low speed impact absorption and it also is used to secure the rear facia wire harness -- I used zip ties and some tape.
11) The Watson bar is secured using additional bolts, so drilling is required:

12) The Template for cutting the slot in the facia was accurate, but needed enlarging a little.
13) Assembly was straightforward and a little easier with the reduced weight from elimination of the facia inner molding:

- Thread starter
- #425
Changed both the Diff and Trans fluid after 8 track days (I changed the Engine Oil after 1,000 break in miles and then every 6-8 hours of track use).
@voodoo child21 explained the process for the Diff in this post: https://trackmustangsonline.com/index.php?topic=11286.0
Only things I'd add are 1) The lower cooler hose is easy to remove (using the spring clip) and 2) Access to the drain plug is restricted by the upper cooler hose -- had to torque it by judgement -- could not get a torque wrench in there.
Access to both the fill and drain plugs on the Tremec 3160 is easy. Fill to the bottom of the fill hole, replace the fill plug but do not torque, run the car in gear for 2-3 minutes to fill the cooler, pump and lines (I raised the rear of the car) and then re-fill to bottom of the drain hole (don't forget to lower the car first to level -- the fill is at the very rear of the Trans).
moto
Ron
Black Boss said:Obviously we have no data on these cars. If I were running the PSC2's, I'd try 1.5-1.6*. I'll wait to see how the R7's wear......
I did a good workout at Sonoma this weekend with the PSC2's and used the tire temp probe. I had 2.0(neg) on the front and it was too much so went to -1.8 to get good results. For the rear I had -1.4 and had too much and will go to -1.2 for next time. 38.5-39 psi(hot) was good for even tire temps.
Moto said:I did a good workout at Sonoma this weekend with the PSC2's and used the tire temp probe. I had 2.0(neg) on the front and it was too much so went to -1.8 to get good results. For the rear I had -1.4 and had too much and will go to -1.2 for next time. 38.5-39 psi(hot) was good for even tire temps.
Did you trailer your car up the I-5 on Thursday? If so I saw you but I was heading South.
moto
Ron
Yes. That was me[emoji3]byronj said:Did you trailer your car up the I-5 on Thursday? If so I saw you but I was heading South.
Moto said:I did a good workout at Sonoma this weekend with the PSC2's and used the tire temp probe. I had 2.0(neg) on the front and it was too much so went to -1.8 to get good results. For the rear I had -1.4 and had too much and will go to -1.2 for next time. 38.5-39 psi(hot) was good for even tire temps.
what are you using to get to the 1.8?
If you don't want camber plates you can get over -2.0 possibly -2.4 degrees camber by chicagoing the strut bolts
Sent from my iPhone using Tapatalk
Sent from my iPhone using Tapatalk
moto
Ron
Same as Nick. MM camber plates.fuhrius said:what are you using to get to the 1.8?
I have MM plates on the '16 GT and was set at -2.1, Like Moto says I think it may have actually been too much, with the X springs the car went from stock to -1.4. Toe change was huge, I had -5/16" after setting to -2.1, adjusted it back to +1/16" at the track. Will be getting full 4 wheel alignment this week.
Steve
Steve
- Thread starter
- #434
Interesting that the wear patterns at 2.0* camber between Hoosier R7's and the PSC2's are very different:
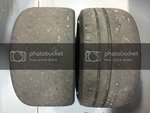
The R7's are wearing evenly, while it looks like the PSC2's need more camber. The Hoosiers have 7.5 hours of Track time and 15 cycles the PSC2's a little less at 5.6 hours of Track time and 13 cycles.

The R7's are wearing evenly, while it looks like the PSC2's need more camber. The Hoosiers have 7.5 hours of Track time and 15 cycles the PSC2's a little less at 5.6 hours of Track time and 13 cycles.
How much camber do you think the PSC2 needs in front ?
Ben said his is bone stock.
- Thread starter
- #438
I'm not sure. Based on Tire wear, if I were only running PSC2's I'd try 2.4*, but I plan to run R7's so 2.0* looks good.8250RPM said:How much camber do you think the PSC2 needs in front ?
Moto used a Temp probe and found less camber was needed:
Moto said:I did a good workout at Sonoma this weekend with the PSC2's and used the tire temp probe. I had 2.0(neg) on the front and it was too much so went to -1.8 to get good results. For the rear I had -1.4 and had too much and will go to -1.2 for next time. 38.5-39 psi(hot) was good for even tire temps.
I've always used wear as a surrogate for probing. Driving style will also have an impact.
Will be interesting to see others wear patterns......
That's impressive that you "only" need -2* in the front with race rubber on the 350R. The rear camber must help quite a bit!
moto
Ron
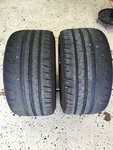
Here are my PSC2 with left -1.9 and right -2.0 measured without driver. 90 minutes on track with 5 cycles. By looks, I agree that 2.0 seems to not be enough but I measured twice coming off track and definitely had 8 deg f cooler on the outer edge on both tires. I may just continue to run them with this camber based on the wear I see.
